Introduction
![Waltental with Sarner Weißhorn]() The Sarntal Alps as seen from Saxner The Sarntal Alps as seen from Saxner |
Half a year ago
Lukas Kunze posted an article about creating panoramas,
Panoramas? Here is how to do it!. After having received a number of comments and PMs about posting panoramas to SP I thought it might be a good idea to publish the whole information in an article. Some of the information of this article will be redundant with the one of Lukas but I think it makes sense to start from the beginning and discuss the prerequisites, at least shortly.
Also I can’t pretend that I invented panorama posting on SP. This honour goes to
brendon, who pioneered it about two years ago on one of the
Site Feedback Forum Threads. Several others have taken it up and I’m probably the one who used it most.
But before we start, let’s first recapitulate some hints and tips for creating panoramas. It is quite obvious that the best posting technique won’t help if the panorama itself is poor.
Prerequisite 1: The Photo Op
Surely you need a good opportunity to shoot panorama photographs. Often my own attempts have been worthless because I made silly – and sometimes not so silly – mistakes. Also different cameras pose different problems. Let me start with a checklist about taking panorama shots:
- The single shots should overlap. There is no optimum overlapping region, but most stitching programs work well with 10 – 20% overlap. At short focal length (wide angle shots) too much overlap can result in weird results while stitching, since the edges of the single shots are distorted (straight lines are curved).
- The single shots should be taken at the same focal length. This might sound like a no-brainer but with SLD-cameras a change might happen involuntarily. Digicams generally are safe since there the zoom factor is controlled by a stepper motor and you notice when there is a change. Different focal length shots are very hard to stitch and 360° panos might be impossible. The horizon often gets distorted, curving like a rollercoaster.
- The single shots should have the same exposure. Point at a direction where your pano will have medium light conditions and fix them by determining the exposure time and aperture. Fix them and take the rest of the shots.
This is very hard to realize with digicams that are on automatic. Often you can fix exposure by pointing at a place, then dragging the exposure by keeping the shutter button pressed down slightly. Doing a 360° pano that way is a pain – I used to always fix the exposure at the place of the last shot, thus creating a gradation, which was slight enough so that the stitching program could adapt it.
- Don’t use polarisation filters. A polfilter changes the colouring of a photo and at different directions the colours are different. It often becomes impossible to fix these discrepancies with programs.
- If possible, don’t use your zoom at its widest angle. Always zoom in a bit to avoid curved lines at the edges of the frame (where it counts for stitching).
- Smaller panos are easier to stitch than large ones. A 360° pano can be a real pain in the butt to stitch, especially if some of the overlapping regions don’t show much contrast.
- Don’t point up or down while shooting the single shots. Keep the horizon. Pointing up or down will result in curved panoramas, which can be very hard to get straight again. The worst that can happen is that you have buildings at the edge of the pano frame which will point inwards or outwards.
Prerequisite 2: Digital Picture Processing
Pre-Stitching
If you follow the hints above you don’t need to do any picture processing prior to stitching the panorama and you should not do it. Only if there are changes to the exposure you might try to adapt the shots. Concentrate on the sky because differences in the exposure of the structured foreground are harder to detect.
It is much harder to adapt pictures in which the colour aspect changes from shot to shot. This happens if you use polarization filters and your panorama covers a wide angle. Often it is impossible to correct the errors but you can try. Adjust the pictures step by step (single shot by single shot). This might result in huge adjustments for the last shot and generally it is here that the panorama will look whacky.
As for Curved panoramas – the ones where your single shots were taken pointing up (or down) - you should try to correct the error in the single shots already. Photoshop has a feature while cropping, where you can correct for part of this error. Vertical lines, which on the un-edited shot point inwards, can be “straightened”. The whole picture looks straightened and a panorama stitch turns out much better results.
Stitching
Here I refer to Lukas’ article. He used a suite of programs, none of which I ever used. There is a multitude of quite decent panorama software out there, all with advantages and disadvantages. I used
- PanoramaMaker
- Canon Photo Stitch
- Panorama Factory
- Photoshop elements
For me PanoramaMaker is the program of choice, mainly because of its ease of use. It offers decent results when it is on automatic and only when the contrast is lacking or if some of the shots were taken at different focal length you have to do adjustments manually. However the drawback is that all single shots need to be the exact same pixel size, which is hard to realize if you scan slides or paper pictures. Moreover PanoramaMaker will only work with shots with aspect ratio between 2:3 and 3:4.
I use exposure and focal length adjustment while stitching my panoramas. Generally the results are satisfactory and I rather adjust the single shots before stitching than twiddling around with the controls of the stitching program.
Post-Stitching
Sometimes the exposure correction is overtaxed and you see the lines along which the program stitched. In that case I use Photoshop’s Healing Brush Tool to correct the error and make the line invisible. Nowadays it doesn’t happen too often anymore but my first panos all had these lines.
If I didn’t adhere my own tips and pointed upwards to take a panorama – e.g. a mountain from its base – I use the Crop Tool, allowing perspective corrections. This doesn’t always help, especially if there are objects with vertical lines at the edges.
Size Considerations
Before dealing with the html code itself, let’s discuss the size of the resulting panorama first. IMHO this is the most important part of the prerequisites. Why?
People use different browsers and different screen resolutions. What might look good on my 1400 x 1050 screen in Firefox might look terrible on IE on a resolution of 1024 x 768. Large width panoramas result in the pages to adapt to that width, resulting in scrollbars at lower resolutions. To read the texts above and below the panorama you have to scroll back and forth, which is simply not acceptable.
Therefore I would suggest you prepare your panoramas for a size of 1024 x 768 pixels, a size which nowadays most of the computers can deal with. Subtract the left SP-sidebar and the browser’s menu bar and you’ll come up with an effective size of
770 x 550 pixels. We (
livioz and I) checked many browsers and this seemed to be the best compromise.
Consequently I reduce the height of my panos to 550 pixels and to whatever resulting width. With sliding panos (see below) the sliding frame will have 770 pixels width.
Colour code
The following html codes are posted in different colours:
- Black: obligatory code for the respective type of panorama
- Blue: optional code for a SP-frame around the panorama. Additionally there is an icon in the bottom right corner which lets you view the picture page of the panorama.
- Green: code for labelling the panorama
And now: let’s go…
Simple Magic (SP Built In Dialog)
Let me start with the simplest option – using SP’s picture dialog. In edit mode you will find a button above each section: “Insert Image”. You can search for pictures, chose size and alignment and add a caption. Everything will be placed in a frame and look SP-like. My recommendation is to use the medium size and centered alignment. This works quite well with panoramas, created from two or three single shots, as it will result in a picture of 500px width. SP inserts some image code, which gets replaced by the image itself when viewing the page.
Code:
[img:241491:aligncenter:medium:The Northern Chain of the Pale di San Martino Group]
Result:
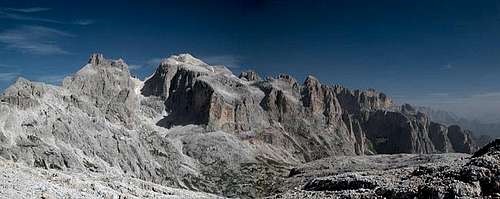
![The Northern Chain of the Pale di San Martino Group]() The Northern Chain of the Pale di San Martino Group
The Northern Chain of the Pale di San Martino Group
With SP’s built in picture dialog there is only one possible way to add labels to the panorama: write directly onto the picture prior to submitting it to SP. However, that way parts of the picture will be hidden by text.
Example:
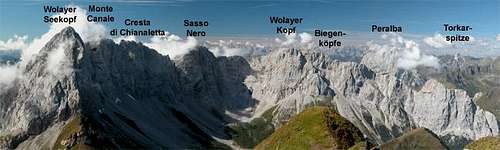
![The Biegengebirge part of the...]() The Biegengebirge part of the Carnic Alps as seen from the Rauchkofel summit
The Biegengebirge part of the Carnic Alps as seen from the Rauchkofel summitAdvanced Magic (Native HTML)
If your panorama doesn’t exceed 770 pixels in width there is always the possibility to post it in its original size. Again this should only be done for panoramas, stitched from two or three pictures, since otherwise the height will be rather small. Here the solution is to use standard html code, maybe with a frame and the link to the picture page itself.
Code:
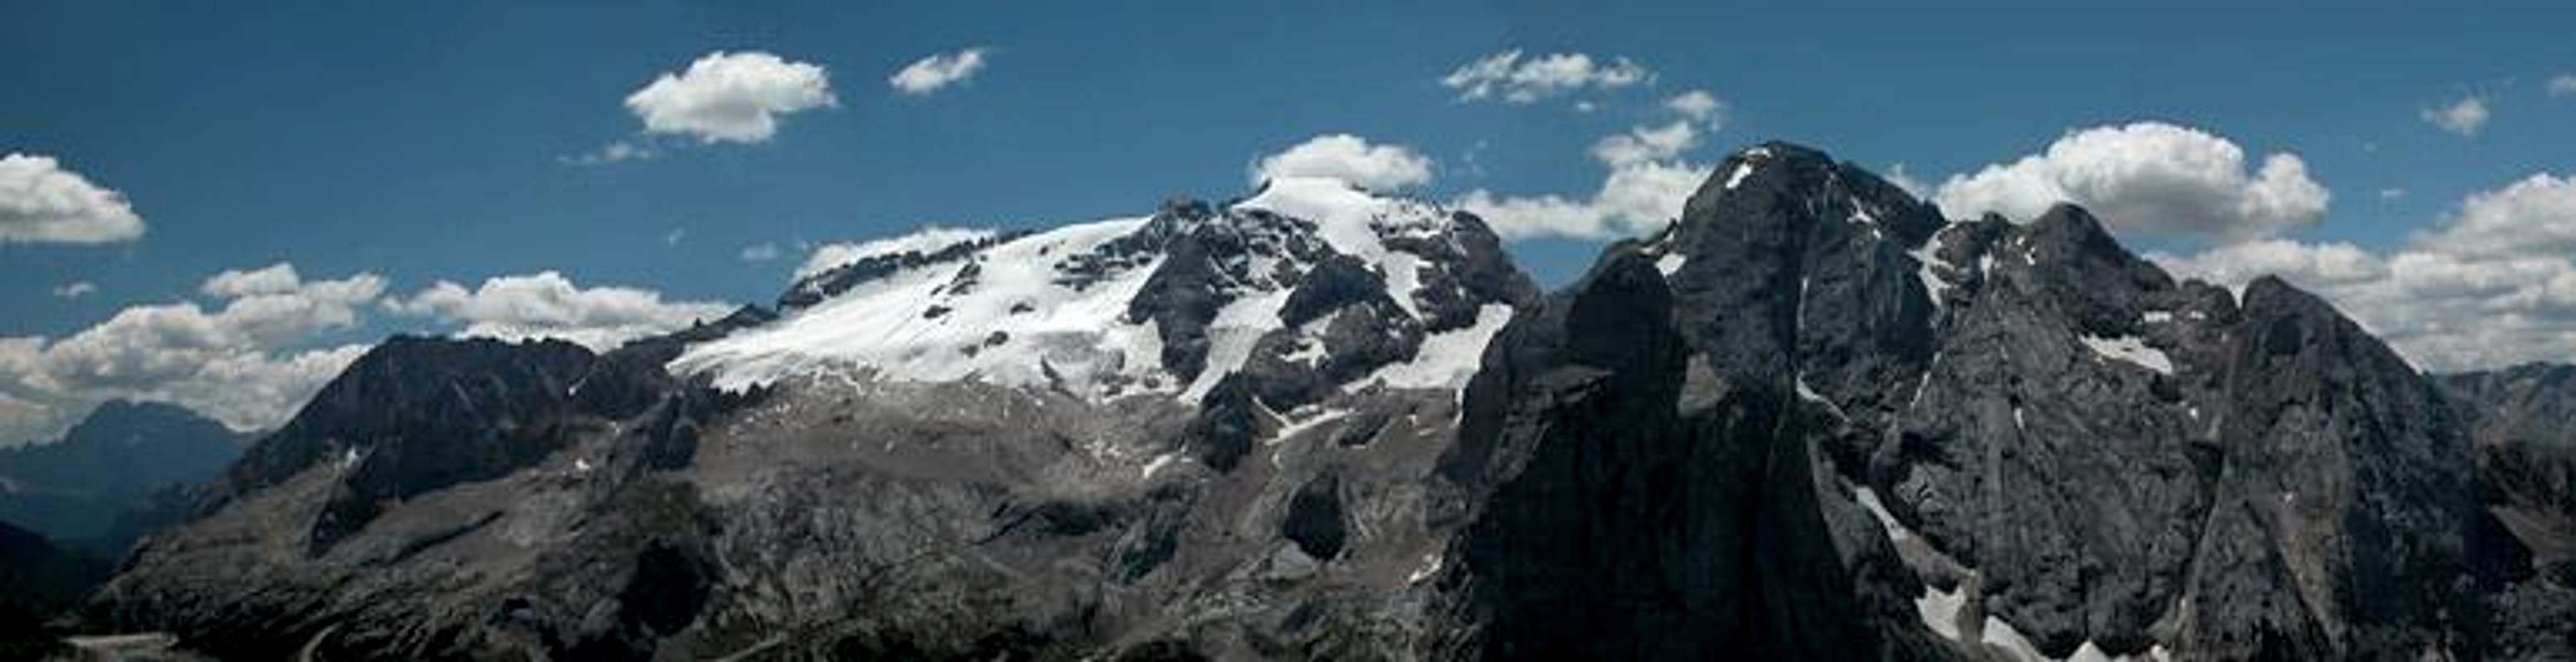
<center><table class='thumb'><tr><td><a href='/view_object.php?object_id=241495'><img class="lozad img-responsive" data-src='/images/original/241495.jpg'> </img></a><div class='magnify' style='float: right; margin-top: 5px;'><a href='/view_object.php?object_id=241495' title='Enlarge'> <img class="lozad img-responsive" data-src='/images/layout/abby/magnify.gif' alt='Enlarge' ></img></a></div>Marmolada and Gran Vernel as seen from Col da Cuc</td></tr></table></center>
Result:
![]()
Marmolada and Gran Vernel as seen from Col da Cuch |
Heavily advanced Magic (Image Maps)
In addition to adding the labels to the picture itself, you can use the so-called image maps. Usually used for maps, you can get tooltips, when you move the mouse over an interactive area. While the code is still straightforward, you must figure out the coordinates of the spots of the panorama you want to “interactivate”. Some picture processing programs offer image map support, to determine the coordinates by clicking the mouse. I use Adobe Image Ready for a task like that. Drawback with the tooltips is that you don’t directly see the labels and thus don’t know where to put the mouse to get the text.
Code:
<noformat><center><table class='thumb'><tr><td><IMG SRC=" /images/original/241498.jpg" USEMAP="#Map">
<MAP NAME="Map">
<AREA SHAPE="poly" TITLE="Niederer Weißzint" COORDS="703,125, 769,163, 742,178, 705,179, 671,177, 641,136, 655,128, 692,124">
<AREA SHAPE="poly" TITLE="Hoher Weißzint" COORDS="639,134, 623,119, 572,115, 542,110, 523,117, 608,161, 621,179, 651,173, 669,173">
<AREA SHAPE="poly" TITLE="Hochfeiler" COORDS="475,83, 512,111, 522,116, 605,161, 621,179, 593,185, 531,146, 504,144, 484,121, 455,104, 438,116, 432,102, 455,98" HREF="https://www.summitpost.org/mountain/rock/150982/hochfeiler-granpilastro.html">
<AREA SHAPE="poly" TITLE="Blauer Kofel" COORDS="472,199, 539,223, 562,198, 594,183, 533,148, 505,142, 469,199">
<AREA SHAPE="poly" TITLE="Fituidenkopf" COORDS="468,199, 422,187, 392,168, 406,124, 442,115, 459,105, 482,119, 504,142, 503,142">
<AREA SHAPE="poly" TITLE="Weißspitzen" COORDS="413,86, 441,115, 405,125, 392,167, 335,169, 342,135, 361,126, 398,90">
<AREA SHAPE="poly" TITLE="Hochferner" COORDS="327,116, 382,81, 398,89, 361,123, 342,134, 331,170, 299,157, 316,132">
<AREA SHAPE="poly" TITLE="Rotwand" COORDS="302,126, 315,133, 294,157, 243,173, 290,130">
<AREA SHAPE="poly" TITLE="Großer Möseler" COORDS="132,145, 191,115, 220,109, 245,123, 289,130, 241,172, 184,179" HREF="https://www.summitpost.org/mountain/rock/151034/grosser-m-seler.html">
<AREA SHAPE="poly" TITLE="Hochsteller" COORDS="21,149, 63,131, 127,145, 187,182, 152,207">
</MAP><br /><div class='magnify' style='float: right; margin-top: 5px;'><a href='/view_object.php?object_id=241498' title='Enlarge'> <img class="lozad img-responsive" data-src='/images/layout/abby/magnify.gif' alt='Enlarge' ></img></a></div>Hochfeiler Group seen from Grubenkopf. Hover mouse over mountains to see the names</td></tr></table></center></noformat>
Result:

Hochfeiler Group seen from Grubenkopf. Hover mouse over mountains to see the names |
If you plan to use more than one image map per page make sure you use different names for the maps.
Explanation:
- <IMG SRC=https://images-sp.summitpost.org/tr:e-sharpen,e-contrast-1,fit-max,q-60,h-800/241498.jpg" USEMAP="Map">
Displays the image of the map and announces that an image map with the name "Map" will be used subsequently
- <MAP NAME=" Map">...</MAP>
Within these tags the actual image map is defined. For each image map use a unique name!
- < AREA SHAPE="poly" TITLE="Hochfeiler" COORDS="475,83, 512,111, 522,116, 605,161, 621,179, 593,185, 531,146, 504,144, 484,121, 455,104, 438,116, 432,102, 455,98" HREF="https://www.summitpost.org/mountain/rock/150982/hochfeiler-granpilastro.html">
Definition of the area which will be interactive
- SHAPE="poly"
A polygon area will be interactive. Circles and Rectangles are also possible
- TITLE="Hochfeiler"
This text will be displayed as you hover the mouse over the interactive area
- COORDS="475,83, 512,111, 522,116, 605,161, 621,179, 593,185, 531,146, 504,144, 484,121, 455,104, 438,116, 432,102, 455,98"
Coordinates of the interactive area. Find out by trial and error or use a tool like Adobe Image Ready to find them.
HREF=" https://www.summitpost.org/mountain/rock/150982/hochfeiler-granpilastro.html "
Link to the Hochfeiler Page
Expert Wizardry (Sliding Panoramas)
Now for the real stuff – sliding panoramas. You submit your large panorama to SP and with a bit of rather simple code you get scrollbars to move the picture around. This method can also be found at the bottom of the current FAQ, where you can find a short explanation in addition to the one you get here. Take care to make the picture frame a bit higher than the original picture. You need the space of the additional scrollbar, which should be about 40px. The scrollbar itself is narrower but different browser display it differently so that you should give ample space. For a panorama of 550px you should use 590px x 770px for the frame.
Code:
<center> <table class='thumb'><tr><td><div><div style="width:770px;height:590px;overflow:auto;"><img class="lozad img-responsive" data-src="https://images-sp.summitpost.org/tr:e-sharpen,e-contrast-1,fit-max,q-60,h-800/239825.jpg"></div><div class='magnify' style='float: right; margin-top: 5px;'><a href='/view_object.php?object_id=239825' title='View Pano'> <img class="lozad img-responsive" data-src='/images/layout/abby/magnify.gif' alt='Enlarge'></img></a></div>The Pfunderer Berge Group seen from Bairnockspitze</div></td></tr></table></center>
Result:
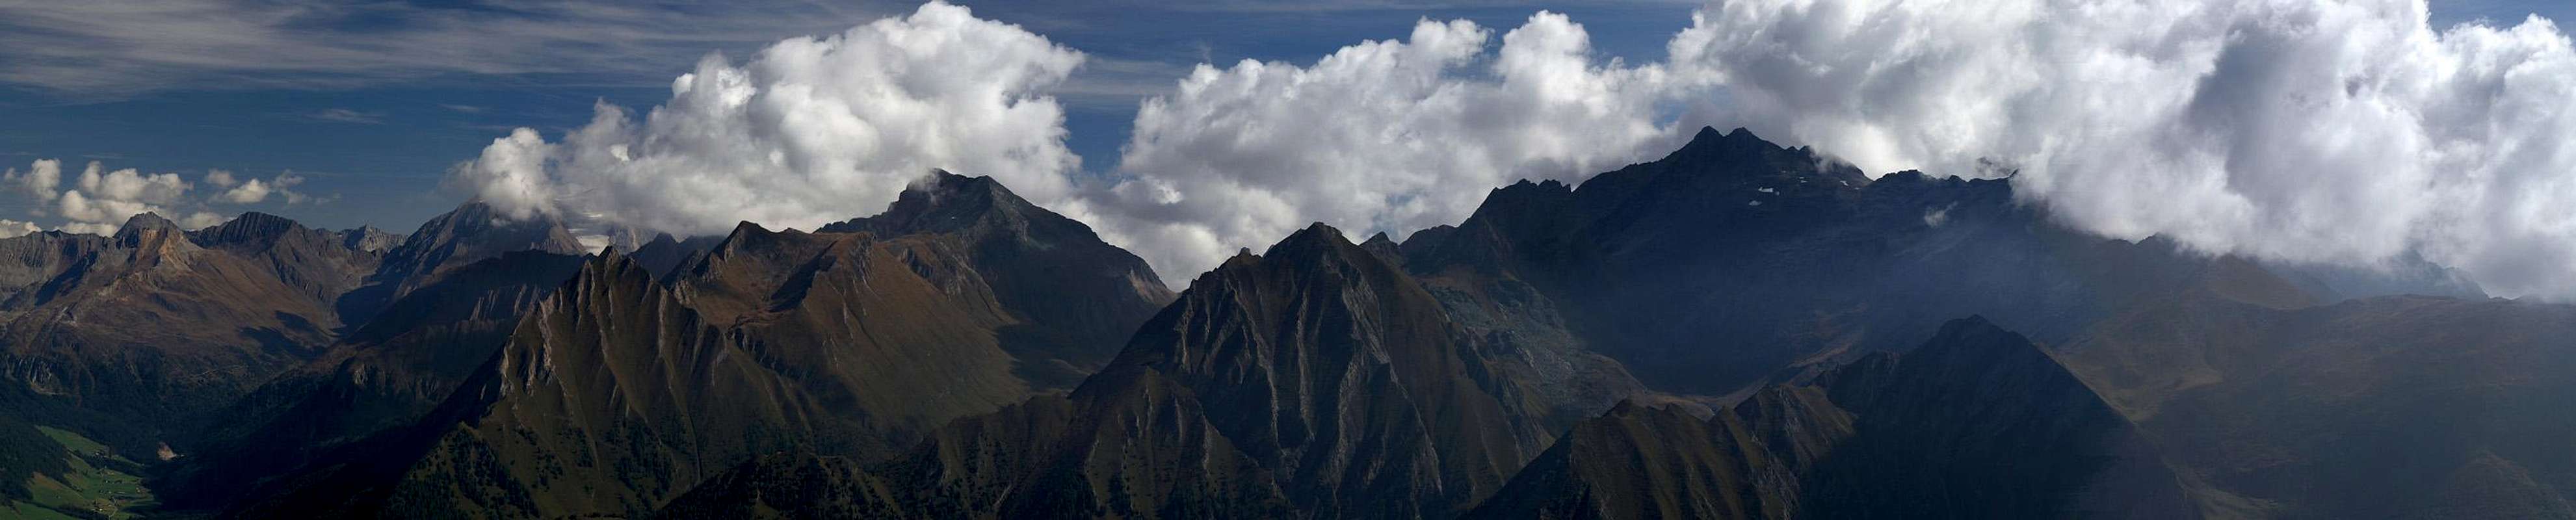
The Pfunderer Berge Group seen from Bairnockspitze |


Comments
Post a Comment