
|
|
Route |
|---|---|
|
|
47.50760°N / 121.29°W |
|
|
Rock Climb |
|
|
Most of a day |
|
|
Class 5.6 but a lot of Class 4 |
|
|
Approach
For the approach to the bivy basin (c. 4,600 ft) at the southern toe of the Chimney Glacier, see the "Getting There" Section on the Main Page. It will take 4-6 hours to make the bivy basin depending on your fitness and/or speed. The elevation gain is about 2,000 ft over 7.5 miles.
This topo map may be helpful.
 |
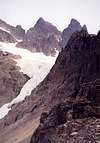
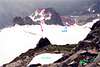
Bivy Basin to Base of Route
The bivy basin is at the toe of the lower part of the glacier. Actually, the lower and upper glacier are separated, the lower not being particularly active or crevasse-filled. Though there are steep bits, the biggest danger in the lower glacier are falling rocks and falling ice/snow blocks.
The lower and upper glacier are separated by a cliff with three (3) breaks in it.
1) At far left is a gully next to the east wall of the South Point (Pt. 7240+). The snow can be severely undercut by a stream. Moats can also be a problem. Lastly, snow blocks still perched on the wall to the left can slough off. This was happening while we were there. If we had chosen that route, we would have been clobbered. By the time we came back to camp later that day, the amount of debris below the gully was astounding. Some of the snow blocks were the size of compact cars. Expect 2 hours to get from camp to the base of the route.
2) In the middle is another gully. You can't climb directly up it but you can ascend it part way until you can gain a ledge that leads right onto a buttress of rock. Climb up and over the buttress to the edge of the upper glacier. Loose Class 3. Expect 2 hours.
3) To the right is the icefall break. YOU CAN'T CLIMB UP THIS WAY. DANGER, WILL ROBINSON!
There is a fourth way but it's not obvious:
From the bivy basin (c. 4,600 ft), continue up to the gap leading to the lower glacier. To your right are two ledges that allow access to the rocky ridge on the right. Take either ledge. When the ledge disappears into the flattening top of the ridge, turn left (north) and walk along the morainal rocks until you come to a stream coursing down from a small hidden basin. Go up the stream course. In the small basin there will be a narrow gully leading directly north and a small buttress and shoulder to the right. You can go up the gully (or the small one to its immediate right) but there are two 10-ft Class 4 sections to deal with.
The shoulder route is easier. Go around the corner of the shoulder then bear left (west) along the scrambly ridge until you come to a deep notch. To get across, look for a tree on the south side. Descend 15 feet (Class 3) down the south side of the ridge 12 feet before the notch. When you get even with the tree, turn right (west) and descend slightly past the tree on a duffy slab (Class 3). The slab drops into the narrow gully mentioned in the previous paragraph. You don't want to go all the way down there (requires an iffy climb through or over chockstones). Instead, turn right (north) before the drop for a Class-3 bypass that ends above the chockstones. Scramble back up to the notch then continue along the ridge.
When the ridge gets dicey, leave it for snow on the north side. A short descent (crampons probably necessary--aluminum crampons are sufficient) around a buttress then back up to a saddle gets you to the east side of the glacier. Cross the glacier to the base of the route (not all that steep except for on the immediate other side of the saddle then the final incline to the moat below the rocks).
There can be issues with getting onto rock--especially in late season. The moat can be quite large at times. This could mean you'll have to climb down into it and climb from lower down. Either way, you might have to work at it or choose to climb a harder rock pitch where the gap is small enough to allow you to get to it.
 |  |  |  |  |
The Lower Third of the Route
There is more than one way to do the first 1.5 pitches to the broad grassy ledge above. The rock is steep and slabby but adequately jointed for protection. One start is near the middle of the wall (look for an old pink runner hanging in a left-facing dihedral).
Pitch 1: Class 5.6
Climb up cracks, minor dihedrals, open books, and/or chimneys to within half-a-pitch of the grassy ledge.
Pitch 1+: Class 4
This is the half-pitch to get to the grassy ledge. We went up near the trees at center-ledge. There are rap anchors at the trees.
Simul-climbing: Class 2/3
Once on the grassy ledge, bear right (north) along it until you come to an obvious ramp bearing up and left. Take this ramp to its top at the corner that drops away to the prominent East Gully that separates the South and Main peaks.
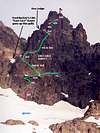 |  |  |  |
The Middle Third of the Route
Most of this part of the route can be done in a running belay. The climbing is largely 4th Class but enough Class 5 lurks to make it interesting. If you find yourself climbing something harder than mid-5th then you're off-route.
Pitches 2-3: Class 4/5
Climb up and then right. The first chimney you come to can be climbed (some Class 5 for sure). You can see a rap station at its top. Or, you can continue traversing right to the next depression in the face. A chimney forms later on in this depression. Climb up the depression (Class 4) until it turns into a chimney (low-5th Class stemming). Bear right out of the chimney back on open face climbing (Class 4) to the far right side of a big ledge ("Key Ledge").
Pitch 3+: Class 3
Depending on where you come up to the Key Ledge, you may have to walk along it to get to the next upward pitch. If doing the latter variation described in Pitch 2-3, you will come up at the far right side of the ledge at about where it begins descending in a thinning ramp along the long east wall. To get to the Key Ledge requires 100 feet of Class 3.
 |  |  |  |
The Upper Third of the Route
There are now about 2.5 pitches left to attain the summit. The first pitch is Class 5, the middle half-pitch is Class 3/4, the last pitch is Class 5. An echo from the South Face of the Northeast Peak can cause problems with communications, especially on the first pitch.
Pitch 4: Class 5.3 From near the center of the Key Ledge, climb up the obvious chimney. The middle of the chimney is the crux section (blocks). Once above the blocks, bear up and right.
Pitch 5: Class 3/4 You need to traverse up and right for about 100 feet to get to the base of the true summit tower. This pitch can be done as a running belay.
Pitch 6: Class 5.5 There are two parallel chimneys between which is the summit tower. The right (north) chimney is narrow and of uncertain climbing value. The left (south) chimney is wider. Take the left chimney. The chimney begins as easy Class 4. At about two-thirds of the way up the chimney converts to a slot cave. DO NOT GO IN THERE. Either climb left (face climbing?) or go right over the right wall (Class 5.2) to a concavity in the face. Climb up the concavity to a set of overhanging blocks directly below the summit. Either climb through the overhang (5.5) or find an easier platform traverse atop big blocks (Class 5.2). The final 10 feet is Class 3.
Time: 6 hours from the bivy basin, 3,100 feet of gain.
 |  |  |
Descent
There are ample rappel stations on the route. The rappels do not always go down where you came up. For the upper two thirds of the face, the raps go down close to the left (south) corner of the face. With a 60m rope, you should be able to get back to the glacier in 8-10 raps depending on how much downclimbing you do. We did 8 raps on a 60m rope.
Here's what we did:
Rap 1: From the summit to the base of the final chimney pitch
Downclimb A: From base of final chimney pitch back to top of Pitch 4
Rap 2: Halfway down Pitch 4 to Key Ledge
Rap 3: Rest of way down to Key Ledge
Rap 4: From south end of Key Ledge to a third of the way to the top of the ramp
Rap 5: Middle third of the way back to the ramp
Rap 6: Final rappel back to the ramp
Downclimb B: Back down ramp then back across grassy ledge to trees at center of ledge
Rap 7: From trees to top of Pitch 1
Rap 8: From top of Pitch 1 to base of rock at moat (rope barely made it)
Essential Gear
Overnight gear if camping
Bug spray
Ice axe and lightweight crampons
60m rope
small rack (mid-size cams were used often, as was the #11 nut).
some throwaway slings if you want to improve some manky rap anchors
helmet
PICKETS ARE NOT NECESSARY. NOR ARE ROCK SHOES.
 |  |  |