
|
|
Route |
|---|---|
|
|
48.49420°N / 121.008°W |
|
|
Technical Rock Climb |
|
|
Less than two hours |
|
|
Class 5.3 |
|
|
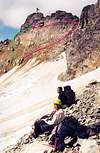
Final Approach to Peak
Note:: In saying the climb takes less than 2 hours, I am referring only to the climb to the summit from its base, not the trek over to it from the car, which would take a day in itself. Most parties will elect to climb Mt. Buckner on the same trip.
From the west side of the ice or snow-filled depression (see approach descriptions on main page), scramble up loose sand and scree beside the ice to a point where it is necessary to either go left or right. Going left will lead to the a small saddle on the south side of the main summit. Going right will lead to an obvious notch between Horseshoe's false summit (east tower) and a large tower farther east. Note that the Lick of Flame is one tower farther east.
 |  |
Leftward Approach to Climb
If you choose to go left to the small saddle (c. 8,300 ft), then here's what you need to do to get to the final notch where the half-pitch of technical climbing begins:
From the saddle, scramble north up the short Class 3 face of the rock spur between you and a gully below the main tower of Horseshoe. The gully isn't really visible until you climb atop the spur. Once atop the minor spur, trend rightward along its crest for 30 feet (Class 3), eventually traversing the north side to gain a small notch right of a set of chockstones in the gully. You could probably climb up through the chockstones (Class 4 or low 5th) by dropping a few feet into the gully but there is a bypass.
From the minor notch, scramble up a low-angle didedral slab (Class 3+) then down the other side (Class 3) and into the gully above the chockstones. The last 40 feet in the gully is on steep sand or snow in early season. You are now at the notch where belayed climbing begins.
Rightward Approach to Climb
If you choose to go right to the major notch in Ripsaw Ridge between the east tower of Horseshoe and the next tower to the east, then this is what you need to do to get to the final notch where the half-pitch of technical climbing begins:
From notch (minor scrambling to get there), turn left (west) and climb a 10-ft Class 3 step to a ledge. This ledge bears along the south wall of the east tower. The ledge is easy (mostly Class 2) until the very end where a little bit of Class 3 scrambling is necessary. You can either scramble up and right (Class 3+) before the end of the ledge to gain the notch via a rocky crest or you can continue all the way to the ledge's end, whereupon you will be at the low-angle dihedral slab mentioned in the other approach.
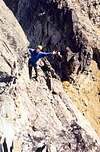
The Technical Climbing
You only need a 30m rope for this as the pitch to the summit is only 100 ft or so in length.
There is a nice large horn on the east side of the notch that provides an anchor (triple runner recommended), else there are cracks with which to set a passive anchor.
From the notch, scramble up 10 feet of Class 3/4 to the obvious ledge that cuts diagonally up the south face to an obvious cleft in the summit. Climb out on the somewhat loose ledge (Class 3/4). At about halfway there is a series of cracks. This would be a good place to set a piece. I set a Black Diamond 0.3 (little cam) but there were other crack sizes to accomodate larger or smaller cams.
The ledge eventually ends on small footholds below the cleft. The rappel slings are here at the cleft. Another piece should or could be set at the cleft. If you have a long reach, you can probably manage to sling a runner to the rappel slings (I'm a lanky 6 feet tall and had to step up and reach high). If not, you can use some suspect cracks below and right of the cleft.
The haul over the cleft is the crux of the climb. The rocks that comprise the cleft are generally loose but are solid enough if you pull them the right way. You could yard on the rap slings but that would be cheating. All in all, I'd rate that one move as 5.3. It would be harder for a shorter person. From a geologic standpoint, the cleft is an interesting thing. On the other (north) side of the narrow cleft is a narrow gully. The cleft looks like the initial erosional evidence of a deep notch that will form there in another million years or so.
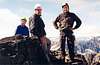
To the left is the register. To the right of the cleft is a small cairn. The summit spine is rather small but four or five can lounge up there comfortably.
 |  |  |
Descent
If you happen to have a 50m rope you can rappel the south face from the cleft all the way to the gully at some point just above the chockstones. If you have only a 30m rope, you should be able to do a rappel-downclimb back along the ledge to the notch. The rope may run out just before the notch but the remaining 10 ft of downclimbing is easy and not all that exposed.
After re-attaining the notch, scramble back down either approach route. If continuing on to Buckner, the latter approach ("Rightward Approach to Climb") will be the most direct and require the least elevation loss. Depending on the season, crampons may be needed to cross the upper fringes of the ice patch. Without crampons at least 200 feet of vertical will have to be lost to get around it.
Essential Gear
30m rope
Two single runners with 'biners.
One or two cams (I used a Black Diamond 0.3 cam)
Triple runner for notch anchor
Triple runner for rappel sling back-up (if needed). We used what was there.
 |