
-
 68328 Hits
-
 93.04% Score
-
 41 Votes
|
|
Route |
|---|---|
|
|
36.57860°N / 118.293°W |
|
|
Trad Climbing |
|
|
Spring, Summer, Fall, Winter |
|
|
Half a day |
|
|
5.8 (YDS) |
|
|
Grade III 5.8 |
|
|
8 |
|
|
III |
|
|
Overview and Approach
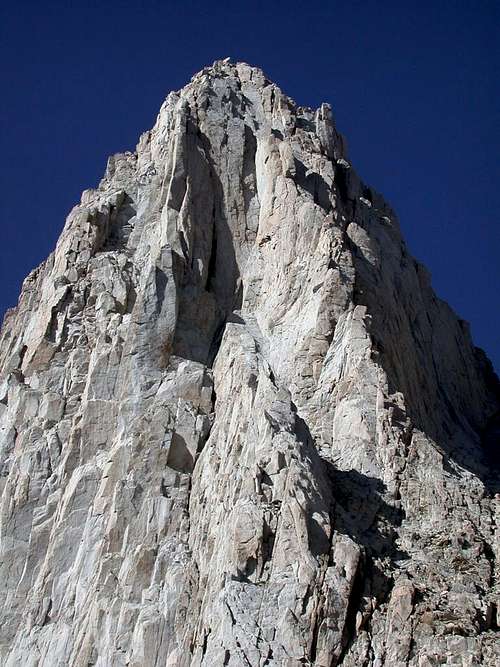 The East Buttress was the second technical climb put up on the massive east face of Mount Whitney. Glen Dawson, who also lead the first ascent of the East Face in 1931, lead a team of five climbers on September 5, 1937 up the imposing buttress rising up from the same notch that begins the East Face. The original route , dubbed the "Sunshine PeeWee" route, avoided the steep dihedral at the top of the first tower by traversing around the back on fourth class ledges and cracks. But climbing gear and standards have advanced considerably since then, and the the direct route described here is more commonly followed.
While the East Face deserves its classic status as the first technical route on the face, the East Buttress is arguably the better route. It is more sustained and aesthetic. It is also less crowded and has less loose rock.
The difficulty rating is variously given as "Class 5" (Roper), 5.6 (Secor), 5.7 (Supertopo), or 5.8 (Moynier & Fiddler). The rating depends in part on who you ask, and which specific variation (they are legion) you are talking about. The route description provided here roughly follows the line described by Moynier & Fiddler. They refer to this line as the "direct route", as will I.
The crux moves are located in the lower part of the dihedral on the second pitch. Given the subjectivity of ratings it seems silly to argue over the "correct" rating. Personally, I didn't feel it deserved a 5.8, but that's just one opinion. The remainder of the route is quite a bit easier.
With the exception of the crux moves (wouldn't you know it?) the route protects very well. If 5.8 is near your upper limit, and your style is to place a lot of gear when the going gets hard, you'll probably find the shallow, flaring cracks around the crux disappointing. Fortunately, it's a short stretch. There are some opportunities for solid, small nuts just below, and the pro gets much better just above. You can always opt for the FA route and enjoy the remainder of the climb free of cold sweats and hyperventilation.
The standard approach is the same as for the Mountaineer's Route. Begin on the main trail from Whitney Portal, pass one stream, and then turn right just before the second stream crossing (signed). Follow the use trail up to a willow-choked valley. Halfway up the valley the trail crosses back to the north side of the stream and runs a short distance along the base of the cliffs.
Scramble up a short class three gully to a series of ledges (the Ebersbacher Ledges) that lead east to a point where it is possible to step up and head back west on tree-covered ledges. Continue up to Lower Boyscout Lake, take the use trail on the south side of the lake through talus to a point where it is possible to pass through the willows onto slabs. Head up the slabs to Upper Boyscout Lake. Head south from the outlet of Upper Boyscout Lake and pick up the use trail again, and follow it until reaching a gully system (marked high on the right by a water seep) that leads to Iceberg Lake.
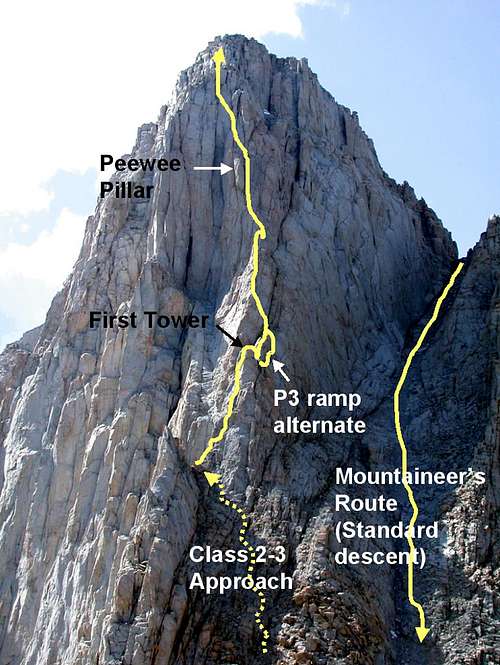
The final thousand feet of the approach ascends talus and then third class terrain to the right of a prominent buttress above Iceberg Lake. Follow this to a notch behind a tower. Rope up here. Note that this is not the same chute as the Mountaineer's Route, which is the big gully to the right.
A more detailed description of the approach to Iceberg Lake can be found on the Mountaineer's Route page.
Route Description
 The East Buttress is a large, complex formation that is intricately broken by crack systems, flakes, blocks, aretes, corners, etc. The route itself is pretty straightforward. Aside from a few sections, there is no "right" way to go. After the third pitch you can more or less climb wherever and belay wherever you please. Your route finding will govern the level of difficulty.
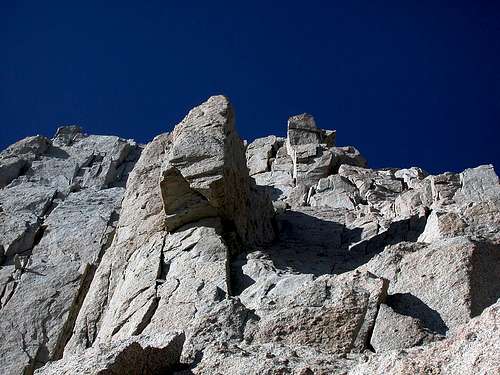
The start of the East Buttress as seen from the notch where both the East Buttress and East Face begin. |
Nominally eight pitches long, there is no reason why it can't be climbed in seven or nine. Supertopo's description includes eleven pitches, but unless you feel like going out of your way for a few moves of moderate class 5 amidst a vast sea of class three and four terrain, you can probably unrope or simulclimb the last few hundred feet of the route to the summit. Accordingly, the route description below is geared more toward describing important features and general directions.
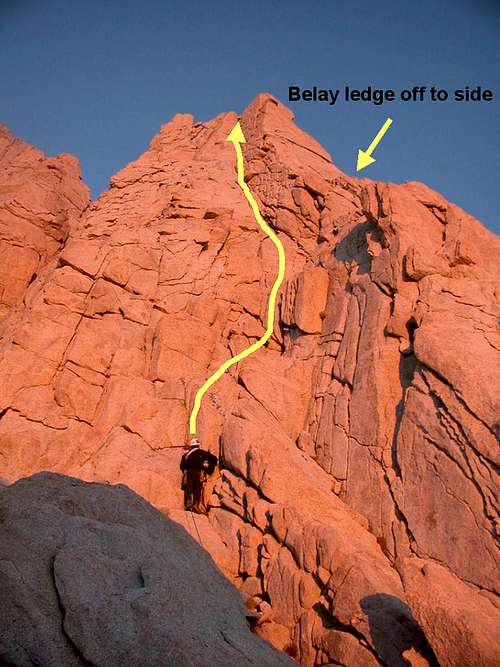
The direct route ascends two pitches to the top of the obvious tower looming above the notch to the north. Follow broken ground (up to 5.6) to an obvious left facing corner (5.7 or 5.8) leading to a belay on the top of the tower. About halfway up there is an inobvious belay ledge off to the right. Finding this is preferable to setting up a hanging belay low in the corner. If the steep corner above has you sketched out, you can traverse right around the tower and then up allegedly fourth class terrain to the top of the tower. This is the first ascent route.
Begin the third pitch by traversing the top of the tower and dropping into a notch. From here you have two options: either climb the short face/arete just to your left (up to 5.7, less than stellar pro) or drop down to the right over a big step (awkward if you are not real tall) to a ramp (up to 5.6). Both options converge on a belay on a large, sandy ledge at the base of a prominent right-facing corner/flake system.
Looking down from the top of pitch four. The prow of the buttress is the sun/shade line in the lower center of the picture. Above this we see the tops of two towers. The route ascends the left-hand one. The "poorly protected" third pitch climbs the brighly lit section just left of the shaded prow. The third pitch ends at the big sandy ledge in deep shadow. The fourth pitch ascends the corner above that. |
Ascend the corner (~5.6) its entire length until you naturally reach the arete, or traverse left at your first convenience to the arete (up to 5.7, supposedly better climbing). Continue up in the general direction of a humongous overhang (the "PeeWee"). There are several decent places to stop and belay.
Loooking up the upper half of the East Buttress. The "PeeWee" is plainly visible. The route passes right of the "PeeWee", then goes up and slightly left above it, though there are an infinite number of variations. |
From this point on there are many ways to go, and many options for setting up belays. The difficulty doesn't vary tremendously, so don't worry too much about making a mistake. Your goal is to pass the "PeeWee" on the right, staying close to this indecorously-named formation. You will eventually find yourself on top of it.
From the top of the "PeeWee" climb a face to a right facing corner (5.7) near the top of the buttress. Once above the corner, about 300 feet of third-fourth class climbing leads over and around blocks to the summit. While it is possible to continue roped climbing by staying as close as possible to the now-indistinct arete, this hardly seems worth the effort.
The upper buttress is such a jumble of blocks, talus, and towers as to defy description. At this point, many parties are ready to call it a day and get on with the descent. However, if you are going to have an epic on the East Buttress, this part of the climb presents many opportunities. In general, staying to the left will lead you towards the upper part of the east face, and the easiest way (a short stretch of south-facing class four) past the final steep section. If you hit it right you will top out within feet of the summit, and perhaps a few gawking hikers who never considered the possibility that the face could be climbed. Then again, there are also 5.10+ finishes where your huffing and cursing may prompt well-meaning walkers to pull out the cell phones and call Inyo County SAR.
Descend the Mountaineers Route to Iceberg Lake.
Essential Gear
A standard alpine rack with cams to 3 inches, one set of medium nuts and long runners. A 50m rope is plenty, though a 60m will give you a bit more flexibility, and may save you time by allowing you to eliminate a belay. A helmet is recommended. There isn't much loose rock on the route, but the Mountaineer's Route descent is lousy with the stuff. If attempting the route before mid summer crampons and an axe may be needed for the approach and the Mountaineers Route descent.
5-1-06 5914
For More Information
There are several sources of additional information on the East Buttress. Here are a few good ones:
- Moynier & Fiddler Sierra Classics: 100 Best Climbs in the High Sierra, 1993 Chockstone Press. ISBN 0-934641-60-9 (A good topo and brief route description)
- Steve Roper The CLimber's Guide to the High Sierra, 1976 Sierra Club Books. ISBN 0-87156-147-6 (A brief route description and window into the mindset of early Sierra climbers)
- R.J. Secor The High Sierra: Peaks, Passes and Trails, 1999 The Mountaineers. ISBN 0-89886-625-1 (route description follows the FA, many variations described in concise language)
- Chris McNamara High Sierra Climbing, 2004 Supertopo. ISBN 0-9672391-8-4 (A rather ornate topo and brief route description)
rpc - Apr 22, 2004 12:17 pm - Voted 10/10
Route CommentI was hoping that if you can find some time, you could add in all the relevant route photos to the East Buttress page. They're difficult to find in the general Whitney photo page given it now has >500 photos.
Thanks.
rpc - Jun 2, 2004 1:53 pm - Voted 10/10
Route CommentDid the East Buttress route over Memorial Day weekend (2004). Here are a few points to supplement the good description on the route page:
We did the route following the SuperTopo description of it. The difficulty of P1 and P2 depends on which left facing dihedral is taken. The one on the right (recommended by ST and one we did) is 5.6; the one on the left is 5.8 (have not done it). The face moves on P3 which ST describes as the crux of the ("standard") route (rated 5.7) are probably much easier than that. The piton (2 actually next to each other) on that pitch are useless as they have been banged in to the point where you cannot get a biner or even a thin cord thru. the head. Route finding is mostly straightforward (though not trivial - route meanders on and mostly off the arete). If you are following the ST directions, note that the route veers off to the left as you move above P7. P9 should put you on a talus field below a small tower (tower is on right; talus field on left). As you near the top, pitches 10 and 11 (as described by ST) have many variations. Some of those can put you at the base of some fun terrain. Our P11 put us on a ledge 30 feet below the summit that had several ways of topping out visible - from a 5.7+ finger crack (short) to a (probably?) 5.9 fist crack (opted for the former).
Protection: Light rack with stress on cams rather than nuts. Cams in the 0.5 to 3 inch range - most pro was in the 0.75 to 1.5 inch range. Pitches are easy but tend to be long (most are over 140 feet; many over 160 feet). I'd imagine that backing off the route would be pretty gear-intensive (unless you'd be willing to downclimb it).