
|
|
Route |
|---|---|
|
|
39.07610°N / 106.9867°W |
|
|
Scrambling |
|
|
Summer, Fall |
|
|
Half a day |
|
|
5.2 (YDS) |
|
|
|
|
|
Warning
Don't make the mistake in thinking the only reason this route is difficult is because of the rating. The rating is a sum of various reasons. Everything in the West Maroon Creek Valley is loose, dangerous and should be approached with caution.
The rock on this traverse (and both peaks) is absolute crap. It is broken, fractured and weak. You'll find multiple rock types here but the predominant is sedimentary. The best advice when doing this traverse is...trust nothing.
Route finding is a huge issue. People have been rescued from this traverse for getting off-route (most recently- August 2014) and bodies have been recovered for making poor route choices (most recently- July 2014). When the terrain you're scrambling/climbing in blends seamlessly, it's easy to get off route.
A lot can go wrong on this ridge traverse. And depending on which direction you climb this, your route will be slightly different. Hence, having a page for this describing both directions. If you climb this in a north to south direction, expect to repel one or two sections.
Make logical choices and think things through before committing too far. The easiest path around an obstacle isn't always the best choice. This IS a fun route to climb when approached right.
And yes, it is steep with no reasonable bail-out points once committed. So an early start is recommended. Take this ridge seriously.
Approach
 Kessler on a repel!
After 2.4 miles, you'll come to the new trail junction for South Maroon Peak. This turn-off is now located in a scree field (rock/avy debris) as opposed to the old junction located further up the trail in the forest. This is easy to miss in the dark. So keep a look out in the pre-dawn hours.
Leave the trail and continue up the slope towards the South Ridge for South Maroon Peak. Be warned, the 2,800' initial gain to the ridge is a thigh-burner. Follow the well cairned trail on ledges to the summit and enjoy the views. The ridge traverse will have much of what you'll find on the South Ridge approach. So it will be a good primer.
Route Description
 2nd Gendarme (cliff)
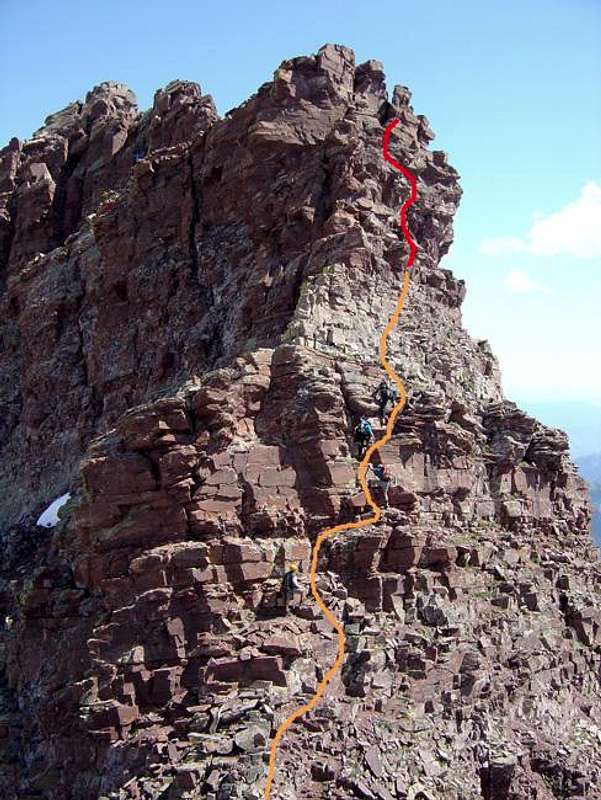
- I know most guidebooks state this traverse has three 5th class cruxes, but depending on your comfort level, I would have to say only two sections are really 5th (easy) with the first being 4th class. But you also have to take in account the awful rock quality and exposure. If you're uncomfortable soloing these conditions, go with someone who has already done this traverse. But also keep in mind, this has been done multiple times by people NOT roping up and solo. Expect to take about 90 minutes to two hours on this traverse. Just an FYI.
Leave the summit of South Maroon Peak on a northeastern heading following the summit crest. Descend from the summit staying at least initially, on the crest. The difficulty should never exceed 3rd class. If it does (which is easy to do) then you're off-route. Keep descending while gradually contouring to the left.
You will eventually see a steep gully. Aim for this gully. The rock is very loose and fractured, so descend one at a time if need be. There are some sporadic cairns. The ledges are trustworthy but covered in scree. Roughly 50' down this gully, there will be a good ledge on the right. Take it. It will wrap around to the right out of view. Then simply follow the path of least resistance to the col just a little further down. The ledges become slightly sloped the closer to the (Bell) col you get, just be mindful.
The first crux comes almost immediately after leaving the col for the Bell Cord. Take a small flaring ledge (about 5' high off the ground) to the left. Scramble to the left over to the west side of the traverse. Fact, you'll spend more time on the west side of this traverse than anything.
There are three cairns you'll look for here. Climb straight up on good holds gradually making your way back to the right (crest). The climbing here is steep but the holds are really good and wide. This is supposed to be 5th class to some sources, but personally, I'd rate it 4th class. Keep climbing up to the top of the ridge.
You'll be on the crest for a short distance before you'll need to venture a little bit over to the east side, but not too far. You're still basically on the ridge crest. The second crux comes fairly soon after the first. Keep climbing straight up and things will become fairly apparent the only way onward is literally straight up. This section is about 40' give or take. The holds are not the best but they are ok. This is where you'll feel the drop behind your back as your climbing. The route up this tower is pretty much straight up, never venturing too far left or right. There is a small cleft near the top you'll want to aim for. If you need to belay a less-experienced partner, this cleft actually makes a good belay ledge as it is somewhat protected.
Once on top of the ridge crest, the difficulty drops to 3rd class for a while. When in doubt as to route finding, just remember to stay mostly on the west side when possible.
 Flaking the rope at the second chimney option
The third crux comes about half-way across the ridge. There are actually three possibilities to ford this section.
1.) As you're standing at the bottom of the cliff, to the FAR left is a 40' chimney with small but good holds. The distance (height) may give some a moment of pause but the chimney is tight affording good and easy stemming or counter-pressuring. At the top of this chimney, the exit is a bit tricky but you'll want to exit to the right. Stick your left foot out and push yourself up and out onto a wide ledge. DO NOT go left. You'll cliff out. As you scramble to the right (very exposed), look for a small cleft. Aim for this and climb through. This is roughly 5.2 in difficulty. This option might prove to be a better choice for shorter people.
2.) A second option is to climb a shorter but much wider chimney about 40' to the right of the first. The height is less, about 30' give or take but the climbing is slightly different in that you'll be stemming your legs fairly wide and walking yourself up by rocking. Difficulty is about 5.2. There is a small choke stone at the top that you'll need to climb over. But there is a good lip on the other side of this that provides a good and secure hold. Mantle yourself up and wait for the others. Scramble to the left around a slightly bulging wall (exposure) to an apparent cleft. Scramble through this cleft (4th class) and back to the ridge crest. The difficulty will drop back down to 3rd class.
3.) A third option is to climb the wall directly. This is about 10' further right of the second chimney and goes at about 5.4. The holds on this option are smaller and of poorer quality but it keeps you more on the crest. Near the top of this short wall, there is a very small alcove with a good, "gorilla-grab" to power yourself up the last few feet to the top. But you'll feel the exposure behind you if you choose this option. Good for tall people.
Keep scrambling along the ridge crest for another .2 mile or so. The difficulty will never exceed 3rd class, if it does, reconsider your route choices. About 3/4 the way across, another small cliff will be encountered. I have found that if you venture to the east side of the traverse, there is a REALLY good ledge that skirts this crest and drops slightly as you descend to a small col. The exposure along here is pretty decent and the ledge will slope a little bit but the ledge is fairly wide. I've taken this three times and it works well. Follow this to the col. Breathe and relax. North Maroon Peak is now all but yours!
Leave the small col by venturing back to the west side on questionable rock. There are 'some' cairns along this final ascent but in truth, they're not really needed. Some of the guidebooks and manuals will have you climbing to the left towards a small vertical cleft. This may not be possible however as it often hold ice well into summer. Instead, simply climb straight up following the path of least resistance. Most of this will be hard 3rd class with an occasional 4th move but it spits you out directly onto the summit.
Descend the normal route for North Maroon Peak.
Essential Gear
- Helmet (this one is pretty much mandatory)
- Gloves (personal preference)
- jackets
- extra fluids
- et al...