-
 10827 Hits
-
 78.1% Score
-
 9 Votes
|
|
Route |
|---|---|
|
|
36.13190°N / 115.5016°W |
|
|
Hike / Scramble |
|
|
Most of a day |
|
|
Class 3 |
|
|
Approach
From the trailhead (6430 feet) at Red Rock Summit, follow the obvious and well-maintained trail for approximately 1 mile as it follows the contours of a limestone ridge. At the 1 mile mark, the trail reaches the crest of the ridge and a junction with another trail. A sign at that location instructs you to either go left to North Peak or go right for about a mile to Bridge Mountain. From this vantage point, Bridge Mountain is very visible to the E/SE. Take a minute while at the trail junction to study the remainder of the route, as the majority of it is quite visible from here. When you're done, go right on the trail.The trail continues along or near the crest of the limestone ridge for a half mile or so to the south before leaving the crest and heading E/SE toward the sandstone below. Although the condition of the trail deteriorates somewhat upon leaving the crest, it is still obvious. So long as you find yourself descending toward the sandstone and heading in the direction of Bridge Mountain, you are doing fine.
Once on the sandstone, you will see the large and imposing presence of the mountain to the east. Despite appearing non-technically-impossible from this angle, a crack in the west face of Bridge is visible in the distance and is what you will soon be climbing up.
Route Description
From the sandstone, your objective is quite clear: You need to travel across the sandstone, avoiding Pine Creek Canyon which drops away abruptly to the south, and soon, the upper part of Ice Box Canyon, which slopes away steeply to the north, and travel east toward the base of the mountain.The route across the sandstone is fairly level, although you are gradually losing elevation, and well-marked by use trail and cairns, and as awful as it sounds, route markings painted directly onto the sandstone. Shortly after gaining the sandstone, you will pass by a ledge that looks directly down into Pine Creek Canyon (north fork). The view into the canyon is incredible.
Travel across the sandstone over varying class 1-3 terrain, following the aforementioned use trails, cairns and route markings, and you will soon find yourself at the base of Bridge Mountain.
At this point, cairns will steer you up slightly and northward toward your next objective - a steep, class 3 crack leading directly up the east face of the mountain. The crack is 200 feet or so long and easier terrain is typically found by either staying in the crack itself or slightly to the left.
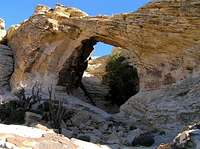
At the top of the crack, the terrain levels out some, and continuing eastward a short distance, you will find yourself looking up at a large sandstone arch above you.
From the arch, you can continue in either of two common ways: Either scurry up onto the sandstone of the arch itself and do an easy class 3 traverse to the top (far side) of the arch; or, go under the arch and scramble up a steep, class 2-3 ramp on the south side of the arch. No matter which of the two routes you take, you will still be heading in the right direction.
From the top of the ramp (or the arch) continue east a short distance over fairly level terrain until you see a small ponderosa pine grove nestled at the base of a system of steep sandstone slopes and ledges in front of you. This is the "hidden forest". Rather than drop down into the hidden forest, stay on the sandstone and work your way to the south along the edge of the forest until you come to a sort of notch that looks straight down the west face and into Pine Creek Canyon below. From here, you will hang a quick left and, following cairns, start working your way eastward and up onto the ledges above the hidden forest. The summit is only a short distance away.
Once on the ledges, gradually work your way eastward and upward on whatever terrain you find suitable. The summit is directly above. A direct ascent is steep and more challenging. Angling more eastward as you gradually ascend is easier. Regardless, do one of the preceding and you will soon find yourself within a short class 2-3 scramble up a couple of crags to the highest crag marking the summit itself.
To descend, retrace your steps.
Despite the roundtrip numbers being only around 6 miles and 3000 (or less) gain, expect Bridge Mountain to be a full-day endeavor.
 |  |