
-
 10877 Hits
-
 84.82% Score
-
 19 Votes
|
|
Route |
|---|---|
|
|
37.12300°N / 118.567°W |
|
|
Trad Climbing |
|
|
Spring, Summer, Fall |
|
|
Most of a day |
|
|
5.9 |
|
|
5.9 (YDS) |
|
|
8 |
|
|
III |
|
|
Approach

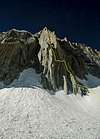
Mt. Goode's North Buttress is an imposing sight. The lower two-thirds of the route is visible from this angle. |
Leave the trail just past Long Lake and head west cross country to Margaret Lake. Take what appears to you to be the least disagreeable path through the old terminal moraines and make your way to the base of the obvious buttress dropping directly from the summit. The east ridge gets heavily corniced in the winter, and the chutes can be full of unstable snow. Spring and summer avalanches are a real possibility until the ridge dries out. Staying well back from the ridge until directly below the buttress is probably the safest approach.
Two large dihedrals split the bottom of the buttress. There is some broken third and fourth class terrain just right of the right hand dihedral. Rope up here.
Route Description
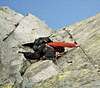
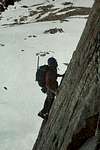
The pitches as described below match the description found in Supertopo. Croft’s topo shows the route in seven pitches, Moynier & Fiddler’s in eight. If there are any mandatory belay stations, they might be those located at the beginning and end of the third pitch, and at the start of the fifth pitch. This is primarily because pitch three makes a long traverse; communication and rope drag make it desireable to belay near both ends of the traverse. There is really no good alternative to the ledge at the start of pitch five. Otherwise, pitches can be linked as you wish. Some suggested linkages are indicated. A trip report provides additional information.Pitch 1: The route starts on the left wall of a large dihedral just to the left of the rope-up area, climbing face and cracks (5.8) until easier ground is reached.
Pitch 2: Continue up a large, left-facing dihedral (5.8) to broken fourth class ground loaded with sand and loose rock just waiting to be knocked onto your belayer’s head. The first and second pitches may be combined with a 60m rope.
Pitch 3: Traverse left toward a large detached flake on an arete. From here or the flakes just above it step around the arête. Enjoy the view below. Continue traversing left, clipping a fixed pin en route to another interesting step-around (5.9). After negotiating the step-around, traverse left and slightly down to a large chockstone wedged in a chimney. Either traverse left out of the chimney and climb the face (5.9) or thieve your way up the chimney (5.8). Neither option protects until it’s too late to matter much. Belay somewhere above.
Pitch 4: Continue up flakes and ledges to a tower (5.6 or so, depending on exact route). Either belay at the tower, or continue down into a notch and up the other side to a comfortable ledge. A horn may be slung near the top of the tower to keep rope drag from becoming unreasonable. There used to be a loose, television-sized block to assist in the descent into the notch, but this somehow got trundled down the north face recently.
Pitch 5: If you didn’t cross the notch at the end of the last pitch, you might want to consider doing so before beginning this pitch. Follow cracks and other features until just beneath the left side of the obvious small overhang. Traverse right and then up (5.9) to a belay ledge not far above. Good protection.
Pitch 6: Continue up a chimney (5.8) until reaching easier ground. Some guidebook authors suggest belaying at a ledge near an obvious tower on the right.
Pitch 7: Climb onto the arête and follow it (class 4/ 5.easy) until reaching a large, talus-covered ledge on the west side of the buttress.
Pitch 8: Follow cracks and flakes on the west side of the buttress (5.7) until gaining the arête. Tunnel underneath a large boulder to a spacious, if rocky, belay ledge. A short, narrow squeeze chimney half way up is unpleasant. Consider alternatives. Pitches four-eight can be combined in whatever way seems to make sense.
Pitch 9: Traverse left around the arête and the climb up to gain the ridge (5.7). Follow this until just below the summit block. A funky bouldering move (5.9) off a large, table-like boulder is one option for escape. A slightly easier, though strenuous hand traverse (5.8) may be done. Or, you can just traverse down (class 4) and left about 50 feet to a corner. Another 20 feet of class 4 from the corner will place you on a large, sandy ledge amidst talus just below the summit.
 |  |  |  |  |
Essential Gear
This climb can be done with a 50m rope, though a 60 or 70m rope will improve your chances of linking pitches. A set of small-medium wired nuts and cams to about 3”. Hexes from about #3 to #7 are also useful. This route takes passive pro very well, in some cases much better than cams. Helmet. Crampons and ice axe, or proficiency in friction technique on snow/ice may be useful, especially late in the season as the snow slope beneath the route consolidates.Getting Down
There are no appealing retreat options on this climb. Generally, rapping straight down from wherever you are will be the most straightforward means of bailing. Once the crest of the arête (pitch 7) has been gained rapping down the west side may offer a shorter path to flat ground.To descend, head east from the summit and either follow the east slopes (class 2) down to the Bishop Pass trail, or follow the east ridge a few hundred meters to a flattish area and scramble down a third class gully to the foot of the ridge (convenient of you left gear or camped near the base of the route).