
|
|
Route |
|---|---|
|
|
36.12083°N / 115.48917°W |
|
|
Trad Climbing |
|
|
Spring, Summer, Fall, Winter |
|
|
Most of a day |
|
|
III 5.9 (5.8 R) |
|
|
5.9 (YDS) |
|
|
9 |
|
|
III |
|
|
Overview
 Community Pillar
Despite the name, the route climbs not a pillar but rather a narrow buttress on the north side of Juniper Peak (side fracing Pine Creek Canyon). This is an old school, Joe Herbst classic - a true adventure climb that follows wide cracks and chimney systsms to the top of the "pillar". Be ready for "serious" climbing at 5.8-5.9. No fixed gear anywhere - this is as pure as trad gets! Additionally, the route should carry an "R" rating (about 5.8 R to be specific) as the pro can be hard to come by in the wide cracks and the rock is quite chunky. Backing off from most of the pitches would involve leaving gear behind. All belays are on good ledges.
Getting There


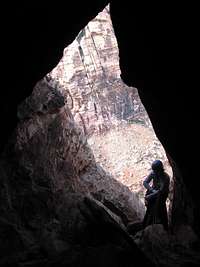
From the Pine Creek parking lot (see main page for Juniper Peak for driving directions), hike into the wash on the main trail heading for Mescalito. You'll pass several trail junctions, keep straight (toward Mescalito). You will pass a band of short, red sandstone cliffs just above you and on the right. As you near the far end of this band and are just slightly past Community Pillar (see photo), watch for a well-beaten trail heading left into the wash. Cross the wash, and pick up the same trail on the other side (this is a major trail - more than just a climbers' boot path; some signs also). As this trail turns left on the other side of the wash, pick up a climbers' trail that heads right. The trail is pretty clear and occassionally marked with cairns. The trail will take you up the gentle slope towards the base of Commnunity Pillar route. Look for the giant chockstone wedged in the giant chimney about 40 feet above ground. This is the start of the route. Scramble up to the small cave (4th class, 20 feet) formed by the chockstone.
Route Description
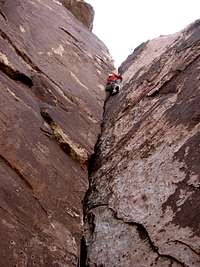


Pitch 1: 5.9, 60 feet. Climb the right side of the cave and enter the tight passageway on the right side and in the back of the cave. Grovel your way up! The going is very strenuous but secure. Note that if your chest/gut/ass size is just a touch bigger than mine, this might as well be rated 5.12+ (bring a gallon of vaseline and a thong); if you're of the "petite" frame, this won't feel harder than 5.7 (unless you're wearing a helmet and carrying a rack). The groveling will put you on the nice flat top of the giant chockstone.
Pitch 2: 5.8-5.9, 110 feet. From top of the chockstone, climb the funky crack system in the dihedral on the right. The main crack starts as a squeeze chimney but quickly closes down to an OW (dont' worry, plenty of creaky face holds keep it pretty easy). Additionally, there are two cracks inside the main crack - they take good gear but become progressively more difficult to reach as you move up. Pitch ends above a short, wide chminey on low angle terrain. Note that you can combine pitches 2 and 3 easily.
Pitch 3: low 5th class, 60 feet. Move up the low angle terrain to the base of a double chimney system.
Pitch 4: 5.6, 100 feet. Climb the easy chimney on the right. Another short squeeze section (not that tight) puts you on a good ledge.
Pitch 5: 5.8 R, 150 feet. Pull up the slight overhang on good jugs to reach the base of a wide crack (right side of belay ledge). Grovel up the crack using progressively more creaky face holds to keep things sane. You can get some questionable pro (#4.5 - 5 Camalot) in the first 20 feet. Beyond, the crack is too wide (#4 Big Bros might fit though not likely to hold much in this type of rock IMHO) to accept gear. Make peace with your Maker and run it out for the next ~60 feet till you can enter a narrow chimney. Catch your breath and make your way up the secure and widening slot. Work inwards, up, the back towards the outside (staying near the outside is more scary). Another short squeeze puts you on a cramped ledge beneath a small roof.
Pitch 6: 5.7, 100 feet. Crawl 10 feet to the left side of the ledge and make your way straight up the easy crack. Some chunky rock is encountered so don't be shy with gear. Enter another chimney at the top and belay inside.
Pitch 7: 5.7 R, 120 feet. Chimney up the the constriction at the outside of the chimney - pretty easy but runout and again some creaky holds. Pull onto the small chockstone and follow cracks to the large cave at the base of another chimney (in back of cave).
Pitch 8: 5.7, 70 feet. Walk to the back of the cave and make your way up the weird but easy chimney. Belay on chockstones at the exit from the chimney.
Pitch 9: low 5th class, 180 feet. Move left and follow low angle cracks/grooves and faces till the terrain crests and you can unrope.
Descent: This is a bit complex but not too bad. The way we did it, two ropes were mandatory (we used two 60 meter ropes).
Essential Gear

Two ropes. Helmets.
2X yellow Aliens
3X red Aliens or #0.5 Camalots
2X #0.75 - #2 Camalots
3X #3 Camalots
1X #3.5 Camalot
2X #4 Camalot
1X #4.5 Camalot
1X #5 Camalot
1X #5 Friend
No nuts were placed.
Is the gear we had. If I were to go back (which I won't), I'd bring another #5 Camalot and probably leave 1 #4 at home.
Route Overview

THE Guidebook
Larry DeAngelo's book devotes an entire chapter to this line. This is an AWSOME read for any Red Rocks climbing fan. The b&w photos are stunning and the stories range from heart wrenchingly sad to piss ass funny!! Oh, and the beta/guidebook part of the book is dead on accurate from what we've seen thus far.External Links
(1) Community Pillar beta page on mountainproject.com.(2) Community Pillar TR from fivenineclimber.com. Gives description for the 5.9 handrack variation that bypasses the 5.8 wideness mid-route.