
-
 11805 Hits
-
 88.61% Score
-
 27 Votes
|
|
Route |
|---|---|
|
|
36.10810°N / 115.4894°W |
|
|
Trad Climbing, Sport Climbing |
|
|
Spring, Fall, Winter |
|
|
A long day |
|
|
5.10c (YDS) |
|
|
A0 |
|
|
9 |
|
|
Overview/Approach

Eagle Dance is one of the Red Rocks classics. Of course that almost automatically equates to being a Urioste route. Joanne and Jorge established Eagle Dance in 1980. Along with Levitation and Rainbow Buttress, Eagle Dance makes Eagle Wall one of the premier winter wall destinations in North America. The Eagle Wall is named after a patch of varnish resembling an eagle in flight. The route Eagle Dance takes you through the neck portion of that feature.

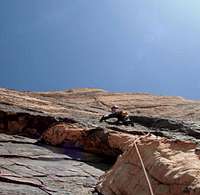

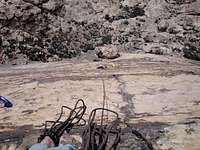
The walk off back deep in Oak Creek Canyon’s north fork is a worthwhile hike to be sure. However, due to Eagle Wall’s south facing aspect, many, including myself, chose to climb it in the heart of winter meaning the walk off descent will more than likely be chock full of snow and ice. So most prefer to rap Eagle Dance at the top of the 9th pitch versus completing the easy 10th pitch which has no rappel option. As of 2010, Eagle Dance is set up to rappel with a single 70m rope. Although it is a mixed route with some trad placement, most of the route is heavily bolted including one aid pitch. Many summit logs reflect that the 8th and 9th pitches are too technical for many parties to complete. Although the rock is of a much lesser quality on these last two pitches, I found them to be fairly straight forward. The full nine pitches to the last rappel anchor are definitely worth completing. We combined the 1st-2nd pitches, 5th-6th pitches and the 7th-8th pitches with a 70m rope.
Many complain of the approach to Eagle Wall, but it really just depends on what you are use to. If from California, you might be a bit agitated at the boulder hopping and scrambling. If from the Canadian Rockies, the approach will seem like a walk in the park. Don’t worry about running into too many parties on Eagle Wall, despite its popularity. I have climbed two routes on Eagle Wall to date and never heard or saw another party on both outings.
If you are climbing Eagle Dance in the dead of winter, which is what I recommend since it is such a south facing wall, the hours on the Red Rocks loop road will be 6:00am to 5:00pm (2010). This approach, climb and descent could easily take 12 hours or more, so I recommend you park at the parking pull off on the main road which sits directly in front of Oak Creek Canyon, just after a burro crossing sign and just after you pass the loop road exit on your right. You save very little distance by parking at the Oak Creek trailhead off of the loop road and waste gas and time getting there.
Head due west for Oak Creek Canyon on an old road. Take the right fork in front of the Wilson Pimple and hook into the traditional Oak Creek Trail which leads into the canyon.
Follow the trail into the canyon and turn right to stay out of the canyon floor and follow the trail staying low and below any turn off up the hill on your right to the Solar Slab routes. Continue, aiming for the narrow section of the canyon, then drop into the canyon floor and boulder hop up canyon for approximately 20 minutes looking to gain access to Eagle Wall by ascending the Painted Bowl descent. You will see a very tall cairn (2010) on your right above some very slick water worn rock. Smear up this short wall to the cairn and angle back right following cairns to a bushy chimney scramble on your left. Break through here and continue back right on nice slick rock until you reach a huge boulder and the west shoulder of Painted Bowl. Turn left and scramble 4th class rock up to the shoulder below Rainbow Buttress. Descend to the start of Eagle Dance which is a right facing corner more than likely marked up with chalk. This is just a few minutes' walk from the shoulder you just topped out on and to the right of a large pillar.
Route Description


1000’+/-, 9 Pitches, 5.10c, A0
1st-2nd Pitches- 215’- 5.9/ I placed little gear on these pitches as my intent was to put them away in short order. However, keep in mind these two pitches require more gear than the remaining 5.10 pitches which are heavily bolted for a mixed climb. Follow the obvious black corner to a scoop at 90’. There is no fixed belay here as the last rap station is positioned out on the face to the left. Continue up the bomber crack that forks left on great rock. Be careful placing too much gear towards the end or use double length slings to avoid rope drag when you make the ramp above and ascend it back right to the fixed comfortable belay.
3rd Pitch- 160’- 5.10a/ This is a solid and sustained 5.10a pitch by Red Rocks standards. Follow the bolt line up and right originally. But the pitch wanders back left, so use shoulder length slings on these first few bolts. Follow a seam back left and past a rappel anchor. Above this anchor you will have the option to place a few pieces in a bomber steep and dark crack as you ascend to the comfortable belay station on a significant ledge with a shallow cave to the right.
4th Pitch- 90’- 5.10c/ I thought this was a stout and worthy 5.10c pitch, there are others who see it as a bit soft. Move right and then back left while mostly face climbing up the dead vertical white sandstone face, utilizing select side pulls and crimpy features. The higher you get, the better the rock. A good varnished jug awaits right below the belay anchor. This pitch is sport bolted, 14 bolts through 90’.
5th-6th Pitches- 170’- 5.10a/ Besides the first two pitches, this is the easiest climbing of the day. Face climb through nine bolts to a belay anchor on a sloping ledge. Traverse out right and up to an obvious right facing corner on a huge block. Make the crux move of the two pitches mantling up this block to a comfortable belay below the aid ladder that traverses back left.
7th-8th Pitches- 100’- 5.10b A0/ It is best to combine these pitches due to the awkward belay stance at the end of the aid pitch and that is what I chose to do. Climb up and left to the first aid bolt. It is a bit run out to reach unless you stick in a trad piece, but that will result in more rope drag on this traverse line. I used double length slings tied off for aiders, but I believe you could swing and grab most of the aid ladder. A few of the bolts might be a bit spaced out for that technique early on. Traverse left over to a sandy seam that is a bit unnerving as you make the transfer from aid to free climbing right below the next belay station. Clip through the station and ascend four or five bolts up the suspect rock. You can add additional protection in the seam and once the hard climbing is over, you can protect with a few trad pieces until you reach the next station with a small stance. For me this was the crux pitch of the route and I lead the lower 5.10c pitch as well.
9th Pitch- 100’- 5.10c/ Quite a few summit logs complain about this pitch, but we found it fairly straight forward. The first hanger, although a spinner, appeared sounder than referenced by some and solid sporadic trad protection was available to supplement the bolts. I actually thought the last few meters of this pitch were the most technical. I also concur with others who state the 5.10b proceeding pitch was the crux of the route. No question in my mind. Just follow the seam to the last rappel anchor (comfortable ledge) on Eagle Dance.
Climbing Sequence
 |
 |
 |
 |
 |
Climbing Sequence II
 |
 |
 |