
-
 4292 Hits
-
 80.49% Score
-
 12 Votes
|
|
Route |
|---|---|
|
|
36.17000°N / 115.49083°W |
|
|
Trad Climbing |
|
|
Spring, Summer, Fall |
|
|
Most of a day |
|
|
5.8 (YDS) |
|
|
6 |
|
|
Overview/Approach
 3rd - 120’- 5.8R
Stilgar’s Wild Ride is the best route on Angel Food Wall located on the northeast face of White Rock Springs Peak in Red Rocks. Tunnel Vision (5.7) sees all the traffic but, in my opinion, ranks fourth behind Stilgar’s Wild Ridge (5.8), Pureblind Pillar (5.8-9) and Healy’s Haunted House (5.7) in terms of sustainability and interesting climbing. I took a partner up Stilgar’s Wild Ride on a Monday in March and there were six other parties on Tunnel Vision backed up just waiting with their thumbs up their respective you know what. Not a sole was willing to attempt any of the other routes. After my standard sarcastic line, “You know, there are more than six routes to climb at Red Rocks”, we took off on our “wild ride”.


Stilgar’s Wild Ride shares its first pitch with Tunnel Vision (ask to pass the others, because you will exit the route at the first belay and there is plenty of room there). The beta available in Handren’s book and via other web sites can be confusing, but to clear it up, you simply climb to the top of the first pitch of Tunnel Vision before moving right and climbing a parallel line to Tunnel Vision for the rest of the day. The 2nd pitch follows good rock in a wide and easy crack to another slung boulder if in fact you wanted to extend the first pitch to move by any log jam on Tunnel Vision. Then you enter a fantastic chimney for the grade. Two pitches worth of real solid rock, requiring true chimney technique at times. When you exit the chimney, one short traverse pitch puts you on a shared ledge with Tunnel Vision at the entrance to the tunnel. And then two really nice and long pitches follow a corner, the first of which is the crux of the climb, to the top just meters from where Tunnel Vision tops out on Angel Food Wall.
It is always best to drive to the end of the gravel road for White Rock Springs. Although you can park right away as you exit off the loop road, there is no trail leading to Angel Food Wall. And even though it looks shorter, the ravines you have to cross will cost you more time and energy than the extra distance from the proper White Rock Springs trailhead. From the trailhead, follow the trail west, turn left and follow the road south. Before you get to the wash, look on your right for a cairn and slight trail that descends the ravine to your right and continues up the opposing bank and into the main wash in front of Angel Food Wall. This is where I always suit up and leave my backpack as it saves energy on the descent allowing you to continue descending from the walk off versus re-circumventing to the base of the route. Continue up a well worn trail which leads straight up to the beginning of Tunnel Vision.
Route Description


750’+/-, 6 Pitches, 5.8
1st - 110’- 5.7+/ This is the same first pitch of Tunnel Vision except that you can extend it if you would rather. I belayed at the same ledge used for Tunnel Vision. Make the hand traverse right into the easy crack and follow it to decent ledge below a short chimney. Climb up the chimney to the next, larger, ledge with a slung block.
2nd - 120’- 5.8/ Take the right 12’ tall wide crack versus the chimney to the left which is Tunnel Vision. Pop out onto a small ledge (another slung block, this is where you could extend the first pitch). Continue up into the deep chimney via easy moves. Belay at an obvious platform and crack below what appears to be a challenging overhang. Large gear for pro.
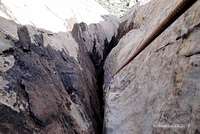
3rd - 120’- 5.8R/ Move up the steep section below the huge block. The features really show up here and surmounting the block is fairly tame for the grade. Continue up the steep chimney having to employ true chimney technique as the chimney continues to narrow. There is fixed gear off to climbers left following a whitish crack which allows for a more protected path. However, I believe the route was intended to run out the beautifully varnished chimney to the very end where you make an easy pull out onto a small ledge out left below what becomes only a crack leading up from the chimney. Good medium pro for belay.
4th - 80’- 5th/ Move up the crack and traverse up and left via several options aiming for the opening to Tunnel Vision. Belay off of a crack in the floor with large gear.
5th - 100’- 5.8/ Technically this is the most challenging pitch of the climb. Start up blank face on solid rock and place pro in the right facing corner using shoulder length slings to keep the rope out of the corner. Continue stemming up the corner utilizing solid facial features out right on better rock when they exist. Keep protecting in the corner, but climbing more and more out right. Eventually head out right below the third overhang and climb easy run out ground to a huge boulder serving as a solid belay ledge. You can see to the left through a large keyhole to the top of the tunnel pitch on tunnel vision. This pitch is a bit run out early and late.
6th - 230’- 5.8/ This final pitch is not as sustained as the previous pitch but is much longer (full 70m). Take the dramatic roof above to the right (5” allowed pro on better rock but use a double length sling to keep the rope out of the crack). This first half of the pitch is on poor rock. Surmount a whitish bulge protecting in a .5” pocket utilizing precarious “chicken heads” on the mantle. Then chimney out of the dihedral on solid rock to a bush. If you have a 70m rope, continue to right below the top of Angel Food wall and set up a 1” belay.
Climbing Sequence
 |
 |
 |
 |
Climbing Sequence II
 |
 |
 |
 |