
|
|
Route |
|---|---|
|
|
37.71450°N / 119.6354°W |
|
|
Trad Climbing |
|
|
Spring, Summer, Fall |
|
|
Half a day |
|
|
5.9 (YDS) |
|
|
II - III 5.9 |
|
|
5 |
|
|
III |
|
|
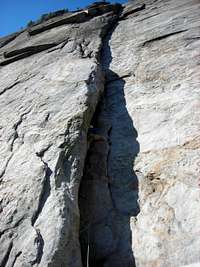
Overview

This gorgeous and compact line climbs a 500+ foot crack system low on the north face of Middle Cathedral Rock (clearly visible from the park road across the Merced River, i.e. Northside Drive). The climbing is essentially all done in cracks ranging from finger sized to (easy) chimney and all of it is on perfect, golden granite! The going is fairly sustained and incredibly enjoyable. The route is very popular so either start early or start late – or take a number and arm yourself with patience.
Getting There


The trailhead for Cathedral Spires is located just east and before the junction with El Cap Meadow, parking available on the right side of the road. Access to Gunsight and routes on Middle Cathedral Spire is located approximately halfway between Bridalveil Falls and the El Cap Meadow junction.
From the middle of the wide pull-out on the right side of the Southside Drive, hike into the woods for ~100 yards passing a climbers’ information sign. Turn right on the Valley Trail (main thoroughfare). In about 200 yards, you’ll pass the first turn off on left (marked with a post with a carabiner sign). Keep going straight. In another 350 yards, you come to the second left turn off marked by another post (which was missing its carabiner symbol). Turn left and hike uphill for about 100 yards to the foot of the Middle Cathedral Rock (another carabiner post). Turn right and meet the start of the route in about 70 feet. Look for an obvious, right facing dihedral (chain anchors visible ~110 feet up, just left of the dihedral).
Route Description
Pitch 1: 5.9, 110 feet. Climb the obvious right facing dihedral using the crack in the dihedral as well as a crack/flake on right wall. Combination of jamming, stemming and even a chimney move or two (if you wish) get you to the top. Step left onto sloping ledge with double bolt anchor.Pitch 2: 5.9, 80 feet. From belay, move left and up heading toward the obvious finger crack. Climb the sustained figner/off-finger crack (not to bad, less than vertical and with some pods for feet) to another small stance with bolts (~25 feet below an obvious roof). Either pitch 1 or 2 are the crux of the route IMHO – depends what you like less: slick stemming or sustained finger cracks.
Pitch 3: 5.8, 100 feet. Climb straight up a thin hand crack (5.8) to below the roof. Pull the easier-than-it-looks roof (~5.7) on perfect handjams and easy stemming. Wide but low angle crack above brings you to another set of belay bolts.
Pitch 4: 5.8, 100+ feet. Climb up the double crack system eventually transitioning to the right one (and the left one – whatever feels good). Fun and straightforward jamming and stemming bring you to another belay just below a flaring chimney.
Pitch 5: 5.9, 100+ feet. Climb the easy chimney (5.6-ish) to where it closes down. Move up into weird crack (not very hard though) above. Though rated 5.9 by Supertopo, this section feels easier than terrain on either pitch 1 or 2. Belay from bolts atop a large ledge at the base of a huge, right facing dihedral.
Descent: Two ropes are needed since most pitches are just over 100 feet.
Option 1: Either rap the route, reversing the pitches on a pitch-by-pitch basis (probably not a great option as there are more than likely people coming up behind you) or,
Option 2: rap down a line to the left (as you’re looking up at the route) of Frenzy. Again, all double rope raps. First rap swing left (climber’s left; right as you look down) and look for good bolts on the face. On second rappel, look for bolt anchor on a small but good stance in the dihedral on the left. Third rappel (pass intermediate fixed nuts station), look for another set of beefy bolts on the face left (climber’s left) of the huge dihedral (hard to spot but there). Fourth and final rap brings you to the ground.