Introduction
The basics of compass usage are surprisingly simple and can be mastered quickly; and once learned they will certainly become an invaluable skill for any hiker, mountaineer, back country skier or suchlike outdoor enthusiast. However, if you are anything like most of us, chances are you have been packing a compass around for years, on your outdoor adventures, without fully utilizing it. It’s probably time to change that, isn’t it? Essentially a compass is nothing more than a magnetized needle, floating in a liquid, and responding to the Earth’s magnetic field consequently revealing directions. Over time compass markers have added features which make compasses work more harmoniously with maps and also more beneficially as stand alone tools. Today, compasses can be classified as one of four types, namely: fixed-dial (the type that you find on a key chain, or that come out of a gum ball machine), floating dial (the needle is an integrated part of the degree dial), cruiser (professional grade instrument used by foresters), and orienteering. For hiking, mountaineering, back country skiing, canoeing, hunting or the like, the orienteering type is the most sensible being accurate to within 2 degrees, not requiring a separate protractor nor map orientation, and being highly affordable. Hence forth, this article focuses solely on the orienteering compass.
Orienteering Compass Parts
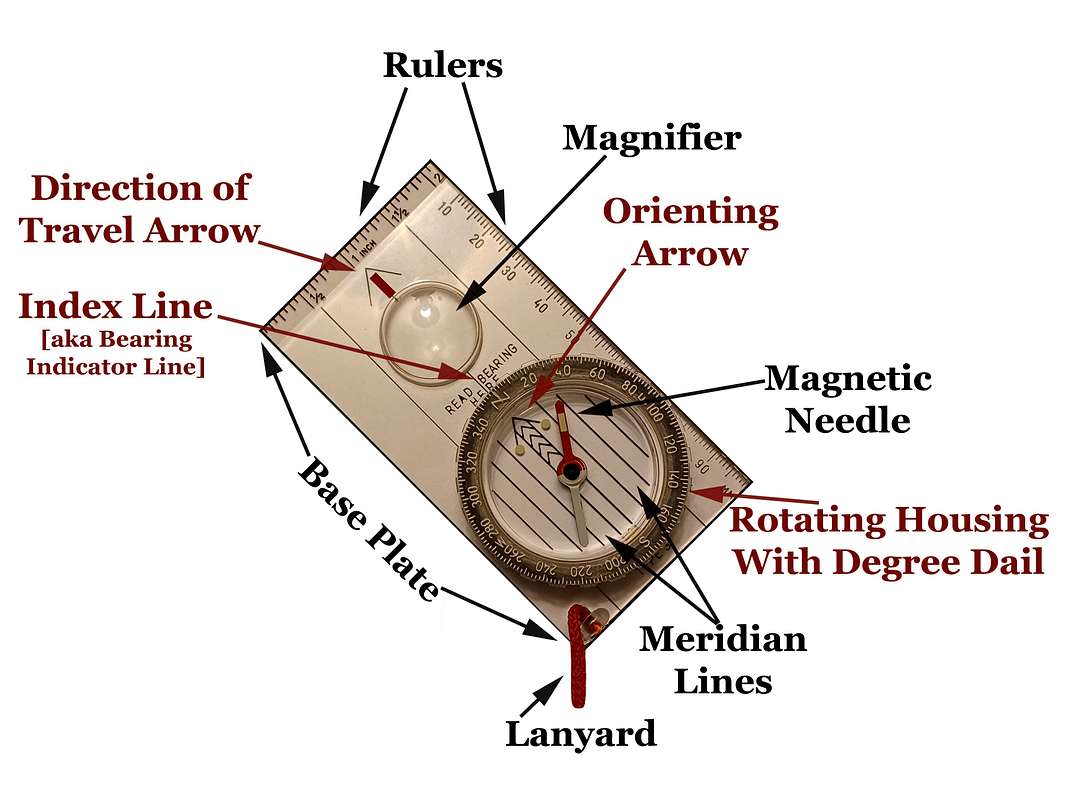
Let’s begin our introduction to compasses by taking a look at a standard, modern day, orienteering compass, and identifying its parts. As figure 1 shows an orienteering compass typically consists of three main parts: a magnetic needle, a revolving compass housing, and a transparent base plate. The magnetic needles north end is painted red and its south end white. The housing is marked with the four cardinal points of north, east, south, and west and further divided into 2 degree graduations indicating the full 360 degrees of a circle. The bottom of the rotating housing is marked with an orienting arrow, and meridian lines. The base plate is marked with a ruler (and/or USGS map scales), an index line (bearing reading line), as well as a direction of travel arrow.
![Figure 1 of Article Compass Basics: An Introduction to Orientation and Navigation]() Figure 1: The Parts of an Orienteering Compass.
Figure 1: The Parts of an Orienteering Compass.Directions and Degrees
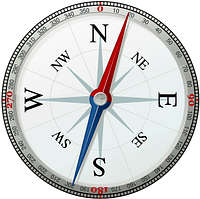
![Figure 2 of Article Compass Basics: An Introduction to Orientation and Navigation]() Figure 2: The Compass Rose.
Figure 2: The Compass Rose.Before beginning to use a compass one should familiarize himself with basic directions and their degree readings. The four cardinal points are all 90 degrees apart, with East being at 90 degrees, South at 180 degrees, West at 270 degrees, and North at 360 degrees (or zero degrees). Identifying the degrees by 45 degree increments gives us the eight principal points of direction namely North (O or 360 degrees), North East (45 degrees), East (90 degrees), South East (135 degrees), South (180 degrees), South West (225 degrees), West (270 degrees), and North West (315 degrees). Memorizing the eight principal points can help one to instinctively associate directions and bearings, and help eliminate errors when taking bears (bearings are explained in the next section). For example if you are told that a landmark is SE of your location, you know that is 135 degrees, or conversely if you know you need to go West but you calculate the bears as 90 degrees you will instinctively realize the bearing is wrong, as West is at 270 degrees (turn your compass around, you have committed the classic 180 degree error). You may have heard directions given in terms like NNW or ESE, those types of directions are a result of distinguishing degrees in 22.5 degree increments resulting in the 16 traditional compass directions. Typically the eight principal points are sufficient to know. See figure 2.
Bearings
One of the most important uses of a compass is taking, and following a bearing. A bearing is the direction from one spot to another, measured in degrees, from the reference line of north; in other words it’s one of the 360 degrees of the compass rose. To take a bearing hold the compass in front of you with the direction of travel arrow pointing at the object of interest. Hold the compass level and steady, and rotate the housing dial, until the orienting arrow lines up with the red end (north end) of the magnetic needle, all the while keeping the direction of travel arrow pointed at the object. Read the number indicated at the index line, and that is your bearing. Now to follow that bearing to the object, let’s consider an example. Say you want to travel to a large rock outcropping on the horizon, which is currently visible to you, but which may leave your field of vision when you walk into a dip, or when pending clouds come in or the sun sets. Let’s say your bearing on the outcropping measured 315 degrees (or NW). Assuming you still have the direction of travel arrow pointing at the rock outcropping, and have not changed the 315 degree bearing setting on the dial, walk forward keeping the magnetic needle over the orienting arrow (by rotating your body, and not the dial), and the straight line course (as pointed out by the direction of travel arrow), will lead you to the rock outcropping. En route, when the rock outcropping leaves you line of sight pick out an intermediate landmark along the bearing, so you don’t have to constantly look down at your compass. Walk to the intermediate landmark, and repeat with another landmark until you reach your destination. Once you arrive at the rock outcropping, what bearing do you use to return to where you came from? Actually you don’t need any other bearing besides the 315 degrees already set on your compass. To return, just point the direction of travel arrow at you, instead of forward, and then rotate your body until the orienting arrow lines up with the red end (north end) of the magnetic needle, and then walk straight ahead while keeping the magnetic needle over the orienteering arrow (just as you did in going to the rock outcropping). That is the easy way to backtrack, of course you could also calculate your back bearing by subtracting 180 from your forward bearing of 315, and set the 135 degree (SE) difference at the compasses index line and then use the same body rotating method mention earlier, only this time you’d have the direction of travel arrow pointing your way. Try this. Take your compass to an empty parking lot or field and mark a spot. While standing at the spot set your compass to any bearing between 0 and 120 degrees, pick a landmark along the direction of travel and take 15 steps toward it. Stop, add 120 degrees to your initial bearing, pick out a landmark along that bearing and walk another 15 steps toward it, stop and once again increase your bearing by 120, pick out a third landmark and again walk 15 steps. Notice you have arrived back at your original starting location. Let’s return to the example above where we took a 315 degree (or NW) bearing on a rock outcropping, and lets suppose that enroute to the outcropping we encounter an obstacle which we must go around thus forcing us to deviate from our straight line course. If you are lucky enough to be able to pick out a landmark that’s along the bearing, and also on the other side of the obstacle, you have nothing to worry about, just go around the obstacle and get back on course by reaching the landmark and aligning the red end of the magnetic needle over the orienteering arrow, and continue walking.
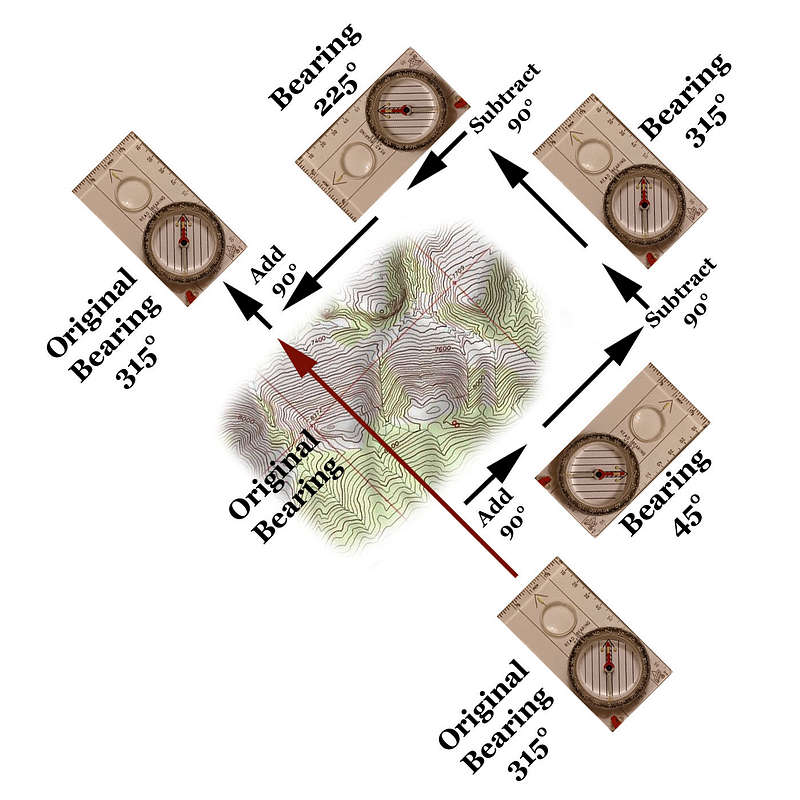
![Figure 3 of Article Compass Basics: An Introduction to Orientation and Navigation]() Figure 3: Use Right Angles to Navigate an Obstacle.
Figure 3: Use Right Angles to Navigate an Obstacle.If you can’t see a landmark along your course, there are a couple of other methods you can use to get around the obstacle and get back on your original course. One method is to have a member of your party navigate the obstacle, and then treat him like a landmark. One he has cleared the obstacle talk him into position along your original bearing. Also have him take a back bearing on you to confirm he is in indeed back on course. He can do this by pointing the direction of travel arrow of his compass at himself and then turning his body so as to align the red end of the magnetic needle over the orienteering arrow, and he should notice that you are along the bearing, if not he needs to move left or right. If the obstacle is too large for the previously described method, or you are on a solo trip, you can use right-angles to maneuver the obstacle. To do this turn 90 degrees and walk across the front of the obstacle while counting your steps. To make a 90 degree turn without changing the bearing setting on your compass, simply turn your body until the red end (north end) of the magnetic needle points at the West marking (to turn right) or East (to turn left), as opposed to the normal North marking. Once you’re past the front of the obstacle turn 90 degrees again, by rotating your body until the red end of the magnetic needle is over the orienting arrow, and walk past the obstacle. Once past the obstacle, turn 90 degrees for a third time (by pointing the red end of the magnetic need at the opposite marking or your first 90 degree turn), and walk the same number of steps you counted to get past the front of the obstacle. Once the steps are up, turn your body to align the magnetic needle back over the orienteering arrow (thus turning 90 degrees for a fourth and final time), and you will be back on course. See figure 3.
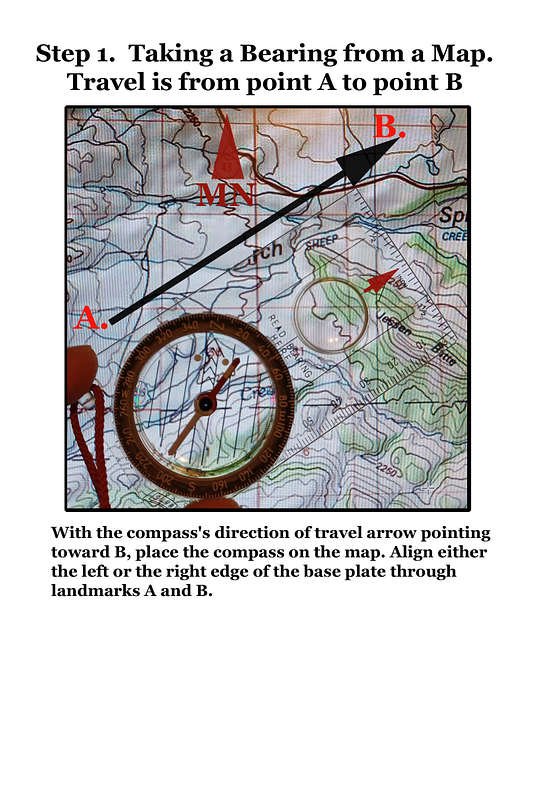
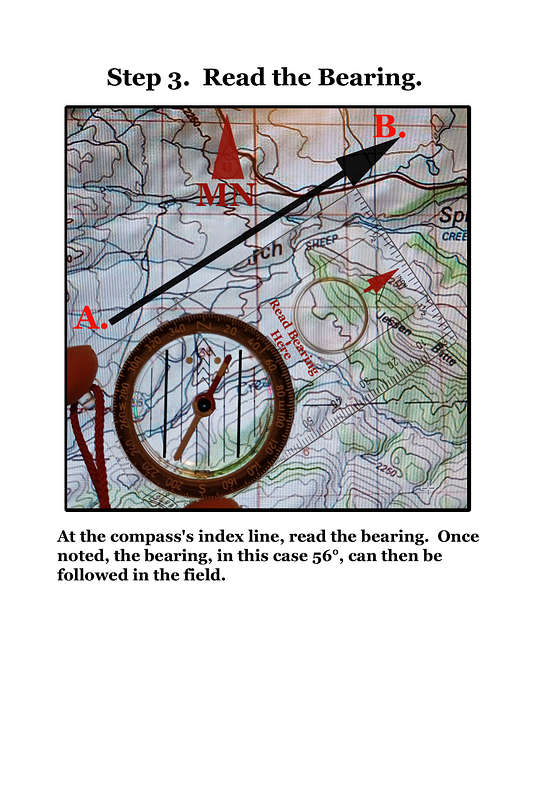
Bearings can also be calculated from a topographic map, and then used in the field. Assume you know you are at landmark A in the field, and you want to travel to landmark B, but you can’t see it. If you have a topographic map and you can identify both landmarks on the map, you can use you compass with the map to get a bearing thus enabling you to travel accurately to landmark B. On the map align either the left or the right edge of the base plate through landmarks A and B with the direction of travel arrow pointing toward B. If the base plate edge isn’t long enough to reach both landmarks simply extend it with any straight edge (for example a piece of paper), or draw a straight line between the points and align the compass edge with the line. Without moving the base plate turn the compass housing until the orienteering arrow points to the top of the map (remember that north is at the top of the map). If you are lucky enough to have one of the maps north/south grid lines visible under the compass housing you can align the meridian lines on you compass with the maps north/south grid line as you turn the housing until the orienteering arrow points to the top of the map. Now, read the bearing at the compasses index line, and follow the bearing in the field! See Figure 4A-C. A word of caution, map bearings and field bearings can differ in the USA by as much as 30 degrees east and 20 degrees west. This difference and how to deal with it is explained in the next section below on declination. Figure 4A-C, has a map with magnetic north lines, rather than true meridian lines, and so declination is not a factor.
Figure 4
![Figure 4A of Article Compass Basics: An Introduction to Orientation and Navigation]() Figure 4A: Taking Bearing from a Map. Figure 4A: Taking Bearing from a Map. |
![Figure 4B of Article Compass Basics: An Introduction to Orientation and Navigation]() Figure 4B: Orient the Housing. Figure 4B: Orient the Housing. |
![Figure 4C of Article Compass Basics: An Introduction to Orientation and Navigation]() Figure 4C: Read the Bearing. Figure 4C: Read the Bearing. |
Declination
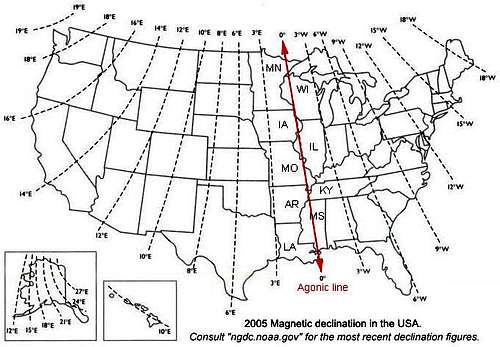
A compass needle is influenced by the earth’s magnetic field which causes it to line up with magnetic north. Maps, on the other hand, are typically oriented to the North Pole (which is truth north). The difference between these two norths is called declination, and must be accounted for when using your compass in conjunction with a map. There are places where the two norths are the same, these places fall on the so-called agonic line, see figure 5. In areas to the left of the agonic line the magnetic compass needle points a certain number of degrees to the east of true north, and on the other side of the line the magnetic needle points a certain number of degrees to the west of true north (in other words the magnetic needle points toward the agonic line). We say areas to the left of the line have east declination and those to the right have west declination. Figure 5 shows the 2005 declinations in the USA. Note, declination numbers change over time as magnetic poles shift. Thus said it’s important to know how old the declination information on your map is before heading out into the field. Current declinations can be had at the NGDC website. The website also tells you by how much declination is changing per year. Note that easterly declinations are changing by a west amount (minutes), and westerly declinations are changing by an east amount, thus over time magnetic north is approaching true north. If you know by how many minutes on average the declination of your area is changing per year you can use that to update an out of date map figure. For example if you have a map from 1960, and you learn that the declination is changing by 0° 7' W/year, multiple that number by the elapsed years, and divide the result by 60 to get the degree change in declination. For example, (2007-1960) * 7 = 329; since there are 60 minutes in a degree 329/60 = 5.48 degrees or about 5.5 degrees. So if declination on the 1960 map is 15 degrees east, the 2007 value is 15-5.5 or 9.5 degrees east.
![Figure 5 of Article Compass Basics: An Introduction to Orientation and Navigation]() Figure 5: 2005 USA Declination Map.
Figure 5: 2005 USA Declination Map.If you are simply taking and following bearings in the field, you can completely ignore declination. Likewise if you are only calculating and working with bearings on a map declination is unimportant. However, when you calculate map bearings from a map drawn to true north and then use the bearings in the field, you may be thrown completely off course if you don’t adjusting them for the declination of the area. Consider this, say you are in Rhode Island where the declination is 15 degrees west, and lets say your map bearing is 0 degrees (or directly north). You set your compass dial to zero, turn your body to align the magnetic needle over the orienteering arrow, and take off in the direction of the direction of travel arrow walking toward an intermediate landmark, without doing any bearing adjusts for declination. In doing so, for each 60 feet you travel, you will be 15 feet to the west of your course, thus after traveling one mile you will be one-quarter mile off course! Fortunately, it a simple matter of adding to or subtracting from a map bearing to compensate for declination. Also, modern compass are available which can be set to automatically adjust for declination if you don’t want to bother with the math, if so equipped consult your compass booklet to learn how to set it. Here is all you need to remember when converting a map bearing to a magnetic bearing for use in the field: If your declination is west (you are on the right side of the agonic line, see figure 5), ADD the number of degrees of declination to your map bearings, and if your declination is east (you are on the left side of the agonic line, see figure 5) SUBTRACT the number of degrees of declination from your map bearing. Of course if you are plotting a field bearing on to a map do the opposite: that is ADD east declination to a magnetic (field) bearing and SUBTRACT west declination from a magnetic (field) bearing. Let’s say you are hiking in Utah where the declination is 13 degrees east. You take a bearing from you map and learn that your destination lays SE at 135 degrees. To use the bearing in the field you would subtract 13 (the declination) from 135 resulting in 122 and simply set your compass dial at 122 degrees and then follow that bearing to your destination. To get this clear in your mind, try this. Pretend your declination is 20 degrees east (your in Alaska). That means the needle on your compass is pointing 20 degrees east of true north. You need to travel due north (0 or 360 degrees), so set your compass to 360, hold it in front of you and turn your body until the magnetic needle aligns with the orienteering arrow. Think to yourself "my compass is pointing off by 20 degrees to the east, my right, so to go true north I really need to point my direction of travel arrow 20 degrees to my left". So rotate you body counterclockwise until the magnetic needle lines up with the 20 degree marking on the compass housing dial. Now the direction of travel arrow is pointing to true north. Knowing where true north lies, now follow the declination adjustment rule by subtracting 20 east declination degrees from your 360 degree bearing and set your compass dial to 340 degrees. Again, turn your body until the magnetic needle aligns with the orienteering arrow, and notice the direction of travel arrow is now pointing to true north! So that is why you subtract east declination. To further cement this concept into your mind repeat this exercise, but use a pretend west declination instead. In field orienteering it’s all about getting the direction of travel arrow pointing in the correct direction. Some compasses have a declination scale marked within the housing. If you compass is so marked, you don’t need to adjust a map bearing before using it in the field, instead you just need to remember to align the magnetic needle with the declination marking rather than the orienteering arrow, and then follow the direction of travel arrow as usual. When you take a field bearing and want to plot it on a map, take it with the magnetic needle pointing to the declination figure rather than the orienting arrow, and then you can use the bearing on the map without adjustment. A map trick used to avoid converting a map bearing to a field bearing is to draw magnetic north lines on the map based off the diagram at the bottom center of all USGS maps. With magnetic north/south lines drawn you can then align the meridian lines of your compass dial with the hand draw lines and the bearings indicated at the index line are field ready bearings. Figure 4A-c above has magnetic north lines drawn on it, and thus no adjustment were needed to use the map bearing in the field. A compass trick used to avoid declination adjustments is to place a piece of scotch tape over the compass dial starting at the east declination and ending at the value of declination plus 180. Map bearings can then be set on the compass dial as read from the map, but the magnetic needle now needs to be aligned with the tape line, rather than the orienteering arrow. Note if the declination is west, place the tape strip at 360 minus declination to 360 minus declination minus 180. The mechanical declination adjustment on so-enabled compasses uses this very procedure.
Compass Dip
As learned in the declination section, magnetic needles are affected by the horizontal direction of the Earth’s magnetic field. Bearing that in mind you might not find it surprising to learn that they are also affected by the vertical pull as well. You see, the closer you get to the magnetic north pole (located near Bathurst Island in Northern Canada in 2007), the more the north-seeking end of the needle is pulled downward. Whereas, at the south magnetic pole (located just off the coast of Wilkes Land, Antarctica in 2007) the north-seeking end of the needle is deflected upward. Only at the equator is the needle unaffected by vertical magnetic forces. To overcome magnetic dip manufacturers must design compasses that have the needle balanced for the geographic area in which they will be used. Thus, a compass built for use in North America, will not work in South America. The North American compass will have the pivot point the needle rests on slightly into the north half of the needle thus offsetting the downward pull. When the compass is taken to South America, the imbalance will work in the same direction as the vertical pull and the needle could very well rub against the roof of the housing making the compass unusable. In other words you will need a compasses manufactured for use in the part of the world you intend to use it. As a result of these magnetic variances, the compass industry has divided the earth into 5 "zones", which you can learn more about at thecompassstore.com. Compasses with so-called global needles are available, and they can be used accurately in any part of the world. Global needles are also useful if you tend to take bearings while moving making it difficult to hold the compass level. Global needle compasses can handle tilts up to 20 degrees.
Triangulation
![Figure 6 of Article Compass Basics: An Introduction to Orientation and Navigation]() Figure 6: Triangulating a Position On a Map
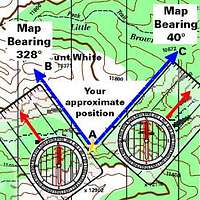
Figure 6: Triangulating a Position On a MapIt was mentioned early that one of the most important uses of a compass is for taking and following bearings. Equally important is using a compass to pinpoint your exact location on a topographic map. If you can look at a map and determine a line you are on, such as a road, hiking trail, or mountain ridge, you can pinpoint your location with only one other piece of information. Say you are on a hiking trail, and to the west you can identify a mountain peak. You take a bearing on the peak and learn that is at 280 degrees. Next you adjust it for, say, the 10 degree easterly declination of the area arriving at a map bearing of 290 degrees - remember to convert a field bearing to a map bearing do the opposite conversion of a map bearing to a field bearing by adding east declination and subtracting west declination. Next, with the adjusted bearing set on the compass dial, find the landmark on the map, and point the direction of travel arrow in the direction of the landmark with the edge of the base plate on the landmark. Keeping the edge of the base plate on the landmark, rotate the base plate (not the dial) until the meridian lines of the compass align with the north/south lines of the map. Now plot this line back to the position line (in this case the hiking trail) you are known to be on, and where the line crosses the position line is your exact location. This method is known as free triangulation. If you are not on a position line, you will need to identify two landmarks in both the field and on the map to pinpoint your location. This method is known as triangulation. First take a bearing on landmark A, and adjust it to a map bearing and set that on the compass dial. Follow the above described process to orient the compass on the map by passing the base plate edge over the landmark and rotating the base plate (not the dial) until the meridian lines of the compass parallel the north/south lines on the map, and draw a line on the map along the base plate edge. Repeat the process with the second landmark and the intersection of the two lines is your exact location. See Figure 6. Another use for triangulation is in being able to return to an exact location. Say you are hiking and decide to stash a water bottle part way along the trail so you can drink it on your return trip and avoid carrying it for the whole hike. You take a look around, and stash the water bottle behind a rock. Next you pick out two permanent landmarks which are preferably about 90 degrees apart, and take a bearing on each. Make a note of each landmark and it’s bearing, then when you return to the general area all you need to do is position yourself where the two bearings match and you will find you hidden water bottle.
Navigation Tips and Tricks
Understanding Maps: To be truly strong at orienteering and navigation, one must become very familiar with maps, and the abundance of information they contain. Unfortunately, it would require a separate article to fairly explain maps, but it’s still worth looking at some map basics here. Know the scale of your map. All maps list their scales in the margin. A scale of 1:250,000 means that 1 unit (be it inches, feet, meters, or whatever) on the map is the equivalent of 250,000 units in the real world. Most USGS maps are 1:24,000, (also known as 7.5 minute maps) where 1 inch equals 2,000 feet (3/8 mile) in other words 2.64 inches equals one mile, thus a 7.5 minute USGS map has a north-south extent of about 9 miles. Clearly, the smaller the scale, the more detail is revealed. Maps are drawn based on latitude and longitude lines. Latitude lines run east and west (that is, parallel to the equator) and measure the distance in degrees north or south from the equator (0° latitude), and are often called parallels. Longitude lines run north and south intersecting at the north and south poles. Longitude lines measure the distance in degrees east or west from the prime meridian that runs through Greenwich, England, and are often called meridians. Latitude and longitude are measured in degrees, minutes and seconds. One degree equals sixty minutes, and one minute equals sixty seconds. The latitude and longitude grid allows us to calculate an exact point using these lines as X axis and Y axis coordinates. Another way to identify a point on a map is with the Universal Transverse Mercator (UTM) coordinate system, which similar to latitude and longitude also uses a north/south and east/west grid. On the USGS maps you will see markings for both grids. The UTM grid is more precise than latitude/longitude because USGS maps identify UTM scales every thousand meters compared to only every 2.5 minutes (about 3500 to 5000 meters) for latitude and longitude. Working with one meter number, can be less confusing than working with three degrees, minutes, and seconds values. Trip Planning and Pseudo Maps: Before setting out on a back country trip into unfamiliar territory, it is wise to carefully study a map of the area, and make some notes. Note such things as landmarks, bearings between landmarks, distances and elevations. Notes of this type can save valuable time in the field, and will help you both stay orientated as well as assist in measuring your progress. I refer to such notes as a pseudo map. There is a tool on the Internet that I like to use to make my pseudo maps called ACME Mapper 2.0. This tool allows you to enter a latitude/longitude and it returns a topographic map, which can be zoomed to various scales. It also allows you to mark spots on the map, and then it gives you the distance between marks as well as bearings to them. I find it faster than measuring distances with a ruler on the map, and a very precise way to calculate map bearings. Even with a pseudo map at hand sometimes it can be useful to track distances as you are hiking. A trick to do so is to count your double steps. Typically one double step (that is just counting the steps of one of your feet, while ignoring the other) is about five feet. So, a thousand double steps is about one mile. Also, if you keep an eye on your watch, and time yourself over known distances, you soon get an idea of how long it takes you to cover distances over various terrains. Altimeter: An altimeter can be a useful companion to your topographic map and compass, assuming one knows how to calibrate it. As you hike the altimeter approximates your current altitude (based on atmospheric pressure), and you can use that information as a "Z" coordinate, if you will, to determine your location on a map. Knowing your general location on the map, if you find the contour line of your current elevation you know your position. Aiming Off: When navigating to a target, if you realize that it could be easily missed if you get slightly off course one way, whereas missing the target the opposite way wouldn’t be a problem, you should use a trick known as aiming off. Consider this example; you leave your car at the north most end of a road that runs south to north. Leaving your car you walk SW at 240 degrees, making your literal return bearing 60 degrees. Returning you worry you will miss your car, if you get off course a bit and end up to far north, where there is no road. On the other hand, if you were to miss your car by being to the south you would cross the road, and you could just follow it back to the car. To avoid going to far north, you intentionally aim off so you will end up south of your car, thus guaranteeing you encounter the road. To do so, in this case, you might follow a return bearing of 70 degrees. Awareness: When hiking, or mountain climbing, in an area unfamiliar to you, make use of a topographic map and compass to learn the area. As you spot a landmark, such as a mountain peak, take a field bearing on it, and convert it to a map bearing. Starting at your current location pinpointed on the map (see the section on triangulation), plot the converted bearing on the map, and see which mountain it passes through, and then read the name of the unfamiliar mountain from the map. That quickly and that easily, you will learn the area, and that knowledge will help you stay oriented and lessens chances of becoming lost. Reverse Bearing: When hiking in and back out from somewhere one should know who to calculate a reverse (or opposite) bearing. For example, if you walked south following a 177 degree bearing, and turned around to return to your starting point what bearing would lead you back? Simply look at your compass and the straight line across the dial (the number on the opposite side) is the return bearing. The easiest way to calculate the opposite bearing is to add 180 degrees to the original bearing when it was less than or equal to 180 degrees, and to subtract 180 when the orginal bear was greater than 180. So for our example, the return bearing for the orginal bearing of 177 is 177 + 180 = 357 degrees (or almost due north). One can also leave his compass set to the orginal bearing and turn the compass 180 degrees by lining up the white end of the magnetic needle with the orienting arrow, as opposed to the normal red end of the magnetic needle. Another orientation trick, which I learned as a child from reading Louis L'Amour books, is to occasionally turn around and have a good look at the back trail, because a trail looks difference in the reverse direction. It’s also beneficial to pay attention to wind directions. For example some areas are known to have winds that blow from the west. If you are hiking in such an area, even if the wind isn’t blowing, you can often observe the results such as pine trees being leaner on their west side. We have all heard the saying that moss grows on the north side of trees. Why not verify if that is true in your area? If your trail crosses, or parallels a stream or river, pay attention to the direction it flows. Does it flow east, or northwest? Being aware, will reduce lost time, and disorientation, and make your outdoor experiences more rewarding. Wristwatch as Compass: A watch with an hour hand can be used as a makeshift compass. If is set to the correct time, simply point the hour hand at the sun, and in that position, the point halfway between the current hour and the 12, is south. In a vice versa way a compass can act as a watch. For example knowing the sun is in the east at 6:00 am, southeast at 9:00 am, south at noon, southwest at 3pm, and west at 6pm, you can take a bearing on the sun, and get a good idea of the current time.
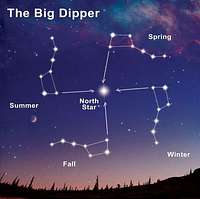
![Figure 7 of Article Compass Basics: An Introduction to Orientation and Navigation]() Figure 7: Finding the North Star.
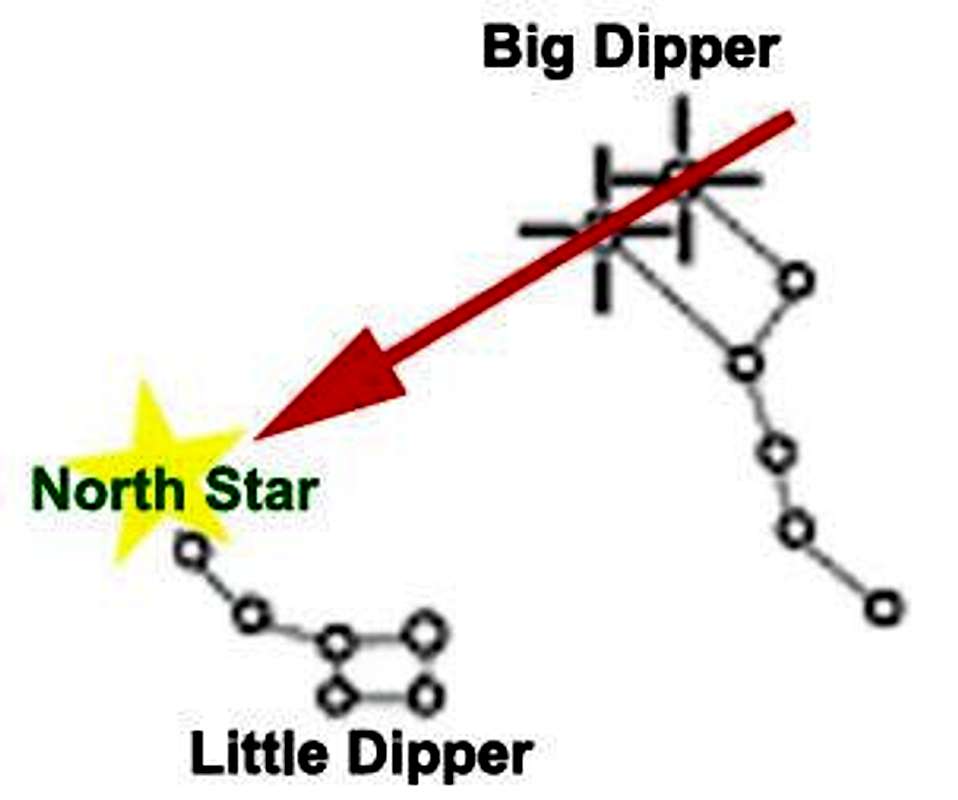
Figure 7: Finding the North Star.The North Star: In the Northern Hemisphere, Polaris (the North Star) is visible all year round. To find it, locate the Big Dipper and follow the two pointer stars at the end of the cup to the tail of the Little Dipper, Polaris is the last star on its tail, see Figure 7. Roughly the distance to the North Star from the Big Dipper is 5.5 times the distance between the two pointer stars forming the non-handle side of the cup. The Big Dipper rotates around Polaris. The North Star can be used to measure declination. At night, place two sticks in the ground lined up with the North Star, with the taller one to the north of the shorter. Set your compass dial at 360, and point the direction of travel arrow north at the longer stick. Look at the compass needle, and note the difference between its bearing and true north, the difference is declination. In the Northern Hemisphere, latitude is obtained by measuring the altitude of Polaris. At the Equator (0° of latitude) the North Star is on the horizon, making an angle or "altitude" of 0 degrees. Whereas at the North Pole (90° of latitude), Polaris is directly overhead making an angle or "altitude" of 90 degrees. Likewise, at 30°N the star is 30 degrees above the horizon, and so on. In other words, in the Northern Hemisphere, if you know your latitude, you can use that as an angle from the horizon to locate the North Star. To measure your latitude, point a stick at the North Star, then measure the angle the stick makes from a level horizon. Note, some compasses, include an inclination gauge (not covered in this article) by which you can easily measure the angle. Determine East and West Via a Shadow: To determine east and west, place a stick in the ground so you can see its shadow (alternatively, you can use the shadow of any fixed object). Ensure the shadow is cast on a level, brush-free spot. Mark the tip of the shadow with a pebble or scratch in the dirt; try to make the mark as small as possible so as to pinpoint the shadow's tip. Wait 10-15 minutes, as the shadow moves from west to east (the opposite side the sun moves on, ie the sun moves from the east to the west -- but both the shadow and the sun move in a clockwise direction). Mark the new position of the shadow's tip with another small object or scratch. Connect the two shadow tip markings with a straight line and you have an east-to-west line approximation. Midday readings give more accurate approximations. To get an exact east-to-west line join the marks from two shadows of equal length. In either the approximate or the exact case stand with the first mark on your left, and the second on your right, and you will be facing toward true north. Pay attention to your own shadow during the course of the day while on a long walk - if you are moving north your shadow will be over your left shoulder at sunrise and over your right shoulder at sunset. You might be the only object to throw a shadow when walking in barren terrain like a desert. Global Positioning System: The U.S. Department of Defense has 24 satellites orbiting the earth, which give off signals that handheld GPS devices can pick up and translate into a user’s position and altitude to within roughly 50 feet. These devices are useful, but are not a replacement for knowledge of the basics of orientation and navigation with a compass and map. Also always remember that a GPS unit is a delicate, battery powered device that can fail or be easily damaged. Never rely solely on, nor allow yourself to become dependent on such a piece of equipment. The tops of pine trees tend to dip to the north. If you do lose your way, keep a cool head - a cool head can accomplish much, a rattle one nothing. Note that lost people tend to wander in circles; as such above all don’t run around aimlessly. First stop, relax, and think, then look around for a familiar landmark, or climb a tree or a hill to try to find one. Estimate the time you have been traveling, and the remaining about of daylight - this will help you figure out how far you have traveled. If possible consult your compass, if not possible pay attention to sunset or sunrise which will indicate east and west, or use a wristwatch as a compass. Consider blazing your way by leaving small marks indicating the direction you have taken such as arrows in the dirt or snow, peeled bark on a tree, toilet paper on a tree branch, and/or rock cairns. If it gets dark it may be best to stay put, as such build a rousing fire, making it easier for others to find you and allowing you to stay warm. At night find the North Star and mark that direction on the ground to guide you come daylight.
Other Outdoor Tips and Tricks
![Estimate Remaining Daylight]() Figure 8: Estimating Remaining Daylight Hours.
Figure 8: Estimating Remaining Daylight Hours.
Estimating Remaining Daylight: If you can see the sun and the horizon you can estimate the remaining daylight time. To do so, hold your hand up so it appears that your pointer finger is just touch the bottom of the sun. Then count the number of finger widths to the horizon. Each finger is worth about 15 minutes of time. For example, if you can fit eight fingers (two hands without thumbs) between the bottom of the sun and the top of the horizon there is about two hours of daylight remaining. Note that this trick doesn't really work when one is near either of the poles, as the sun hovers over the horizon longer at those locations. If thirsty and can’t find water, suck on a pebble or a button, it will relieve the dryness. Make a sundial from a piece of stick stuck in the ground where the sun’s rays can cast a shadow from the stick onto the ground. Refer to a watch to mark the hours, then when the watch goes missing or the owners leaves camp, or the batteries die, you can use the sundial to tell time. To prevent sickness, keep your feet and inner cloths dry, your bowels open, and your head cool. A warm head makes you sweat causing you to remove your hat, and then leaving you open to a cold.
The surest way to stay both fit and healthy is to simple make a point of walking each and every day. Consider this statement by Soren Kierkegaard a 19th-century Danish philosopher, "Above all, do not lose your desire to walk. Every day I walk myself into a state of well-being and walk away from every illness." To dry the inside of wet boots, heat peddles in a frying pan or kettle, or in the fire and place them in the boots, shaking the boots now and then. Reliable Weather Indicators "Red at night, campers delight; red in morning campers warning." A red sunset indicates clear weather, whereas a red sunrise indicates rain and wind. Pale Yellow sky at sunset indicates wet weather. "Rain before seven quits before eleven." In other words morning rain often makes clear afternoons. Slow rain tends to last, but sudden rain is typically short in duration. Heavy dew indicates dry weather to follow. Daytime temperatures drop about five degrees Fahrenheit per 1,000 feet of elevation gain.
Seasons
![As the Earth moves around the sun the angle of our view of the Big Dipper changes and thus is different for each season]() Big Dipper by Seasons
Big Dipper by SeasonsIn the Northern Sky the Big Dipper is one of the most familiar asterisms of the constellation Ursa Major (the Great Bear). As the Earth moves around the sun the angle of our view of the Big Dipper changes and thus is different for each season.
Summary
In summary, a compass is an invaluable tool that every outdoors enthusiast should understand how to use. Two of its main uses are to measure bearings, and to pinpoint locations. When working with bearings one needs to be aware of declination and how that causes map bearings and magnetic (field) bearings to differ. Remember it’s simply a matter of subtracting an east declination from a map bearing to convert it to a magnetic (field) bearing, and a matter of adding a west declination. Of course, when converting a magnetic bearing to a map bearing apply the opposite of the rule. Remember, the magnetic needle of a compass is for use in the field, and is never used on a map. Also recall that the top of a map is always north, so when taking map bearings always turn the compass housing to point the orienting arrow at the top of the map. Of course a compass isn’t the only thing that will help you stay oriented in the back country. Always study a map before entering unfamiliar territory. In the field always carry a map and pay attention to the surroundings, as well as make use of natural direction indicators, like shadows, stars, wind, and landmarks.
About the Author
![]() The Author
The AuthorI considered myself to be an outdoors enthusiast. Very few activities provide me with as much joy as hiking, camping, skiing, mountain biking, rock climbing, ice climbing and exploring.
This passion began in my childhood. At the young age of 10 years, I climbed Chief Mountain in Glacier Park, MT, and not long after I back-packed the 26 mile from the USA/Canada border over Stoney Indian Pass to Goat Haunt.
Over the years, I have crossed paths with cougars, been charged by moose, and spooked by grizzly bears. I have stood on the Great Wall of China, strolled beaches in Australia, enjoyed winters in Canada, and lived in Asia. I have cycled the Golden Triangle from Banff, Alberta and the full C&O Canal Trail from Washington, DC. I have rock climbed at Stone Hill Montana, ice climbed in Ouray Colorado, scaled Denali in Alaska, explored the Copper Canyons of Mexico, skied the Trinity Chutes of Mt. Shasta California, and white-water rafted on the Gauley River of West Virginia. I have climbed to the highest point of all 50 states.
I don't like GPS and never use any type of electronic navigator.
Enjoyed this Article?
If you enjoyed this article, perhaps you would like to read another article by this same author? Read, The Effort Scale of Highpointing the Fifty US States.
I have published a book about my journey to the highest point of every U.S. state. The book, All Fifty: My Journey to the Highest Point of Every U.S. State, is available on Amazon.com.


Comments
Post a Comment