
-
 1089 Hits
-
 74.01% Score
-
 4 Votes
|
|
Route |
|---|---|
|
|
38.10079°N / 119.45213°W |
|
|
Trad Climbing |
|
|
Summer |
|
|
A long day |
|
|
5.10 (YDS) |
|
|
4 |
|
|
III |
|
|
Overview/Approach
Tired of being a climbing tourist? In California it becomes more and more difficult to find a private wall/mountain with quality established routes that you might have to yourself on a great weather weekend in the Sierra summer. Juggernaut in 2020 fits that bill but probably not for long. Its two high quality moderates, Crimson Gem, 5.10-, and Dihedral Route, 5.10, are two routes that will rival any at their grade in the Eastern Sierra. Although only five and four pitches long respectively, they make for a great two-day pairing (or for the ambitious, competent and efficient partners, one full day). We left our camp with approximately a one-hour approach at 7am each day and was back to the base of these routes by noon each day. Both routes are easy to follow and straight forward. Although Crimson Gem seems to get more accolades as of 2020, my favorite pitch of either route was the 3rd pitch on the Dihedral route, a finger crack corner that leads to a massive right leaning roof that you traverse below before pulling out of it at its terminus and continuing on for a long fun well protected pitch at the grade. Crimson Gem’s first and third pitches offer stellar finger and ring locks before giving way to easier ground including a “hero type” roof at 5.9. Forgot the masses at the Incredible Hulk, try something new at Juggernaut, while the quiet lasts.
Covering the 10 mile+/- ascent with an overnight pack and climbing gear will take approximately 5 hours and the return approximately 3 hours. I have no idea of the net elevation gain, but you will have enough ups and downs and turns to slow you down compared to the straight forward Incredible Hulk approach. Despite the topos for both routes being spot on in my opinion, approach beta as of 2020 on MP.com left something to be desired. Getting to Barney Lake from the “Red Neck’s-R-US” RV Resort at Twin Lakes outside of Bridgeport is straight forward. Park where the boat trailers are and go pay your overnight parking fee at the entrance gate to the main RV grounds. Then hike from the west end of the relatively massive RV park to Barney Lake which is a unique and pristine lake offering a true sandy beach at its east end (a nice swimming hole on return) and a hanging valley swamp at its west end. The trail along the north side of the lake forces you to gain and then lose elevation at the other end.
Along the east sandy beach of Barney Lake is your first view of the Juggernaut. You will see two obvious features to the west. The most obvious north face is on the feature to the right which is in the foreground. The Juggernaut is the less obvious objective on the left, considerably further away. From the west end of Barney, continue on this singular trail up to a trail intersection at a narrow pass. Continue straight for Mule Pass Trail which does not maintain straight for long. This trail meanders along several lakes passing from the east side of the first to the west side of the rest of them, mosquitoes aplenty in July. At these lakes more than likely you will see camps of a few avid backpackers. During this lake navigation you will have lost complete sight of the Juggernaut. Don’t panic, just keep trodding along a good trail. Eventually you come to your 2nd intersection on Mule Pass trail and the Juggernaut will be starring down on you.
The location at this intersection (go straight) is your best camping option (left). Good water, good shelter from the wind, available shade, several level sites and drier ground resulting in less mosquitoes compared to most options.
The hike/scramble up from this most ideal camping spot takes less than an hour to reach the base of the north face (closer to 30 minutes once you have it wired). Continue on Mule Pass trail crossing a creek in short order, turning south (left). Look for a lightly cairned climbers trail on your right in 5 minutes +/- and before another creek crossing. Follow the terrain southwest to eventually contour directly west to avoid the rockier/snow laden ground guarding the northeast face directly. Once up on the ridge head south for the true north face where you will want to leave your packs regarding the return from the west. Dihedral, Crimson Gem and Arch Rival all start off a ledge that requires some 4th class climbing to reach the northeast corner of the formation. In fact, this area receives a solid amount of morning sun in July.
Route Description
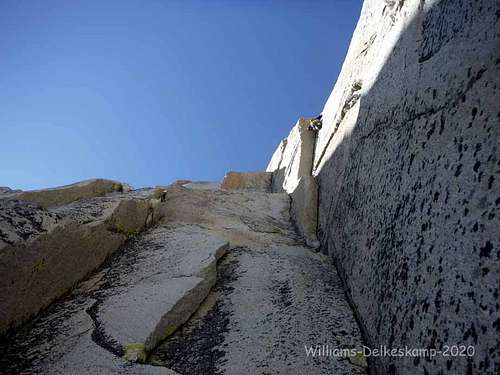
1st Pitch- 200’- 5.10/ I saw a young pair of climbers get off route on this first pitch (when I was climbing Crimson Gem) and it sort of ruined their day. They spent 14 hours camp to camp doing a route we spent 5 hours on. The topo is well written however. You start up a short chimney section below the obvious dihedral and start climbing the steep and featureless twin cracks for several meters (crux of the route). In short order you can get a jam in the right facing corner that protrudes over to meet the cracks and mantle it which is a reprieve from the slightly dirty rock out right. Continue up the cracks again as they get wider offering more secure finger jams but again moving naturally left to the corner (dihedral) and mantel up and over it. I extended this pitch to 200' and still found a small stance but a better ledge is below at about 150’. Nothing extraordinary about the corner climbing but the twin crack start will be the crux of the climb for most.
2nd Pitch- 100’- 5.9/ Keep to the uneventful corner (dihedral) and belay below an obvious clean finger portion at a ledge, below the intimidating right leaning roof above, using #.5’s for the belay.
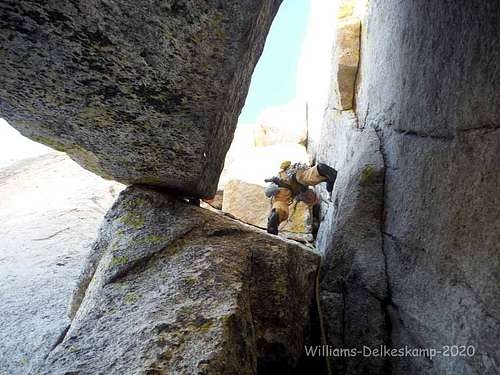
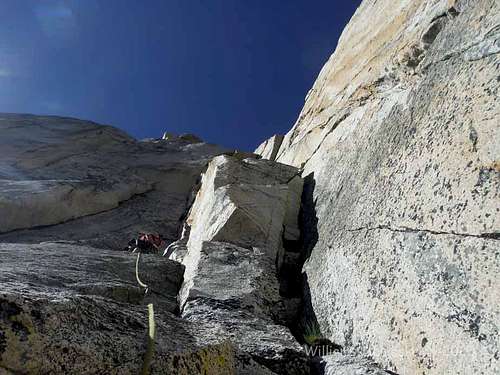
3rd Pitch- 170’- 5.10/ To date, this is my favorite pitch I have climbed on this wall. Better than anything on Crimson Gem I thought. Stem the finger corner (topo says 5.10-). I was a bit worried that my partner had used both #.5’s in the station when most of this finger corner and subsequent roof looked to be that size. But once you get into it, they both take plenty of other sizes. Once right below the roof, it no longer looks so intimidating and I felt it led much easier than the start of the route on pitch one. Seemed like plenty of feet and good jams for a 5.10 rating, but it is exposed. The pull out was relatively mellow. Continue up and traverse right into another fun corner but below grade. Climb it to its top and belay at a stance on a horizontal of sorts. This pitch is longer than the topo suggests. Extend your placements and flip your rope behind you to keep it out of the roof crack which can bite down on it. Gear belay in start of the 5.7 crack that extends to the top of the formation.
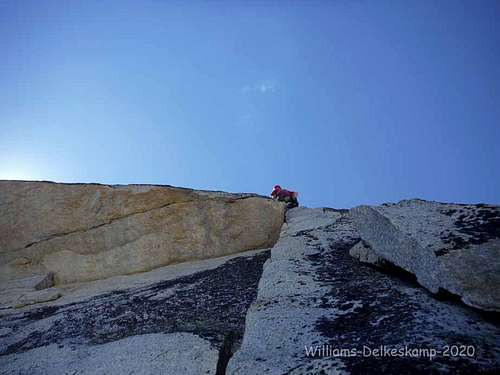
4th Pitch- 115’- 5.7/ Topo is a bit short on length on this pitch as well. Topo calls it 5.7, MP.com calls it 5.8, either way, relative to its grade, it is a fantastic pitch and is most in line with the route than the other two options the topo gives. Not sure why one would avoid it. Climb straight up a crack/corner that pulls a roof and continues up a straight-in hand crack to the top of the formation. Sling a small boulder for a belay.
Climbing Sequence
|
|
|
|
Descent
Hike west to the upper most western bump. Descend down a short ridge line to a col and turn right to descend an easy sandy and rocky gully that wraps back around east to the base of the north face. On the approach you essentially leave your packs at the base of the true north face (west of the route) and rack up before making a 150’ scramble up and east to a ledge that serves both Crimson Gem and Dihedral (the start of their respective corners).
Essential Gear
We did not rack a #4 and I saw zero need for it. We took the double rack suggested from #.3 to #3 and no doubt did not need the extra #3 either. I had a #.1 and #.2 and don’t remember placing the #.1 at all. Single from #.2 to #3 and doubles from #.3 to #2 seemed to be the ticket with a small selection of off-set cams or wires. There is zero hardware on this route, so keep in mind you will make gear stations at each belay. Ten alpine slings, helmet (Dihedral route has a bit of loose rock on it including one serious teetering small block that needs to be cleaned (2020) when one is positive no one is below, including the scramble approach), biner approach shoes to your harness for the descent. Route receives a fair amount of morning sun in July (the first pitch is east facing for the first half). We were done climbing the route before noon which it no doubt is fully shaded by then.