
-
 7781 Hits
-
 79.04% Score
-
 10 Votes
|
|
Route |
|---|---|
|
|
51.12361°N / 115.11667°W |
|
|
Trad Climbing |
|
|
Summer |
|
|
Most of a day |
|
|
5.10a (YDS) |
|
|
7 |
|
|
Overview/Approach
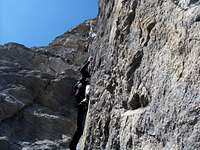 5th and 6th Pitches- 60m- 5.10a
Missionary’s Crack contains one of the most debated grade allocated pitches on Yamnuska, its 6th pitch. If you spend a lot of time in the desert as I do (Lady Wilson’s Cleavage for example), the 6th pitch of Missionary’s Crack is just another pitch of 5.10a or b off-width, climbing over an eagle’s nest to boot. If a typical Yam climber however, you might find the moves much tougher than you are used to at this grade. Both my partners that day have tons of Canadian Rockies experience, however spent a lot of time trying to maneuver the 6th pitch as 2nd (s) and felt the grade was closer to 5.11a. Academically speaking, it just depends what you are used to. Rock has been lost on this pitch, including a flake used to layback on the original ascent, thus published grades are all over the place.


Missionary’s Crack was put in by Vockeroth and Greenwood in 1964. Chick Scott has remarked, “this was one of the pivotal technical bits of free climbing on the mountain to come out of the early period.” I actually combined the crux pitch (6th pitch) with the 2nd hardest lead of the day, the 5th pitch. However, we still had to pitch it out twice more to finish the route in 7 pitches. I recommend my version of splitting the pitches particularly if one leader is stronger than the other(s). Another stellar pitch of the day is the 4th pitch which requires quite the physical move to stem a “squeeze roof”.
There is a new (2008) flagged trail below Yamnuska that takes off at the base of the scree descent. This is the best approach for the western routes. At the Y in the approach trail, take the left Y versus the normal right option. Continue until at the base of the first patch of loose scree. Look for the flagged faint trail down and to the left. Continue following the flagged trail as it ascends the western treed rib below Yamnuska. This trail will put you right at the base of the obvious corner system that makes up Missionary’s Crack among other routes. Scramble up the Pumpkin’s first pitch (ramp/corner-5.5). The ring bolt belay has been cut. There are several old pitons at the top right side of the ramp to set up a belay as well as gear opportunities.
Route Description


1000’+/-, 7 Pitches, 5.10a
1st Pitch- 35m- 5.8/ Even though this is not even 5.8 grade climbing in my opinion, this pitch can be a problem as it is so easy to get your ropes stuck on the far ranging traverse just off the deck. Step up and clip a piton, then traverse out right along suspect rock. Avoid temptation to follow another piton up a short corner along the way. You need to head into the broad open left facing corner way over right. Once in the corner itself, ascend easy ground to a small ledge to the right with a piton belay. I got my ropes stuck on lead on this pitch and never got the rope pull completely unstuck until the 2nds came across the traverse. I advise solid rope management on the traverse, I did not realize I was going into the large corner way out right. Using double length runners actually worked against me due to the bulges the ropes were getting caught under.
2nd Pitch- 25m- 5.8/ Kind of a fun, but loose, pitch. Step up and clip the piton in the corner, then move out left and over vertical blocky terrain past several other pitons, angling left to avoid the “looser” blocks. Keep moving left while avoiding getting sucked up right, to a comfortable piton belay on a ledge. The rock up and right is very loose and large.
3rd Pitch- 35m- 5.7/ The junk pitch of the day. Climb easy rock above to a ramp that moves out left. Climb up a short dirty corner and belay right below a roof capped by a large block. Belay at a piton and bolt.
4th Pitch- 45m- 5.8/ The real climbing begins. The rest of the route could be sandbagged for climbers not leading a lot of 5.10 trad. The guide book sort of makes mention of this and it is true. Climb the right face and then diagonal out left to right below the roof made by a large block. Make some dramatic moves (strenuous stemming) to overcome the roof and continue via good climbing up to the base of a long corner/crack. You can build a station here with a #1 and #2 or sling the chock stone and give the next leader the opportunity to have all the gear to combine the 5th and 6th pitches.
5th and 6th Pitches- 60m- 5.10a/ I combined these pitches (the 5th being 5.9 in the guidebook topo and the 6th a 5.10a). My partners, both experienced and long time Canmore residents and climbers, both thought this pitch was 5.11a. The one has led a lot of 5.10d and said he swore this pitch was at the higher number grade. I do a lot of off width and crack in the desert and thought the pitch was tough, but am ok with the published grade. Due to the variety of experience I have, I have also been accused of sandbagging, so be prepared for a possible hard pitch. I am sure if you took 10 different opinions, they would be all over the place regarding the grade for this pitch. Rock has fallen out of this corner making the original aided ascent somewhat obsolete.
The main thing, if you are going to combine the pitches, is that you want all the gear. I let my partners keep their gear belay established even though there was a solid chock stone to belay off of and regretted it as I had to run out the line at the end. Climb up the wide crack above via easy stemming moves, placing a #4. Don’t fret too much about letting your #4 go, as most of the crack above is too big for it anyway. Climb up the crack/corner until you reach a small overhang section that can be taken at 5.10a, but is somewhat loose and dirty. I placed a piece below this section, used a double length sling and then moved out right on sticky and hard limestone face climbing. There is some exposure in doing this. Cut back left into the corner above the loose overhang. You can belay here for the top of the 5th pitch or continue into the 6th pitch. There are opportunities to use some of your gear as you work your way up the wide crack/corner. Most of the chock stones mentioned in the guidebook appear to be missing however. Two #3’s were handy. You eventually work into an off-width section that is the crux of the route. Squeeze in, face out and arm and knee bar your way up past an active eagle's nest (2008). Eventually, you have to make a desperate move out of the narrow chimney and mantle up to a good foot ledge with a piton. From there, I had no viable gear left and ran out the remainder of the easier ground diagonally up left to the very top of a pillar that forms the corner. A small C3, an existing jammed nut (2008) and another off set nut will make a solid gear belay here.
6th and 7th Pitches- 50m- 5.8/ You are about 20m short of finishing the 6th pitch as laid out in the guidebook. This final 20m is on easy ground however. Run up the short corner above and turn hard left up easy ground to the top of a block. I advise bringing in the 2nd(s) here because the finish involves descending the other side of that block, crossing a large loose and dangerous block and descending into a gully that must be ascended to pop out of a hole at the top of Yamnuska’s western ridge. The 2nd (s) will be exposed on this final portion as they also must descend to the base of the gully before climbing upward.
Climbing Sequence
 |
 |
 |
 |
 |
 |
Descent

Walk off the western flank of Yamnuska. You can leave your packs at the base of this route as it is not much extra energy to re-ascend from the trail below to the base of the climb. Continue east from there and descend via a large scree gully back down to the lower trail that heads east back to the trailhead.
Essential Gear
60m Double ropes are usually best for Yamnuska. Full rack of cams to 4” and C3’s down to “1. Double up on .75” through 3”. One set of wires. Several double length slings would be helpful. Mostly shoulder length slings and a few draws. Helmets a must on Yam as always. Biner your shoes to your harness for the walk off. Never want to rap Yam if you can avoid it.External Links
- 100’s of Canmore and Banff National Park multi-pitch rock climbs, ice climbs, alpine climbs and scrambles, just scroll down to routes
- OR: Best True Technical Clothing and Accessories in the Outdoor Industry
- Scarpa, has surpassed La Sportiva in terms of quality, function, value
- Osprey Backpacks, Not a Second Choice
- Great Outdoors Depot
- Mont-Bell
- Cascade Designs (MSR; Thermarest; Platypus)