
|
|
Route |
|---|---|
|
|
31.94010°N / 109.9932°W |
|
|
Technical Rock Climb |
|
|
Half a day |
|
|
5.8 |
|
|
Approach
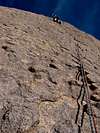
Follow the directions on the main page of Whale Dome to reach the base of the left side of the south face. The route starts on the left side of a huge flake (so huge that you can't really tell it's a flake when you actually see it) up a low angle ramp with two parallel cracks. See photo here for start of route.
 |  |
Route Description
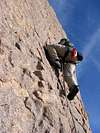
The route climbs to the summit of Whale Dome in six fun pitches. It is considered an area classic so plan on getting an early start or bring a camp chair and take a number. With some simulclimbing (over easy to moderate 5.6 terrain), the route could easily be done in three pitches. The advantage of this is that all the belays will be on comfortable and secure ledges. The linking scheme I have in mind here would link pitches 1 and 2, pitches 3 and 4, and pitches 5 and 6. The book's ratings of the pitches (ratings are consistent between the two guidebooks listed) I thought were a bit off. I will provide my interpretation of the ratings below. The route rating of 5.8 is fairly soft - there might be a total of 2 or 3 moves of 5.8 face on the whole route (on 1st pitch) and those are above a good bolt. However, there are some minor runouts on terrain up to about 5.7. In other words, the route (my opinion again) is mild for a seasoned 5.8 leader and a fun adventure for a 5.7 leader. This is my opinion only - so don't kill yourself!
Pitch 1: 5.8, 90 feet. Climb up the double cracks and low angle face for about 30 feet. Then switch to the left hand side crack. Clip a bolt and pull off a few 5.8-ish moves interrupted by nice chickenhead stances. Just above those, move right onto a well featured face (chickenheads again). Pitch finishes at a double bolt anchor and an uncomfortable stance just above.
Pitch 2: 5.7, 100 feet. From belay, move left to the edge of the slab. You could lieback on the right side but this option looked runout (huge crack too big for anything I think). Follow a thin crack up for about 20 feet. Move back right onto a featured face. Follow the face/dihedral to a nice ledge with one tiny tree. Belay using tree and chickenhead.
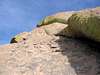
Pitch 3: 5.7, 100+ feet. The book gives this a 5.6 rating but I thought this pitch was just as "hard" as the one below. Follow the face and dihedral up. At about 80 feet move left slightly away from dihedral and clip a bolt. This friction face climbing is the crux of the pitch. The angle kicks back above and you can belay on chickenheads above the bolt (probably not so comfortable).
Pitch 4: 5.6, 50 feet. Look for a bolt off on the right side atop the fold of rock forming the dihedral you've been following. Clip it and move up and right onto a low-angle face. Keep moving diagonally up and right over easy face aiming for a nice "balcony" with a double bolt anchor.
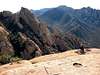
Pitch 5: 5.6, 180+ feet. The book rates this pitch at 5.7+ but I think 5.6 is more fair as the holds are huge and very positive. From the belay, move right and up onto a steeper face. You can see a bolt from the belay about 20 feet up. Keep moving up past the bolt. Two bolts (total) protect about 50-60 feet of climbing here. You could probably try to get some nuts inbetween chickenheads here but the going is easy (don't fall!!). As the angle decreases at about 80+ feet above belay, you can belay at one of many positive "dikes" ("butt/brace" belay - probably no gear) when you choose to.
Pitch 6: 4th class, <100 feet. Walk the low-angle slab to the summit. Pitches 5 and 6 are nowhere near as long as the guidebook would suggest and can be easily linked with just a bit of simulclimbing (leader will be walking comfortably by the time the second starts up the pitch).
Descent:
Walk to the back of the summit "knob". Find a triply bolted rap anchor (watch it - anchor is kind of exposed - hip belay?). Rappel with two ropes off the "backside" of the formation. Kind of fun, some free air rappel. Walk down the class 2-3 gully to the left (gully on the left side of the formation as you're looking at the formation from base of route).
 |  |  |  |  |
Essential Gear
Mid-sized to light rack with stress on cams rather than nuts (unless you're planning on sawing up pitch 5 above then bring lots of nuts to fiddle with). I brought and used (twice) a #5 Friend but it would have been OK not to have that one. I've also used down to about a green Alien (~0.3 inches) cam. Bring a handful of triple runners for tying off chickenheads. Two ropes needed for descent (most likely).
Internet Links
See main page for Whale Dome. In particular, Link 3 has nice Moby Dick photos.
More Route Photos
 |  |  |  |  |
Alex Wood - Nov 13, 2013 5:48 pm - Voted 10/10
Rappel UpdateThere are a new set of bolts/chains on the summit and they are less sketchy! You can rappelfrom the summit with a 70m if you use the old chains. This will put you about 12 feet from the ground but then you can use a bolder and ledges to downclimb the last 12ft (easy). If you used the new chains with a 70m, you might be a little bit further from the ground.