

-
 9110 Hits
-
 79.78% Score
-
 11 Votes
|
|
Route |
|---|---|
|
|
36.10810°N / 115.4894°W |
|
|
Hike / Scramble |
|
|
Half a day |
|
|
Class 4 |
|
|
Overview
Although there are shorter scrambling routes to the summit of Rainbow Mountain, they involve exposed Class 5 terrain. This route keeps things at Class 4, though with serious exposure at times, and it is highly scenic as well from the moment you leave the car until the moment you reach the summit. Also, it is a fun route, lacking the boring slog to the summit that the route to Mount Wilson from Oak Creek Canyon entails.Please note-- I have adopted this page, with permission, from the original owner. His beta is good, so I have kept it intact, but I wanted to add photos and some commentary. In the following sections, my comments are in italics.
Approach
There are a couple of starting points for this route:1) Get on the Red Rock NCA Scenic Loop and follow it for approx. 11 miles to the signed Oak Creek Canyon dirt road turn-off. Follow the well-maintained dirt road for a mile or two to a well-marked parking area. The parking area is spacious and even has a restroom. The trailhead, which is at the south end of the parking area, is signed for Oak Creek Canyon.
2) You can avoid the fee and the one-way loop drive by parking at the unmarked but easily seen trailhead for North Oak Creek Trail located along SR 159 a short distance west of the loop drive's exit. This, of course, adds some hiking distance each way-- 0.9 mi.
Hiking in from the signed Oak Creek Canyon TH off 159, which reaches the canyon via South Oak Creek Trail and the Chinle Trail, adds 1.5 mi each way-- definitely not recommended unless the other TH off 159 is closed for some reason.
Route Description
In my opinion, as a well-traveled veteran of the Red Rock backcountry, this is one of the most aesthetic and enjoyable non-technical standard routes to any of the peaks in the NCA.Oak Creek Canyon is absolutely gorgeous, particularly in spring and in the depths of the back canyon, when the melting snows from the mountains above send their waters down into the deep sandstone canyon. The result is spectacular cascades, the constant sound of rushing water, and even the occasional waterfall. Oak Creek runs year-round, but spring is undoubtedly the best time of year to be in the canyon. The appeal of this route is not just the creek - the remainder of the route covers some beautiful ground with stunning views of the Red Rock backcountry...and there's a small hidden forest, a nice ridge to cross, and even some fun class 4 stuff at the very end.
Here's how to get started -
From either of the trailheads, follow the well-marked trail to the mouth of Oak Creek Canyon.
Now, I'm not going to try to over-complicate things by going into too much detail. The beginning of the route from the mouth of the canyon is rather simple, actually. Once the mouth of the canyon is gained, continue into the canyon, seeking out the path of least resistance, which is generally Class 2-3, hopping up and around and over and sometimes even under massive boulders, sometimes crossing over little streamlets or working your way around cascades and small waterfalls, taking right forks in the canyon as they come, and ultimately work your way to the end of the main canyon where the yellow sandstone meets the gray limestone of the peaks in the rear. You can't miss the geologic transition. It's painfully obvious.
Once this area is reached, start at any point and head north up the yellow sandstone talus slope above. It's tedious at times but generally easy and sometimes even enjoyable scrambling.
Some notes:
- There really is only one fork to take note of. This fork is about two miles from the Scenic Drive TH, and it splits Oak Creek Canyon into its north and main forks. Here, it is crucial to take the right fork. Later, near the head of the canyon, there will be a minor fork on the left, but by then it will be obvious that one needs to work up and right.
- The crux during the canyon portion of the route is the waterfall seen in the first picture below. Bypass it via an exposed Class 3-4 traverse on either the left or the right. The right side is longer but easier; I say this because I used the left on the ascent and the other on the descent.
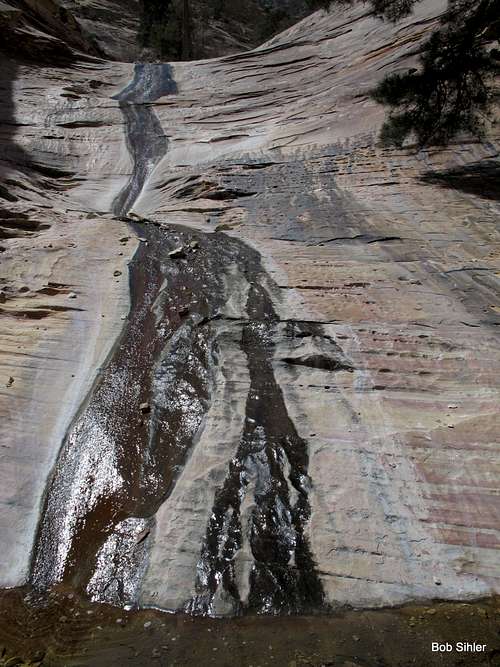
- It is not necessary to head up from where the yellow meets the gray. After passing the waterfall seen in the second picture below, you can start working up good sandstone (as opposed to the talus) and wind up on the red sandstone ramp mentioned in the third paragraph following this bulleted section. This is what I did on the ascent, and the footing was good and the route was more direct.
- If you do follow the canyon to its head, then use the three side-by-side pictures below as guides. They show the watercourse as it heads up and right. The use trail mentioned in the next paragraph intersects this watercourse high up.
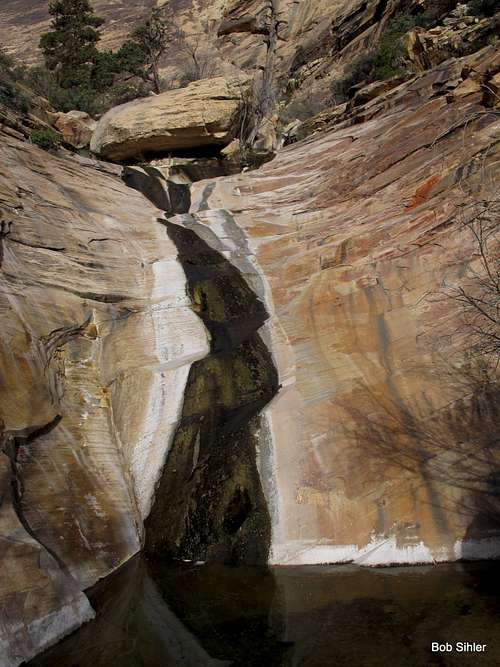
This is probably the crux of the canyon section. You can bypass this waterfall on either the left or the right via exposed Class 3/4 terrain. The left side is shorter but harder, and more exposed.
Last major waterfall in the canyon
 |  |  |
The slope starts out a little steep but mellows out in a short time. As the slope levels off, look for a faint use trail heading easterly. Follow it.
The next part of the route is hard to explain. While on the mountain, it is a little hard to follow. Good route-finding skills and a little trial and error will get you there nonetheless.
The use trail will continue easterly for a hundred yards or more and then start traversing northward around the edge of a steepening slope on your left. Follow the trail northward a couple hundred feet to the bottom of an obvious ramp slab. Leave the trail and head up the ramp.
![The Red Ramp]()
When you reach this (it's hard to miss it), follow it to the ridge above.
From the top of the ramp, you will be able to see Bridge Mountain and the other awesome crags of the northern Red Rock backcountry for the first time on the route.
From this point, you may be tempted to continue east and up a ledge system to higher ground, but don't. Instead, start traversing northeasterly along the north side of the ledge system over class 2-3 terrain (note the route for your return, as it's amazing how class 4-5 terrain seems to materialize out of nowhere) and aim for the base of a prominent cliff that is 1/4 mile or so ahead of you.
The next part of the route is hard to explain. While on the mountain, it is a little hard to follow. Good route-finding skills and a little trial and error will get you there nonetheless.
The use trail will continue easterly for a hundred yards or more and then start traversing northward around the edge of a steepening slope on your left. Follow the trail northward a couple hundred feet to the bottom of an obvious ramp slab. Leave the trail and head up the ramp.

When you reach this (it's hard to miss it), follow it to the ridge above.
From the top of the ramp, you will be able to see Bridge Mountain and the other awesome crags of the northern Red Rock backcountry for the first time on the route.
From this point, you may be tempted to continue east and up a ledge system to higher ground, but don't. Instead, start traversing northeasterly along the north side of the ledge system over class 2-3 terrain (note the route for your return, as it's amazing how class 4-5 terrain seems to materialize out of nowhere) and aim for the base of a prominent cliff that is 1/4 mile or so ahead of you.
It is excellent advice to avoid the temptation to continue east up the ledges; I went that way and cliffed out, which cost me some time and energy.
From the base of the prominent cliff, follow a use trail north for a 1/4 mile or so to the end of the cliff. Just past the cliff, the use trail starts to spiderweb and becomes harder to follow. About this time, you will notice a large rock tower to your right. This is a semi-important landmark. Angle eastward and toward the north side of the tower on one of the faint use trails. (Note - If you take one of the faint use trails spiderwebbing away from the tower and more northerly, you will be heading toward Rainbow Wall, another fine feature of the Red Rock NCA backcountry.)
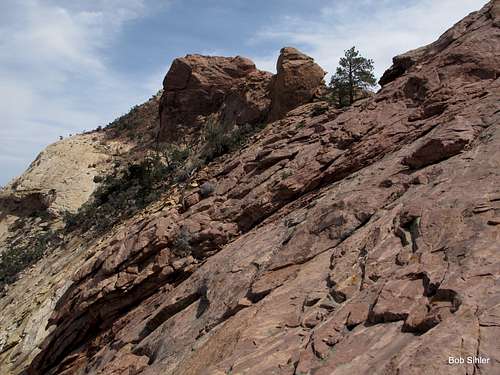
One complication along this part of the route is that a rock formation not far east of the point where the ramp meets the ridge may have you thinking it is the "tower." It is not, and that is how you can head up the wrong ledges and cliff out. DO stay to the left (north), following cairns and the use trail to a point just east of the "real" tower (seen from the east in the second picture below).
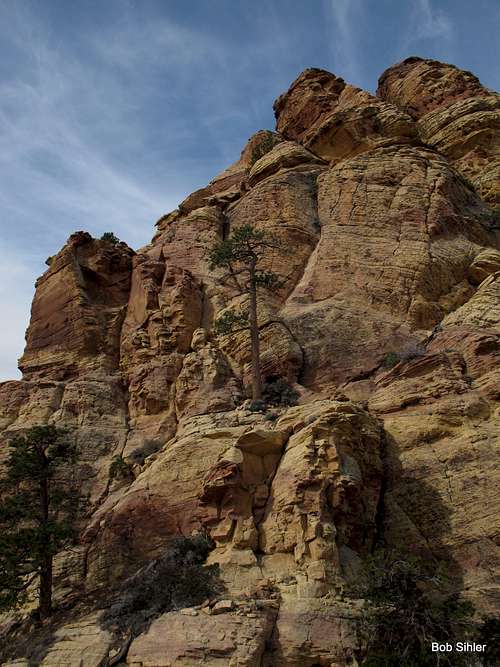
![East from the Ridge]()
The pillar on the right is not the tower mentioned in the route description. Do not ascend the ledges to its left unless you like cliffing out. Instead, stay to the left and eventually regain the ridge past the formations seen here.
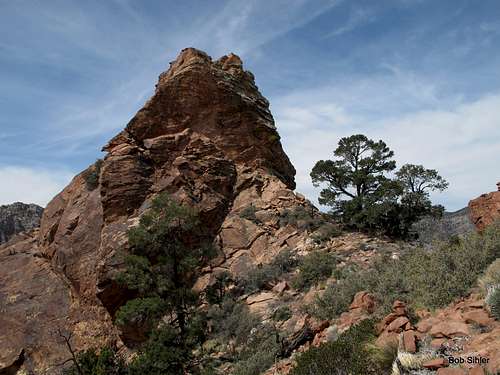
![The Tower from the East]()
It's hard to get a decent shot of the tower during the approach from its west side, but here it is from the east.
As you head up, the use trail becomes easier to follow. Do so. If you stay on the use trail and head generally eastward, following the occasional cairn, you will soon find yourself heading down a slight slope into a sort of basin housing a small grove of ponderosa pines. Very nice. Sometimes there's some water there. Don't count on it.
Cross through the grove and shoot for an easy way up to the terrain above and to the right. Class 2 should be plenty easy to find. This terrain above is the summit ridge.
Once on the ridge, head east/northeast over easy terrain toward the summit, which is a little over 1/4 mile away, only a tad higher, and presumably simple to reach. Guess again - you've got a big (fun) surprise coming.
Although not apparent from the beginning of the summit ridge, just short of the actual summit you will come to an abrupt and steep notch in the ridge. The notch is 150-200 feet deep and two sections of class 4 terrain, one of them exposed, must be negotiated in order to reach the saddle at the base of the notch.
Negotiation of the notch is challenging, but not as challenging as describing it, so I'm not gonna try that hard. Fortunately, common sense, good route-finding skills, and the ability to see cairns here and there will set you in the right direction.
From the ridge just before the notch, drop down on the right side over class 2-3 terrain and look for a short (12-15 foot) class 4 wall to scramble down. The exposure is close to 1000 feet (if memory serves me correctly) but the scramble down is easy.
From the bottom of the wall, work your way over whatever terrain you find comfortable along the cliffs and traverse to the other side of the ridge (still on the far side of the notch away from the summit). You are already about halfway down to the saddle. (Remember, cairns are there to serve you - look for them)
When you get to the other side of the ridge, you should find yourself standing at the top of a 20 foot class 4 chimney. The exposure is minimal but the chimney has northern exposure and tends to be moist, and therefore, slick. From the bottom of the chimney, follow class 2-3 terrain down the remaining 40-50 feet or so to the saddle in the notch.
The pillar on the right is not the tower mentioned in the route description. Do not ascend the ledges to its left unless you like cliffing out. Instead, stay to the left and eventually regain the ridge past the formations seen here.
It's hard to get a decent shot of the tower during the approach from its west side, but here it is from the east.
As you head up, the use trail becomes easier to follow. Do so. If you stay on the use trail and head generally eastward, following the occasional cairn, you will soon find yourself heading down a slight slope into a sort of basin housing a small grove of ponderosa pines. Very nice. Sometimes there's some water there. Don't count on it.
Cross through the grove and shoot for an easy way up to the terrain above and to the right. Class 2 should be plenty easy to find. This terrain above is the summit ridge.
Once on the ridge, head east/northeast over easy terrain toward the summit, which is a little over 1/4 mile away, only a tad higher, and presumably simple to reach. Guess again - you've got a big (fun) surprise coming.
Although not apparent from the beginning of the summit ridge, just short of the actual summit you will come to an abrupt and steep notch in the ridge. The notch is 150-200 feet deep and two sections of class 4 terrain, one of them exposed, must be negotiated in order to reach the saddle at the base of the notch.
Negotiation of the notch is challenging, but not as challenging as describing it, so I'm not gonna try that hard. Fortunately, common sense, good route-finding skills, and the ability to see cairns here and there will set you in the right direction.
From the ridge just before the notch, drop down on the right side over class 2-3 terrain and look for a short (12-15 foot) class 4 wall to scramble down. The exposure is close to 1000 feet (if memory serves me correctly) but the scramble down is easy.
From the bottom of the wall, work your way over whatever terrain you find comfortable along the cliffs and traverse to the other side of the ridge (still on the far side of the notch away from the summit). You are already about halfway down to the saddle. (Remember, cairns are there to serve you - look for them)
When you get to the other side of the ridge, you should find yourself standing at the top of a 20 foot class 4 chimney. The exposure is minimal but the chimney has northern exposure and tends to be moist, and therefore, slick. From the bottom of the chimney, follow class 2-3 terrain down the remaining 40-50 feet or so to the saddle in the notch.
I did not follow the exact same route but do agree it is Class 4 and exposed. Although there are cairns, at times it is not clear how to get from where you are to that next cairn. So to repeat, good route-finding skills are necessary.
![The Crux Downclimb]()
Here is the downclimb to the notch just west of Rainbow Mountain's summit. It is Class 4 and highly exposed in some places. It is also fun!
From the saddle, head up the left side on class 2-3 terrain and ultimately work your way to the summit. It's less than 10 minutes from the saddle and difficult to miss.
To descend, do the obvious - retrace your steps.
Roundtrip stats for this route are in the ballpark of 14 miles and 2800-3000 feet of gain.
Although I didn't GPS the route and although the obstacles in the canyon make it hard to estimate distance traveled, I felt the RT mileage was closer to 10 miles, maybe 11-12.
You won't be disappointed.
No, you won't. The whole way, the route is fun and the scenery is excellent.