
|
|
Route |
|---|---|
|
|
36.03500°N / 115.46639°W |
|
|
Trad Climbing |
|
|
Spring, Summer, Fall, Winter |
|
|
Half a day |
|
|
5.9 (YDS) |
|
|
5.9 |
|
|
4 |
|
|
II |
|
|
Approach
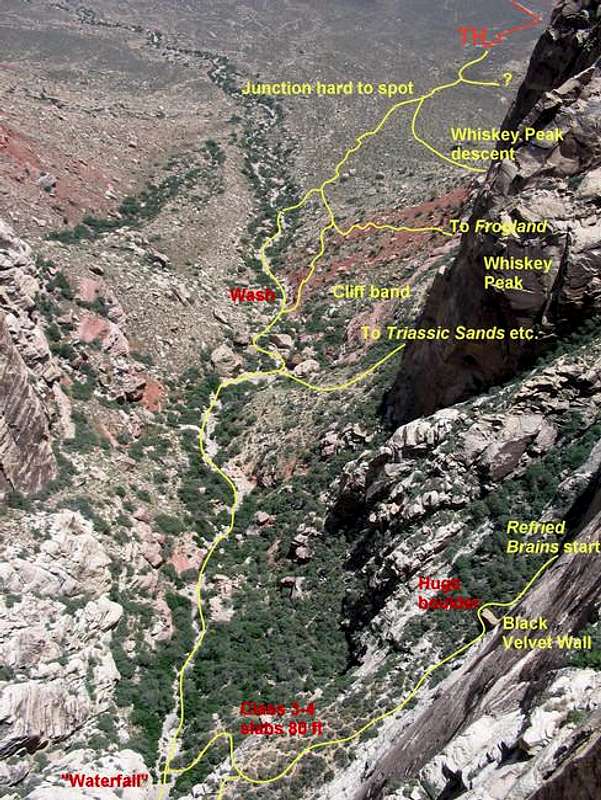
Follow directions to trailhead on the main Black Velvet Peak page. Begin the foot approach by following directions on the Epinephrine page to reach the top of the “waterfall” (usually dry) mentioned in Josh’s description (either class 3 scramble up slabs left of the waterfall or 5.easy directly up the 30 foot waterfall). From top of the waterfall, instead of heading further up the wash towards Epinephrine, cut sharply left (~100 feet before the waterfall) and go up the overgrown ramp (many “trails”) that follows the base of the Black Velvet Wall (a.k.a. Prince of Darkness Wall). Follow this brushy ramp a few hundred feet to the leftmost edge of the Black Velvet Wall. The route starts ~50 feet left of a huge (think like 2 pick up trucks put together) boulder lying close to the left hand side base of BV Wall. Look for a single bolt about 30 feet above ground and a very shallow dihedral above that.This photo shows the approach from trailhead (TH) to start of route:
Route Description
Most parties approaching this route will end up doing only the first four pitches (or five as described by Swain’s guidebook) as the upper pitches are (supposedly) very loose (have very shaky bolts for pro) and require topping out on the ridge above in order to descend (you can rap the route as it is described here). If you have done this entire route, you can either add beta regarding the upper 2 (?) pitches here (I’ll add it to the text and credit you) or I’ll be more than happy to give you the route page to maintain. The route as described here is quite sustained and given the length of the pitches makes for a nice half day outing (car-to-car).Pitch 1: 5.8+, c. 140 feet. Move up easy, slabby terrain (5.6-ish or easier) to reach the bolt about 30 feet above ground (visible from base). Make a couple of friction moves above the bolt and enter a nice, shallow, left-facing dihedral. Follow the dihedral to the belay anchors (not visible from base). The crux of the pitch comes near top of dihedral as the crack peters out for about 6 feet or so. Belay from bolts.
Pitch 2: 5.8 – 5.8+, 170 feet. On left side of belay bolts, move up via a few mantle moves and arrive at the base of a prominent, right-facing dihedral. Pull the bulge on the left side of the dihedral and climb the slick dihedral (crux of pitch). Above this pretty short dihedral, enter a low 5th class chimney and continue to a multi-tiered ledge system (at a mouth of another chimney) with two or three good-sized trees on it. Either belay on gear (using trees) or look right 30 feet and belay off of bolts on the face. The latter option would probably make for some horrendous rope drag as you’re bringing your second up (you could move the belay to the bolts later).
Pitch 3: 5.9, 160 feet. This is the crux pitch of the route (as described here). From the ledge system, move right 30 feet (past the above-mentioned belay bolts) to reach a nice crack system in the face heading straight up. Climb the crack which is mostly hand sized with 2 or 3 10-foot long OW sections. The face is sufficiently well featured that you’re not really doing much true off-widthing. The crux comes 20 or 30 feet below the belay as the crack closes up to the tiny nut size (I could not fit my fingers past my fingernails) and the face features around the crack seem to disappear. You might look to the right for possible face climbing options. Belay off of nice bolts directly above a small tree growing horizontally out of the face.
Pitch 4: 5.9, 150 feet. Note that roughly speaking this pitch as described here is pitches 4 and 5 from Swain’s guidebook. Reason for this linkup is that the belay bolts atop Swain’s pitch 4 are total crap. Move up the chimney clipping a good bolt (left) 15 feet above belay. Continue moving up another 30 feet or so past the old belay station. Watch for loose blocks on the right (don’t kill your belayer)!! A few feet above the old belay, move left and clip an OK looking bolt near the corner. Move left around the corner and onto a face. You are NOT climbing the huge dihedral directly above! Look up and admire the 30 foot runout to the next bolt (also new looking)…actually it’s not that bad as there’s ample trad pro opportunity on the well-featured face. Above this good bolt, 3 or 4 manky but reasonably spaced bolts are followed up, slightly left and then back right. Belay from bolts.
Descent:
Rappel the route with two ropes. Careful when you pull down your ropes especially after rapping down P2. All stations equipped with bolts/rap links.
Comments:
The route in its original form tops out (so in theory a single rope would be sufficient). Above the fourth pitch however, you no longer have the option to comfortably rap the route. If you have beta on these upper two (?) pitches, see my comment above. Also see Web Links section below.
 |  |  |  |  |
Essential Gear
Comprehensive rack including a full set of nuts (couple extras in small sizes perhaps). Depending on your comfort level, a double set of cams (green Alien to #3 Camalot; about 0.3 to 3 inch) might or might not be an overkill. I also had one #5 Friend and #4 C4 cams for the wider sections.Web Links
Excellent route description and very useful discussion (including description of upper pitches by Red Rocks’ own Larry DeAngelo) can be found here (from climbingredrocks.com). We used this route description almost exclusively (guidebook was secondary).More Route Photos
 |  |  |  |