Hi Ben,
Good questions. I'll try to giving some answers, just ask if you want more.
Preparation Is EverythingThe most important thing you'll need to know is that you should do almost all of the creating before even opening up the Create Page dialog on Summitpost. You have to write a draft version. In principle, you can use any editor you like, but as I'll explain later, some editors can be more useful than others. MS Word can do the job, and even Notepad works, sort of. You might want to keep in mind that Summitpost is based on HTML, but if you don't know HTML and don't want to learn it, just ignore this for the time being. I'll get back on that.
For any good trip report, you'll need the text of your story. Ideally it would be well written and proper English, but if I have to choose, I'll prefer an engaging story in bad English over a boring one any day. I'm not formally trained in creative writing, I just have a stab at it, but there are courses on that.
For the record, Summitpost accepts Trip Reports without text at all, but the type Album is more suitable for that. In fact, I regularly create an Album instead of a Trip Report when I only have a short bit of text and the photos are the main thing.
A good trip report also needs pictures. You'll need them to illustrate the story, but also to give the readers some eye candy. Besides, no matter how well written, a story with only text often goes unnoticed, and pictures will greatly liven up the flow of the text. Even using exactly the same text and images, the position where you put them can make a big difference on the quality of the report. For example, all pictures on the right is boring. Even something as simple as putting them more or less randomly left and right makes it look much better. There are much more fancy ways of positioning images, but I won't go into that right now.
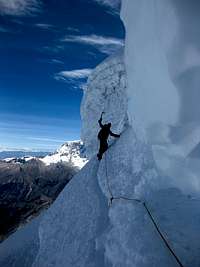
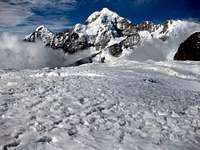
Unfortunately, the options of positioning images in this forum are very limited, which is why this is mostly text, but here is some eye candy to remember what Summitpost is all about.
 The Images
So, by now you've written your trip report, inserted pictures at appropriate spots, and are ready to post it all on summitpost.
One of your questions is how to insert the pictures. Well, the Create Page / Trip Report has an Insert Image button above each of the Section Bodies. That's the easiest way to add an image to the report, left, right or center, and in various sizes, but the image must already be posted on Summitpost. For that reason, I usually start by posting all the images that I'm going to use. You can already attach the images to the pertinent mountain/rock, area, et cetera at this stage. When writing the draft version ouside Summitpost, be it in MS Word or in an HTML editor, you can already insert the actual Summitpost image, although it may take a bit of doing to get it displayed in the right size - but that's not very important right now. Alternatively, you can use local copies of your images, which, of course, is better if you want to keep a complete backup of the whole thing.
The alternative would be to first post a trip report with only text, then post the images and edit the report, inserting them one by one at the place that you want. I find that cumbersome, but others do it that way. You'll have to find out which way you like best.
You can also add images
without using the Insert Image button. You'll need to know some HTML to do that, but the possibilities are endless. You can use images that are anywhere on the net (assuming that you are entitled to use them). You can have them in whatever size you want, and if an image is bigger than a typical window, you can add scrollbars around it. However, it's a good thing to remember that in some parts of the world it still takes forever to download a large image, and Summitpost has an international audience! And, if you go totally overboard with HTML, your trip report can end up looking rather different than the typical look and feel of the others on Summitpost, and if there ever is a major overhaul of the site, fancy HTML may not quite look the same anymore.
While not mandatory, a Trip Report should have a Primary Image. That can only be an image on Summitpost, and you can select it with the Find Image link in the dialog.
 Posting The Trip Report
You asked about how to preview your report. Many people have asked for such a feature in the past, but it's just not there! Consequently, the best way is to create a Custom Object page first. It doesn't matter how it looks, people will generally ignore it. Never mind the fields at the top, just copy your draft text into the body sections and put headings above them, insert the images where you want them and see how it looks. Tinker with it until you're happy. It's a bit of a learning curve if you want to go beyond the basics and start using HTML, but you don't have to do that.
Depending on how fancy your HTML is, that tinkering can take quite a while. And the more fancy it is, the more important that you check the result in various browers - I usually check it in Internet Explorer and Google Chrome, and often also in Firefox. It's much better to do this in a Custom Object than a real Trip Report, because new things get noticed (they are on the
What's New page), but if an incomplete Trip Report finally gets ready after long time, nobody will see it anymore.
When all is done, you can finally create the actual Trip Report, and copy everything from your custom object. This is also the time you can also fill out the fields at the top of the report, if you know them. Otherwise ignore them, although it's always nice for the readers to know when and where it was. For the same reason, it's also good form to attach the Trip Report to the relevant Mountan/Rock or Area page.
This may seem a lot of work, but my experience is that writing the text of the draft report is by far the most time consuming part, and that's a lot easier to do in a regular editor than directly in a Summitpost dialog. Even for a really big report, once I'm happy with the draft version and have my images posted, it takes me less than an hour to post the report.
I didn't know all this when I wrote my first few pages. While I quickly learned the advantages of using a Custom Object, it took me a little longer to figure out that I should write a draft even before going to Summitpost.
Consequently, creating my first few pages took quite a bit longer than an hour, with a lot of fiddling, and they still didn't look particularly good. However, I plan to leave them as they are, because I like how it illustrates the learning curve.
As a side note, frankly, I don't think a preview is all that important. I want to keep a backup version anyway, and besides, I don't want to type a lot of stuff in an on line dialog because I might loose my internet connection, SP might go down or some other problem might arise.
A note on HTML and SummitpostIf you don't know HTML, use the buttons above the Section Bodies in the Create Page dialog. For example, if you use the Bold button, you get this:
<b>BOLD TEXT HERE</b>
The <b> and </b> is the HTML way of saying that everything in between must be bold. You can write your own HTML directly, or use the buttons, or both.
If you prepare your draft version with an HTML editor, you can already make things
bold,
italic et cetera, and copy layout as well as your text. If your draft is in a regular editor, you can only copy the text, and have to spend some time to add these effects later, either in your Custom Object or directly in the Trip Report.
The Insert Image button is an exception: after selecting an image, you don't get HTML, but something that might look like this in the Create Page dialog:
[img:672672:alignleft:medium:Spires around Mont Blanc]
This is a Summitpost way of specifying the details of an image. It's a whole lot shorter, and easier to understand, than HTML would be. After posting the page, you get a nicely formatted image. Unfortunately, I can't show how that looks at this place, because the forum does not support that, but here is the image anyway:

Cheers, Rob
