
|
|
Route |
|---|---|
|
|
37.70330°N / 119.5167°W |
|
|
Scramble/Technical Rock Climb |
|
|
Most of a day |
|
|
5.0 |
|
|
Approach
From the Mono Meadow Trailhead, hike northeast for 3.6 miles. Pass the Buena Vista Trail junction and cross the Illilouette Creek by either wading or using downed trees east of the trail. On the other side of the creek the trail heads north through a sandy open area. In two hundred yards a trail junction is encountered - turn right and go east (toward Ottoway Lakes). After a mile, leave the trail and head cross-country towards Mt. Starr King. It looms prominently in your view and is impossible to miss. After heading downhill a short section through thick forest, climb the other side and head for the middle dome.
The easiest route follows the west slope between the middle and south dome, climbs to the saddle between them, then goes up and over the middle dome to the base of the route at the saddle between the north and middle domes (class 2). Alternatively you can climb to the start directly up the west gully between the north and middle summits. This route is largely steep friction climbing, though no worse than class 3, and is more interesting.
 |  | 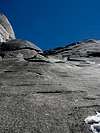 |
Route Description
This is one of the easier technical climbs in Yosemite and the Sierra, and a good beginner route. It's popular, so plan accordingly (which just means be patient if you have to wait in line, or go early or on a weekday if this bothers you). The rock is dry, solid, and free of debris, and the angle is low enough that you can almost walk up in climbing shoes without using your hands (but most folks will want the rope due to the exposure).
The climb from the Southeast Saddle can be done in two or three pitches. To do it in two pitches, climb the saddle as far as you can before starting the first pitch. Climb diagonally up and to the left following obvious cracks to a large flake.
From the flake, you can continue climbing diagonally to the left until you reach an open book (described by Secor), or more easily climb directly up from the flake until you reach a belay ledge in another 40 feet or so. If you climbed to the open book, follow it up a short ways to a belay ledge.
Again you have two choices. You can head diagonally to the right where you will find another belay ledge followed by class 3-4 friction going diagonally to the left. Easier, is to head diagonally to the left from your first belay ledge, climb over the 4-foot ledge of the open book, and head for a small outcrop of rocks. It is an easy scramble from here. There are usually rappel slings at these rocks that can be used for the descent.
There are no bolts on the route, so please don' t add any. Protection can be made most easily with medium and small cams, though medium-large nuts will also work. The belay ledges are just that, and should be backed with the appropriate bomber anchor. Bring a few long slings or cordelettes to tie the anchor points together at the belay, as they may be far apart.
 |  |  |  |  |
Essential Gear
A rope. Secor recommends two ropes to help with the rappel, but we found it easy enough to rappel with a single 50m rope. The last rappel doesn't need to reach all the way to the saddle, as you can downclimb the lower slope easily enough.
A minimal rack suffices, nuts and a few cams (small to medium size), plus an assortment of slings.
It is a good idea to bring climbing shoes to make the friction climbing more secure (and there's a lot of it).
Miscellaneous Info
If you have information about this route that doesn't pertain to any of the other sections, please add it here.