
|
|
Route |
|---|---|
|
|
38.65950°N / 109.3692°W |
|
|
Technical Rock Climb |
|
|
Most of a day |
|
|
III 5.11- or 5.9 A0 |
|
|
Approach
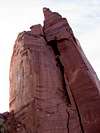
See the main page for The Priest for driving and hiking directions to the base. Honeymoon Chimney climbs the southwest corner/face of the tower - early afternoon sun exposure.
 |  |  |  |  |
Route Description
The route reaches the summit of the tower in 4 great pitches. It offers the least difficult means of topping out on the summit of this awsome tower. There is some debate (surprise!) as to what the true rating of the crux free pitch is (that's pitch 3). Although rated 5.10+ by the FA party, there now seems to be a general consensus that the pitch has gotten harder (sandstone holds wear out on much smaller time scales than most other rock types...that baby looked mighty smooth from the comfort of my aiders). Current ratings in guidebooks put it at about 5.11b. If you're aiding this section (as we did), it's a trivial (though possibly a bit reachy?) A0 bolt ladder. In this case, the free crux of the route hits you on pitch 1. Done as 5.9 A0, the route is still a substantial notch above Kor-Ingalls route on Castleton Tower in terms of free climbing difficulty in my opinion. In fact, Stewart Green gives the pitch 1 crux OW a 5.10 rating on his topo (see guidebook listings on main page). Still, with adequate big gear the crux pitch 1 protects well and the route should not be missed just because one does not like off-widths.
Look for an obvious dihedral formed by the main body of The Priest and an adjoining (huge!) "block". There's a 20-foot boulder at the base of the dihedral. Scramble c. 30 feet (class 3) to the base of this boulder. This is a good rope up point.
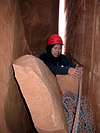
Pitch 1: 5.9, 130 feet. Climb to the top of the boulder. Right side offers an easy 5.7 option (if you've lugged a number 5 Camalot up here, now is a perfect time to leave it behind for your second to haul it up the OW above - you're NOT going to need it higher). Take a deep breath and start your battle with the 5.9 OW crack in the dihedral. There's a decent bolt about 15 feet above the initial boulder immediately followed by a bulge. These 15-20 feet might be the crux of the pitch. A second "bolt" is right above the bulge. Continue up the OW jettisoning the #4 Big Bros shortly above the 2nd (and last) bolt. The going above the 2nd bolt is not quite as bad as there are incuts/slopers to rest on on the side walls of the OW. Soon you'll reach the first of several large chockstones (can plug in small nuts and cams <1"). Continue up the easying OW until it widens to the point where you can get inside (you'll be able to see a floor in this squeeze chimney at this point). The going now becomes more horizontal than vertical as you wiggle your way through the squeeze. If you've got some extra pounds following that dinner from night before (like me), this will be the physical crux of the route. Suck in your chest and clench up your behind and move 2 inches. Exhale. Repeat. Photo of squeeze is here. 40 or so feet into the chimney you top out on a large chockstone and belay (you're almost out the other side of the chimney - behind the chockstone is a nice, wide ledge; note the rap station further behind).
Pitch 2: 5.7, 90 feet. Climb straight up the chimney from the chockstone belay. Going is runout but easy (~5.6 chimney) for about 30+ feet to the first bolt. Having your back to the main tower of The Priest is what the guidebook recommended and it worked well (feet face south). Above first bolt move up and towards the outside of the chimney (westward = direction you came from on P1 below). Clip a second bolt near the outside edge of chimney. Above pull out of the chimney onto an easy arete. One weird 5.7-ish move followed by a short handcrack brings you to a perfect little ledge with two fat bolts.
Pitch 3: 5.11b or 5.7 A0, 60 feet. Move up about 15 feet to a notch between the main tower of the Priest and the adjoining huge block (forming the OW and chimney systems of lower pitches). Climb up to the notch (two pitons on right wall) stemming until you're able to see the bolts on the (left) main wall of the Priest. Here either climb up the 11b face/arete or bust out the aiders and start aiding. Bolts (most of which are actually fixed pitons) are mostly good-looking. Go straight up the bolt ladder (~30 feet and 6 or so bolts) until you top out on a narrow ledge. Traverse the ledge leftward. Clip a piece (old bolt) and move up the slabby ramp toward the belay station. Belay from fixed (but ancient-looking) gear supplemented by trad gear (#3.5 Camalot and small, <1" cams) on an uncomfortable, sloping ledge. I THINK that pitches 2 and 3 could be linked up (see Priest via Honeymoon Chimney TR by piquaclimber.com). Also check out this awsome long range shot (from Rectory) of a climber freeing the crux of this pitch (and route): awesome shot! Photo is on Priest Page of rockclimbing.com .
Pitch 4: 5.8, 60 feet. From belay, traverse slopy ledge left and around the corner. Move up a great dihedral with a finger/thin hand crack up to the summit. Watch for loose/chunky rock near the summit. This is possibly the most enjoyable pitch of the route (feels like a great, exposed, and pretty easy cruise after all the wide stuff below). Belay on summit. Watch your step on the summit - it's not spacious like Castleton Tower and the rock around the edges is questionable.
Descent:
Option 1: We did the rappels with 2 60 meter ropes. Two 50's will PROBABLY work but that's untested. From summit (slung boulder + bolt) rappel straight down with TWO ropes to top of P2. Do another rappel (two fat rap bolts) straight down the chimney to top of P1 (single rope MIGHT work but that's untested). Visible from the belay boulder atop P1 is a triply bolted rap set up. Do another (3rd and last) double rope rappel to the ground. Note that you're rapping the opposite side of the formation to where you started (you're NOT rapping down the squeeze chimney of P1).
JD provided the following comments on the descent from the summit: Two 50m ropes will most certainly work. In fact, a single 60m will work for the first two raps (just barely for the one off the summit though -- it's about 105'). The final rappel to the ground is well short of 50m. One note: the summit rappel anchor for the std. descent doesn't extend over the lip. I can't believe we are the only party to have had trouble because of this (nothing like a little late afternoon prussiking in a 40 MPH gale...). Also, I couldn't help but wonder if Greg Child's impossible looking route up that arete might have rappel stations that could be managed with a single 60m. Who would know? See colbyjw's response below.
Option 2: Alternatively, Eric Bjornstad in his guidebook mentions that you can rap from top of P2 (see above) directly to the ground with TWO 60 meter ropes. This is untested advice - tie in back up knots if you're going to try!!
Option 3: Excommunication rap line - details provided by colbyjw: My friend and I just took one 70 meter rope because we were told that a single 70 BARELY works on the final rappel of the Honeymoon chimney. However, I remembered hearing that a single 60 would get you down Excommunication. We ended up rapping Excommunication because it seemed like the rope was less likely to get stuck. Rappels were nice and the ledges were "cushy". There was some extra rope left over on each rappel which seems to confirm that a single 60 should get you down. That is what I would take if I were to do the climb again. Your first rappel is close to the 5.8 finish on Honeymoon Chimney As you are climbing up the 5.8 finish, you'll notice some bolts about 15 feet to your left. Those are the final bolts to Excommunication. The anchor bolts are directly above those bolts on the Northwest corner of the Priest. Start your rap from that anchor and follow the bolts down until you arrive on top of a large ledge ~25 feet from the summit. Once standing on the ledge, you will continue rapping down the North side of the tower. You should see more bolts directly below you. From there, the rest of the rappel should be very obvious. Each rap anchor is located on a nice cushy ledge.
 |  |  |  |  |
Essential Gear
What To Bring:
One set of cams from about 0.3 inches (green Alien) up to 3.5-4 inches (up to about #3.5 Camalot or #4 C4 Cam) - ONE set is more than enough. A few mid-sized nuts. TWO #4 Big Bros are very, very good for P1 unless you're really confident that you will not fall out of the 5.9 OW. Double ropes might not be essential (see Descent options above for more info.). Helmets (summit rock is chunky and you might bang your mellon up in the chimney's as well). Long webbing to replace/supplement the summit rap set up (lower rap stations are off of fat bolts or chains).
What Not To Bring:
#3 Big Bro was useless. #4 Camalots would be useless. #4.5 and/or #5 Camalots (5-7 inch cams) are essentially uselss. Despite all the (very good) suggestions I found online, I lugged in one #5. I quickly got rid of it 12 feet from the ground on the initial 5.7 flake of P1. Don't waste your energy hauling it in! It WILL in fact just piss you off in the squeeze chimney portion of P1 higher!
What To Bring - Maybe?:
Short cheat stick was recommended for the bolt ladder (if you're gonna aid) on P3. We brought one just in case but did not need to use it - all the bolts were there. Lower 1 or 2 bolts look pretty old so they might pull at some point. It would suck to cover all the OW terrain and then be stopped by a missing piece on the bolt ladder - something to think about...
More Route Photos
 |  |  |  |  |
More Route Photos
 |  |  |  |  |
More Route Photos
 |  |  |
Web Links
(1) The Priest via Honeymoon Chimney TR
. Excellent TR with great photos (our original inspiration for doing this route!!!) from piquaclimber.com
. This is one of the best sites for desert towers TR's.
(2) The Priest / Honeymoon Chimney route beta
. Good discussion board on the route and some decent photos from climbingmoab.com
.
(3) Good TR from rec.climbing. The statement
"Oh, that's a really good route", he said then paused. "Actually, it made me puke. But it's a really good route." His story of projectile vomiting after the offwidth reminded me of the priest in The Exorcist.
is near and dear to my heart as the same thing happened to me.
(4) Another good TR from rec.climbing. These guys' experiences seem quite in-tune with ours :)
(5) Priest Page on rockclimbing.com . Minimal beta but some great shots, including this AWSOME one of a climber freeing the crux 3rd pitch of Honeymoon Chimney: awesome shot!!!
(6) A short TR on Honeymoon Chimney route from farewelltospring.com. The route does not get a glowing recommend by the author there :)
More to come when I find 'em...