
-
 48007 Hits
-
 80.49% Score
-
 12 Votes
|
|
Route |
|---|---|
|
|
48.51000°N / 121.07°W |
|
|
Mountaineering |
|
|
Spring, Summer, Fall, Winter |
|
|
One to two days |
|
|
5.6 (YDS) |
|
|
D |
|
|
IV |
|
|
Overview
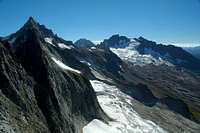
The traverse from Mount Torment to Forbidden Peak is a suberb yet moderate alpine route that will demand the use of every mountaineering skill you've learned. All but the most confident rock climbers will do at least one rappel, probably more. Although the route-finding follows a simple heuristic--when if doubt, drop down on the north until you find a way--there are many small route-finding decisions to be made along its length that will have a cumulative effect on your time, exposure, and overall experience. Easy glacier travel is involved in the approach, and steep snow (ice later in the season) skills are mandatory. Perhaps the most important skill required is the ability to move rapidly and confidently on exposed fourth class terrain. Lots of it. The route is a mile long, and there there are only a handful of places where a fall wouldn't be serious, if not fatal.The views from virtually every point on this route are stunning. From Mounts Baker, Shuksan, and Eldorado Peak to the west, to Boston, Goode, and Sahale to the east, and the likes of Formidable, Glacier Peak, and Johannesburg Mountain to the south, there is no shortage of National Geographic cover quality scenery. In general, the rock is decent, though untrustworthy enough to keep you on your toes.
Approach
Climb Mount Torment by whatever route pleases you. The route begins from the summit.Route Description
As the name implies, the route is typically done from the summit of Torment to Forbidden, though in principle there is no reason it couldn't be done the other way. This page describes the usual Torment-Forbidden direction.Get to the summit of Torment whichever way suits you best. The South Ridge is one option that offers a bit more interest than the commonly used Southeast Face, though the SE face may be somewhat faster, especially if you're not willing to solo the South Ridge.

From the summit of Torment, scramble down the Southeast Face several hundred feet until it is possible to traverse east (skier's left) towards a notch in Torment's east ridge. This is not the lowest notch, but the one to the west of it.
From the notch gain the small glacier (first decent bivy option) on the north side of the ridge. Depending on time of year and snowfall, this might be a scramble, or it might be a free-hanging rappel (for us it was a rappel). Negotiate the glacier (open bergschrund(s) may necessitate additional rapping - fixed anchors can be found) down and east towards a ledge system.
 The second saddle and the snow/ice traverse.
 Start of the knife-edge section
Once back on rock, traverse east and up to a second notch in the ridge (snow bivis). From here to the next notch the route traverses below the ridge on steep ice/snow. Once past the snow/ice traverse locate a ledge system on the north side of the notch that leads once more to a traverse on mostly fourth class rock. Eventually you will reach a rib from which a third notch/saddle is visible. Climb straight up the rib as needed until it is possible to traverse over to the saddle. (Snow bivis, poor rock bivis).
 Scrambling along the knife-edge.
Cross over the saddle to the south side of the ridge, and traverse third class ledges until you arrive at the start of the knife-edge section of the route (i.e., the second half mile). From here the route follows on or near the ridge crest, dipping down to ledge systems on the north as needed to pass gendarmes. You will eventually reach a section that bears a remarkable resemblance to a sidewalk that ends at a point just above the top of the approach gully for the West Ridge route on Forbidden Peak. A single rap on fixed anchors will get you to third class ledges that will lead to the start of the West Ridge. Alternatively, it is possible to once again use fourth class ledges on the north to avoid the rappel.
 The steep tower on Formidable's West Ridge
From here the route joins the West Ridge route on Forbidden Peak. Basically, scramble up the ridge, staying on the crest where possible, or slightly on the north side where necessary, until you reach a steep tower. This is the technical crux of the route (such as it is--5.6). The tower is passed via a left-facing corner on the left. A perfect belay station can be set up at the top of the tower if need be. From there the route is fourth class, again either on the crest or the north side. A short class 5 bouldering move is needed to descend the west summit on your way to the higher east summit. It's not as hard as it might seem.
Descent
Congratulations, you've completed the route! Of course, you still have to get down, and Forbidden is not an easy peak to descend.Assuming you started from Boston Basin, your best options for descent are either the east ledges or downclimbing/rapping the West Ridge. The east ledges is tedious, exposed, and rather loose in places. It does not offer much in the way of protection. Expect about 4 hours from the summit back to camp. If returning via the West Ridge, you will have to down climb most if it, since the angle doesn't lend itself well to rappelling. Descent time via the ridge is probably comparable in terms of time, but may feel more secure to some. It is certainly more solid and easier to protect.
Buckaroo - Sep 4, 2012 4:32 pm - Hasn't voted
Rope Length"" If climbing roped, a 50m rope is more than sufficient."" Just a word of caution. The normal SW face descent off Torment involves 4 to 8 30m rappels. If you are going to bail off this route this is one of the few places to do so.
olsztynr - Jul 16, 2023 2:05 pm - Hasn't voted
Rope length"If climbing roped, a 50m rope is more than sufficient."" To add to the above comment - we made many rope-stretching rappels with a 60m rope, including rapping to grassy ledges on south side (steep snow bypass), and through cat-scratch gully descent. I think anything less than 60m rope is ill-advised.
Steve Larson - Jul 16, 2023 9:29 pm - Hasn't voted
Re: Rope lengthThanks for the additional information. We did not take that route on the descent, so had no first-hand beta to offer. Hopefully this will help others who do this route in the future avoid a potentially challenging and dangerous situation.