
-
 47185 Hits
-
 87.31% Score
-
 24 Votes
|
|
Route |
|---|---|
|
|
51.08056°N / 115.42222°W |
|
|
Mountaineering |
|
|
Summer |
|
|
One to two days |
|
|
5.5 (YDS) |
|
|
III |
|
|
Overview/Approach

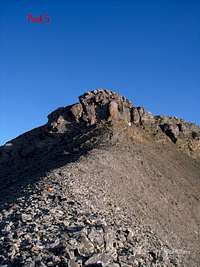
Peak 7, Main Summit
The Mount Rundle Traverse: an unpublished and often gossiped about objective, but who has really done it? I have never actually met anyone who really did but ran into plenty of folks who thought they knew someone who did. It had eluded me for many years. Although I had done the Mount Lougheed Traverse (a more majestic alpine rock outing in my opinion), the Mount Rundle traverse had escaped my focus all these years. However, you can only stare at the massif for so long before it begs one's attention. I had soloed many of the lower end (technical) alpine routes in the Canadian Rockies, i.e. Mount Assiniboine, Mount Joffre, Mount Sir Douglas, etc. and was committed to doing the Mount Rundle Traverse in light style, meaning no harness or rope for rappels either.


How long is it? How many peaks must you surmount? If you really need to ask those questions, perhaps you should give it a pass. Just observe the ground of the Mount Rundle massive as you drive from Canmore to Banff along the TransCanada and assume it is a long day to be sure. The only beta I discovered regarding the length of the route before I took on the ridge (and really only beta I had period for the most part) was that the trip possibly took 17 hours on average and many folks took two days utilizing a variety of bivy spots. It probably deserves an Alpine IV rating for sheer length and elevation gain, but I could not bring myself to give it that grade simply for lack of technical difficulty and lack of glaciers.
My observations of the Mount Rundle Traverse were as follows, 7500’+/- accumulated gain, basically 11 distinctive peaks worthy of their own photo (see climbing sequence below) that I completed from Goat Creek parking lot to the Banff Springs Hotel in 13 hours+/-. That was solo and moving at quite efficient speed, but still taking plenty of snack and photo breaks. Not taking a rope cost me 500’ on the last rappel (50 or 60m rope-10th peak descent) in that I was not able to down climb it and therefore had to descend on south westerly slopes before I could comfortably down climb a shorter section of the cliff band. The other rappels were easily, albeit one was a bit treacherous, down climbed without a cost in elevation. Regarding that subject, I am 50/50 on taking a 60m rope. The extra weight would suck, but then losing 500’ that you have to immediately regain towards the end of the day was a bit of a drag as well.
There is the opposing style of course. Four hours into my climb, I ran across a party of three. It was 8:30 in the morning, just before I arrived at the base of the main peak of Mount Rundle (Peak 7 in my count). They had yet to put away the tent, stove and sleeping bags. They had on huge boots, the best of climbing brand clothes, sorting through ropes and gear. “Where did you come from?” was the response as I strolled past their camp in my sneakers, t-shirt and sunglasses. The one gentleman who had done the traverse before, pointed out the route he knew up the main, most intimidating, peak of the group, and I went on my way never to see or hear from them again. I truly wondered if they might not be in for a three day expedition to conquer the same route I was day tripping with all that gear and extra weight. The most dangerous part of my trip had to be the illegal golf course crossing I made to meet friends who were there to pick me up in Banff.
The description below is assuming a traverse from Canmore to Banff. Drive up to the Goat Creek parking trailhead just south of the Canmore Reservoir above Grassi Lakes (Whiteman’s Pond). Hike back north up the road to the first large utility pole to catch the well trodden trail that takes you on the EEOR (East End of Rundle) scramble.
Route Description


Hike up the EEOR scramble trail for several thousand feet to the first summit (Peak I) of the traverse. This normally takes me 1.5 hours of moving relatively fast with a pack on. Quickly and easily do away with Peak II immediately to the west. These peaks have always been treated separately regarding the EEOR scramble, so I will not diverge from that practice here. Easily scramble up Peak III and hike past Peak IV on its southern flank, which has a remote weather station on its summit. This might take you to three hours if even.
Hike up Peak V, which is going to give up a much more intimidating view than you have had thus far of the massive central main peak of the Mount Rundle massif, with Peak VI blocking your view of the start of the route up the main peak (VII). Hike up and over Peak VI with a bit of hands on down climbing. I reached the col between Peaks VI and VII in four hours. There was a team of three bivying at this spot, and it looked conducive to such in terms of snow available for water etc, but was located too early in the trip for bivying I thought. There are quite a few rock built bivys further along.
Continue along the ridge, then left bypassing a bump I refuse to call a peak and continue to the base of the impressive arête on Peak VII (built rock wall bivy). Traverse left breaking through several short and rubble strewn rock bands working your way below the steep wall above until almost at the water streak/drainage. Start climbing right of the drainage, picking the route of least resistance, but always slightly angling back right until you eventually meet up with the upper ridge of this peak. (route topo photo included) Continue to the summit of Peak VII where there was a summit register in 2009, but no working pencil or pen. Enjoy a great view of Mount Assiniboine from the summit.
Do a short down climb on descent of the main peak but traversing left a bit where I found rappel tat in 2009. Down climb decent rock in the mid 5th class range or take a short rappel. Continue on some hands on scrambling to complete the descent of Peak VII. Take Peak VIII on the left, which is sort of a maze, but eventually tops out on the summit next to a very large detached tower to the north.
Further on descent of Peak VIII will deliver you to your first crux (photo) where you have three choices. You can choose to rappel from a makeshift hand line of some sort atop a precarious pedestal; down climb on loose rock to your right (north); or down climb on hard ice in a narrow chimney to your left that might cliff out at the end. Having no rope, my decision was quite easy, down climb to the right. I found the best rock I could and avoided the very loose corner itself. I down climbed on face moves just to the west of the loose corner and traversed back into it at the bottom. This is definitely mid 5th class down climbing to be sure. Then traverse along the precarious edge of the before mentioned pinnacle and break back onto the ridge proper.
The lower flank protecting Peak IX on the ridge proper looks ominous for sure, but is easily outflanked by descending to the left on rubbley slabs, then re-ascending to its summit which has the largest detached tower on Mount Rundle just meters away. Continue easily along the ridge for the 10th Peak.
Peak X has a little 5th class climbing involved in taking on a short chimney just below its summit. A reprieve to be on your hands for a short bit after all the scree bashing on your legs. Once you top out, you are right at the summit of the 10th peak and finally are staring at the final peak of the traverse, the 11th Peak, also known as the “West End” of Mount Rundle.
Now comes the true crux of a solo ascent without a rope. As you descend the 10th Peak, you will abruptly come to a full rope rappel anchor (2009) that sets up a rappel that runs down an exposed corner. This is not a down climbable option, even for a seasoned mountaineer like myself. Since I chose to make the traverse without a rope, I was forced to descend the southwesterly slope of the 10th Peak until (500’ lost in elevation) I could find a reasonable down climbing option along the same cliff band which formed the before mentioned corner (photos). Then you have to re-ascend the scree laden slopes back to the ridge. I tried to traverse west at an angle, but that saved me nothing really as I got cut off by a huge snow filled chimney.
Regain the ridge and descend to another very ominous looking headwall up Peak XI (West End). You can break through this headwall by descending far left and regaining the lost elevation or climb mid 5th class ground more towards the arête of the ridge, which is what I chose. The descent of the West End is via the scramblers route, which drops you 4000’+ down into the town of Banff at the golf course.
Climbing Sequence
 |
 |
 |
 |
 |
Climbing Sequence II
 |
 |
 |
 |
 |
Climbing Sequence, III
 |
 |
 |
 |
 |
Climbing Sequence IV
 |
 |
 |
 |
 |
Climbing Sequence V
 |
 |
 |
 |
 |
Essential Gear
Not much for giving advice here due to the wide range of comfort zones for climbing long alpine rock routes in the Canadian Rockies. As I mentioned above, I ran into a group of three with tent, sleeping bags, stove, ropes, rock gear, large boots, fancy mountaineering clothing and jackets bivied at a spot that took me just four hours to reach with runners and a cheap t-shirt on. I did carry Trango’s in my pack and switched out to them for the ascent of Peak VII, more to avoid bruising to my feet than for any technical reasons. I carried three liters of water up there, but could have got by with half that in late July as Peak VII had plenty of running water to refill empty bottles with. To carry a rope or not carry a rope is a 50-50 proposition I suppose. A 50m or 60m 8.0 would have been nice for the rappel on Peak X that cost me 500’, but then the fact my backpack was light was also quite a pleasure. I choose, as I normally do, to go with a long alpine ax used as walking stick versus a hiking pole because it is much easier for me to switch to hands on scrambling or climbing with an alpine ax versus hiking pole without actually having to put it away. My cell phone did not work right on the summit of Peak VII, but did work on Peak VIII. Take a pen or pencil for the summit register on Peak VII.
External Links