
|
|
Route |
|---|---|
|
|
47.52938°N / 120.71905°W |
|
|
Technical Rock Climb |
|
|
Most of a day |
|
|
III, 5.8 - 5.9 |
|
|
Approach
Follow the directions on the main page of Snow Creek Wall to reach the base of the wall. From the base (the ascent trail deposits you roughly under the Shield), traverse a well-beaten trail left (south) following the base of the wall for about 150 yards (roughly) or until the trail takes a steep dive downhill (still following the base of the wall). Don't go downhill, this is your "rack up" point. Remember to hang your packs out of reach of curious/hungry mountain goats (hang on trees). From the point on the trail just before it goes steeply downhill, scramble up and left onto the class 3 rock. You're traversing diagonally up and left over easy terrain. Your goal is a LARGE evergreen with slings around it. Just before you get there, you might want to rope up on a nice, wide, sandy ledge as the going becomes a bit tougher (exposed class 4). I will describe this climb the way we started it. The party behind us chose to free solo our first pitch. Note that Orbit begins almost directly beneath the prominent dihedral, Mary Jane Dihedral.
 |  |  |
Route Description
The discrepancy in the rating given is due to two factors: (1) Some options exist which determine the overall route rating and (2) discrepancies in literature. In my description of the pitches, I will try to provide the ratings according to various sources.
Pitch 1: 5.6, 180 feet. Scramble up to the large tree with rap slings on it. Move left and enter a 4th class gully. Follow gully up toward the large tree at the top of it (also with rap slings around it). Pull onto the ledge next to the tree (5.6 move or two).
Pitch 2: 5.8, 90 feet. Move up the slabs and cracks directly above the belay ledge. Enter a dihedral which becomes progressively more difficult. Crux move is pulling onto an upper ledge using a stemming/chimneying move to bypass a small "roof". You're now about 30 feet below Mary Jane Dihedral (a prominent 5.9 dihedral in the SE face of Snow Creek Wall).
Pitch 3: 5.8 - 5.9 (Smoot - Nelson/Potterfield), 150 feet. Climb up to the base of the MJ Dihedral (low 5th) and pick up a ramp heading left and up at a diagonal (low 5th class climbing). Follow the ramp for about 50 feet or until you're at the base of the 5.9 finger crack system (c. 30 feet of it). Climb the thin finger cracks (finger jams and stemming w. feet) moving slightly left near the top. Gain a small ledge with a mid-sized bush just above it. It's more of a slot behind a flake. Sling the bushes and the tip of the flake for belay anchor. Variation: J. Nelson and P. Potterfield's guidebook claims that the 5.9 cracks can be bypassed by continuing the ramp traverse further left and scrambling up the low 5th class gully up (see photos). Looking at pitch ratings, this seems to be the crux, but in reality...
Pitch 4: 5.8 - 5.8+, 150 feet. Move up and right from belay ledge to gain the low angle slab with a thing finger crack down its center. Climb up the slab (thin cams) past a double bolted anchor (one good bolt + one "nail"). The slab bypasses minor roofs on the right. About 10 feet above the bolt, move right around the arete. Climb up the face on the right side of arete (thin cams all the way since the bolts). Continue up the face with decent pro opportunities and some old bolts. Clip a piton and climb 10 more feet to gain a narrow stance that is to be your belay station. Book calls this mantle the crux of the pitch. The stance comes equipped with two rusty, old, thin bolts. These can be backed up with microcams.
Pitch 5: 5.8, 100 feet. From belay, climb straight up the easy dihedral (5.6). The dihedral becomes thin (5.8) after about 40 feet. Move right to gain the knobby face. Continue up the face. Pull over an easy "roof" (maybe 5.7) and continue up the chicken head studded face (sparse pro, easy climbing) to gain an large ledge below a large roof. Belay.
Pitch 6: 5.6, 200 feet. From belay, move right and up bypassing the large roof on its right side. Climbing goes on easy chicken heads but pro is sparse. Run out the rope genrally bearing up and left (follow easiest line). Belay when you're out of rope (should be enough to reach 3rd class ledges up top).
Pitch 7: low 5th, 150 feet. Most will want to belay this last easy pitch as more chickenhead climbing on low angle (but exposed) terrain brings you to the sandy summit area of Snow Creek Wall.
Descent: From the top, hike left looking for cairns that mark the descent "trail". The trail is probably 3rd-4th class in places and so keeping your rock shoes on for the descent might be a good idea. Continue down skirting the left side (that's climber's left) of Snow Creek Wall. The final 300 feet or so goes down a dirty steep class 3 gully. If you do this right, there should be no need for any rappels.
Pitch Linking Scheme:
Provided by Martin Cash.
With a 70 meter rope, this route can be done in 3 pitches, plus some simulclimbing if you are trying to go fast.
Pitch #1 - Scramble to just below the second tree (end of pitch #1 in the description. Pitch #1 will go to the base of the 5.8+ finger cracks. (about 220 feet)
Pitch #2 goes to the belay for pitch #4 in the description. (225 feet)
Pitch #3 climbs the hard dihedral, the roof, and chickenheads as high as you can go. (230 feet).
Now simulclimb about 80 feet of easy terrain to the top.
 |  |  |  |  |
Essential Gear
Standard rack with a good number of small cams (1.5 inch and smaller). I used one #4 Camalot on pitch 4. Helmets.
Optional: goat herding equipment.
 |
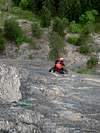
More Route Photos
 |  |  |  |  |
More Route Photos
 |  |  |  |  |
More Route Photos
 |  |  |