
|
|
Route |
|---|---|
|
|
39.09590°N / 108.723°W |
|
|
Technical Rock Climb |
|
|
Half a day |
|
|
III 5.9 |
|
|
Approach
See Getting There section on the main page for Independence Monument. Staying on the Monument Trail will bring you to within 100 yards of the northern prow of the Monument in about 1 hour from the trailhead.
 |  |  |
Route Description
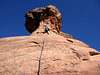
Otto's Route climbs to the summit of The Monument in 5 mostly moderate pitches starting at the center of the west face of the tower. It offers the least technical means of reaching the summit of this spectacular desert tower (all other published routes involve some aid climbing - see my review of Guidebooks below). The route has a rich and - much like its first climber - a colorful history (see Eric Bjornstad's Desert Rock III: Moab To Colorado National Monument guidebook for more on this). In short, John Otto made the first ascent of this spire in 1911 by chopping steps in the soft sandstone and drilling and installing metal rungs for ladders. The rungs are gone today but the holes (and the ever-eroding) steps remain. It is thanks to Otto's modifications that the route has the moderate free rating that it does (without those, the route might go at 5.11 or higher). Furthermore, one should not judge Otto by today's standards. He was afterall one of the founding fathers of the Colorado National Monument.
Many of the guidebooks' topo's for this route seem confused (see my Guidebooks section below) - pitch sketches and ratings are mis-represented. Two exceptions are the Supertopo's Desert Towers Select (essentially dead-on route topo and ratings) e-book and Eric Bjornstad's Desert Rock III: Moab To Colorado National Monument which does NOT give a topo for this route. This is not that big of an issue however as once the start of the route is located, staying on track is pretty trivial. Pitch ratings below are per Supertopo. Pitch lengths are my estimates (rough). Route starts up a low-angle chimney system (wide chimney/gully) near the center of the western base of the tower (will provide photos to clearly show the start).
Pitch 1: 5.5, 140 feet. Move up the low angle chimney following low-5th class terrain. Supertopo (and other guidebooks) call this terrain class 4 but I thought that it was a bit harder than that (it's probably due to the relatively sandy/slippery nature of rock here). Move through a squeeze chimney about 60 feet above ground (~5.5). Continue up via slabby "steps" (some of the terrain felt a bit sandbagged at 5.5). You'll first encounter remnants of Otto's ladders on the upper portions of this pitch: 2-3 inch diameter drilled holes. One fixed piton somewhere here. Pitch ends at a triply bolted anchor at a not-so-comfortable stance.
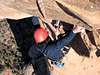
Pitch 2: 5.8, 80 feet. From the stance, walk right and move up low angle slabs (unexposed) to the base of an obvious, flaring low-angle chimney. Getting into the chimney is the crux. Otto's holes make this doable at about 5.8. This is the place to use that large cam you've lugged all the way up here - a number 4 or 4.5 Camalot protects the crux moves. Going is much easier above and ends at the mouth of a low-angle gully at another bolted anchor (note the rope grooves carved in the soft sandstone by climbers' ropes).
Move the belay by "hiking"/scrambling (class 2-3) up the unexposed gully for about 60 feet. You'll pass thru. a narrow slot and exit onto wide, open ledge systems. Look for fixed pitons on the wall to your left. Set up for next pitch here.
Pitch 3: 5.7, 70 feet. Move up the face (about 5.5 to 5.6 initially) and clip a good, fixed piton about 25 feet above the ledge (no pro before then). Follow the steep face (again thank Otto for the nice holds in form of holes) past two more good-looking pitons. Top out just above on the crest of the formation just south and below the summit. Belay from bolted anchor atop another large ledge.
Pitch 4: 5.9, 80 feet. Pull onto the low angle slab and head toward the summit "cap" formation. Going is low-5th class here (thanks to Otto's chopped steps) but there is no protection. As you hit the headwall, you can clip the first of 3 nice pitons that protect the crux moves. Few feet of cranking through overhung terrain (good positive holds for hands but slippery feet and slight overhang) puts you on a comfortable but small ledge 8 feet below the summit. Bolted anchor (and a steel rod?).
Pitch 5: 8 feet, mid-5th class. Mantle onto the summit plateau and take in the views. You'll need to downclimb this section as there is no fixed rap set up on the summit plateau.
Descent:
We did three double rope rappels down the west face using two 60 meter ropes. From the bolted anchor 8 feet below the summit, make a double rope rappel to top of P2 (directly down and swing slightly left or north). Do another rappel to top of P1 - single rope MIGHT suffice here but we did double rope rap (to save time as we already had double set up). From top of P1, rap with TWO ropes straight down to the ground.
 |  |  |  |  |
Essential Gear
Small to mid sized rack. Single cams to #4 or 4.5 Camalot (for P2 crux) and a few nuts. The going is mostly easy and/or fixed protection is available. Helmets. Double ropes.
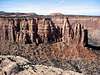
Views From Summit
 |  |  |  |  |
Guidebooks
(1) Desert Rock III: Moab to Colorado National Monument by Eric Bjornstad. Description given for this route is fairly accurate though pitch three is incorrectly graded at 5.8. The pitch is definitely NOT 5.8 - 5.6 to 5.7 (as given in Supertopo's guide) is more like it. The book describes a 5.9 variation start to pitch 1. No route topo is given. This is also the only book listing routes on Independence Monument other than Otto's.
(2) Desert Select by Supertopo. This e-book provides the best description and the best topo for this route. Essentially dead-on accuracy.
More coming soon.....
More Route Photos
 |  |  |  |  |
More Route Photos
 |  |
chicagotransplant - Sep 19, 2010 12:20 am - Voted 10/10
Additional rappel infoA single 70m rope can be used for the first rap off the summit, make sure you land at the base of Pitch 3, even then we only had about 1-2' of tail on the end. A single 60m rope will NOT reach. If you have a 70m, this will help save some weight, you still need a double for the final rap, but you can stash a rope at the top of pitch 1's anchors if you have a 70 and not have to carry/trail it through the crux sections.
Diggler - Nov 28, 2017 12:03 pm - Hasn't voted
Additional potential pro'Tri cams fit into those old drilled pipe holes perfectly, & weight next to nothing, if you want an extra safety factor :)