The Beginning
Well since I was kicked out to the Guild of Radical Ice Climbing for publishing
'So you Want to Sharpen your Tools!'
I figured, 'what the hell!', I might as well get thrown out of the International Guild of Knot Tyers as well. So here is the result
For a long time I have been tinkering with trying to tie one of these

Of course I could just go here
Rope Rugs and get them to do it much more cheaply and quickly that I ever could but what is the fun in that.
Some Background
What one is attempting here is a
Turk's Head knot which comes in more shapes and forms that you can imagine. Whole books have been written about it.
I have looked at quite a few and they always seem obsessed with wrapping one of these things about the main-mast, a tiller, ore or some other such thing. Considering most of these books have titles like 'The Marlinespike Guide' and 'Knots for Sailors' one can understand this wrapping obsession. Unfortunately this does not help in what we want to do here.
As a way of aside this knot has been befuddling for many many years. I first saw them being tied while I was in the Navy by the senior bosuns, whose only other job was to make life for us jr. Officers a right horror.
They kept it as a trade secret and never let any of the uninitiated see them make one until we could prove we could make one ourselves. I never did get in the club.
Endless Frustration
Well armed with my rather dog-eared copy of 'The Admiralty Manual Of Seamanship' I started on my quest again.
This time I was also armed with the power of the Internet. Well there are any number of sites out the best I have seen is
Alan Folsom's knot page but the same problem kept coming up no matter how clear the instructions I just couldn't get any of these knots tied.
My usual result was a long stream of expletives followed by a knot salad thrown against a wall in a fit of frustration.
I would see these picks like this
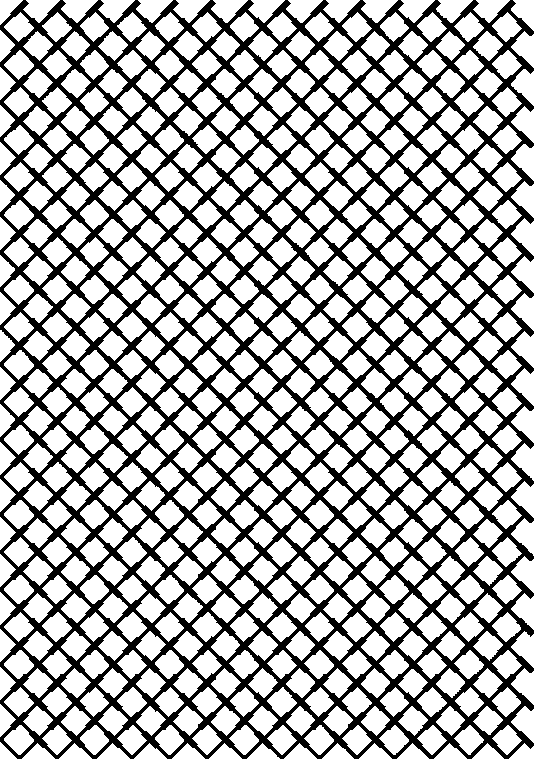
and just get hopelessly lost as I was trying to tie it.
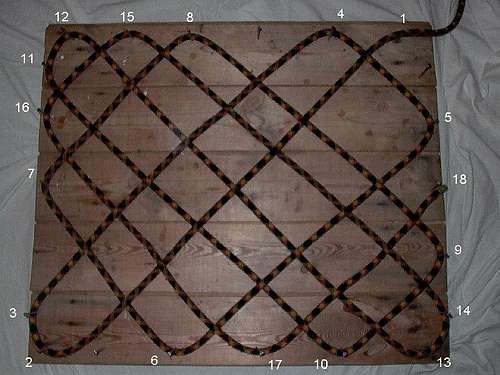
Also most knot tiers seem obsessed by the words Bight and Lead and one typically sees a pattern marked and number accordingly like this
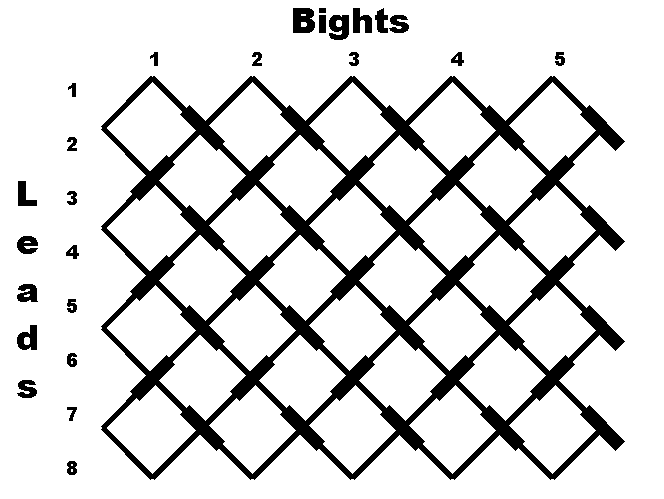
which is a 5 bight by 8 Lead pattern.
The Bights part is easy enough, 5 turning points across the top. It was always the Leads that confused me. I only ever see 4 Leads when in fact there are 8, 2 for each turning point.
Just to make it more confusing one can start from any point in the knot, and most diagrams are made to wrap around something one can see why I was always getting lost trying to figure out how to turn the right hand side of the knot.
Epiphany
That is until now. I finally stumbled on the pattern and figured it out. So without further ado here is how to do it.
The key is that the grid numbering of the Bights and Leads has nothing to do with the order of wrapping them.
So below I have create 6 Bights by 10 Lead pattern where the turning points are sequentially numbered.
![6*10 pattern]() 6*10 pattern
6*10 pattern
and if you do not like these colours here is another view
![6*10 pattern]() 6*10 pattern
6*10 pattern
I have kept with knotting tradition using bars at the crossing points but with the color it is much easier to see which goes over and which under.
So in my pattern I have 6 Turning points across the top and 5 turing points on the sides and I closed the right hand side of the turns and have numbered each turning point in order just to make it super easy.
The next point to remember is that one complete loop is called a Turn. After one Turn the pattern just repeats it self, so if you get the first one correct there is no excuse to get the rest of your Turns wrong. The key
is to remember the Turns always lay next to each other.
Get Pegged
So lets get started First get yourself a good working platform I use an old table top that I can hammer nails into but a sheet of 1/2 plywood will do just fine.
So I hammered in my nails 6 across the top and 5 along each side and slightly past the last row. It does not really matter if they line up exactly or if they are exactly evenly spaced because the knot will work itself out if it is tied correctly.
In my example below I made the space rather large to you can see that is going on. For your first mat this is the way to go as it is easer to see the pattern.
However you will be spending a long time tightening you knot afterwords.
Normally for a 60m rope you would get a mat about 70cm by 50cm wide.
As well in this example of a 6*10 I will get about 5 complete turns in the mat with none of the rope left over.
So once you are pegged in we will start.
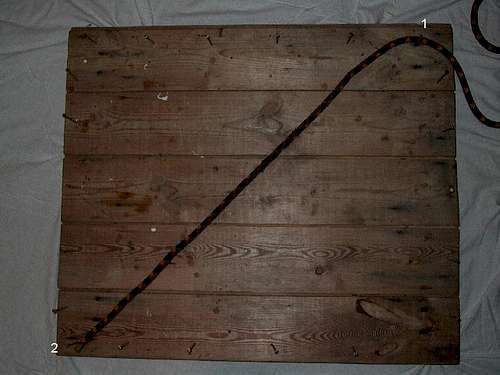
Step 1
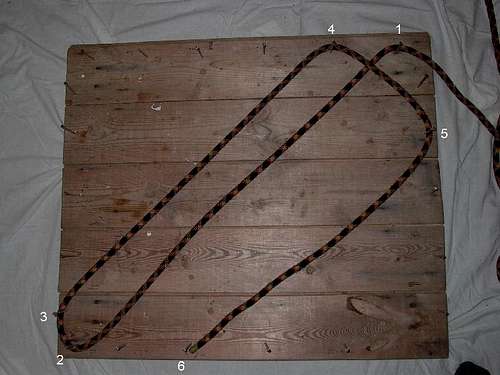
![1-2]() From 1 to 2!
From 1 to 2!
Hey as some fat guy once said 'All Journeys begin with a single step!',
so here is our first.
Here I am pulling the rope out of the coil and passing it around each of my turns. You could just as easily start the other was and pull all your rope though each time but that is too much work.
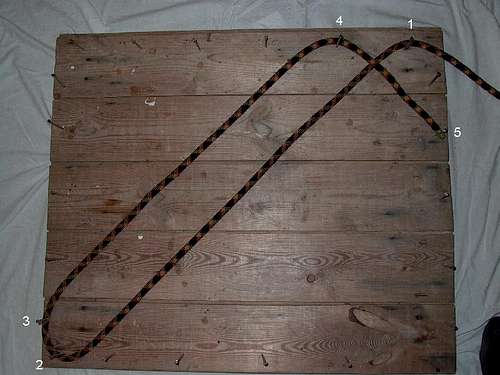
Step 2
![3-4]() Around 2 then around 3 and Across to 4!
Around 2 then around 3 and Across to 4!
OK be steady this is our first big turn coming up.
Step 3
![4-5]() Around 4 and Across to 5!
Around 4 and Across to 5!
Oh no we have to make our first decision. Over or under?? Well unlike many things in life we can just look at out pattern above and see what to do.
Looking at the pattern one sees a bar so that means over we go.
Step 4
![5-6]() From 5 and down to 6!
From 5 and down to 6!
Well simple enough you might think but this is were I was always getting into trouble!
So watch you step because if you make a mistake here you will knot (ha) know it until later and you will be spending your time undoing what you have just done.
Step 5
![6-7]() From 6 up to 7!
From 6 up to 7!
OK now put you thinking caps on because here come the tricky part
Looking at our pattern we have to go over the first line (21-22). Hey it isn't there? So you have to just pretend it is.
Next we go under the next line (2-1) well shiver me timbers we have to go over the next line (3-4) and then over the imaginary line (19-20) and then
around Turn 7.
Actually if you got this far you will most likely get the rest so congratulate yourself.
Step 6
![7-8]() From 7 up to 8!
From 7 up to 8!
Well another easy one.
Step 7
![8-9]() From 8 over to 9!
From 8 over to 9!
Again we have to cross some more imaginary liens. Just keep your pattern sheet handy and you will get though it.
We have Line (19-20) to go over then (3-4) to go under then (You guessed it) over line (1-2) and then down to old post #9.
You might begin to notice a few things here at each turn you always go over the next line ahead and likewise the line behind is always going under.
This is the pattern. Remember this and you can do this without all these post and pattern papers which I am to understand the goal of all knot makers.
step 7
![9-10]() From 9 over to 10!
From 9 over to 10!
Enjoy this one it is the last one that you will not have to think about.
Step 8
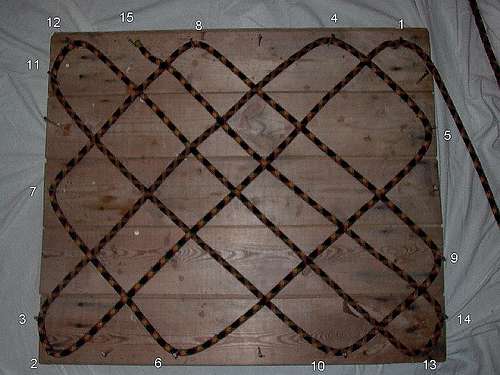
![10-11]() From 10 up to 11 and then 12!
From 10 up to 11 and then 12!
Well this time I am going to let you go by yourself.
So enjoy figuring this one out.
Step 9
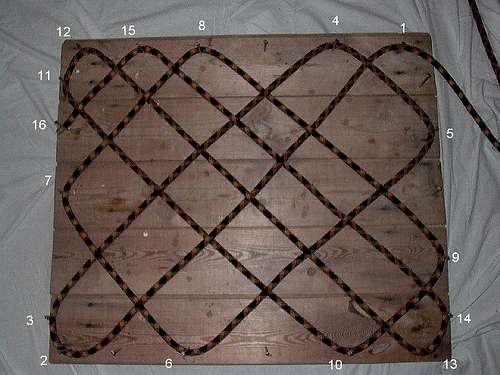
![12-13]() From 12 back down to 13 and around to 14!
From 12 back down to 13 and around to 14!
Well how did 10 to 12 grab you.
Lots of fun eh! Guess what you are also half way there.
Well this one is the same and you can check your progress here if you want.
Look at Line (10-11) and Line (12-13) they should be opposites of each other meaning when a cross on (10-11) is over the opposite cross on (12-13) should be under.
If this is not the case, Check you Lines before you go any further as something is awry.
Step 10
![14-15]() From 14 up to 15!
From 14 up to 15!
Well the same thing again.
Remember to check you pattern and note that this Line (14-15) should have the same over and unders as Line (10-11)
Step 10
![15-16]() 15 over to 16
15 over to 16
By now you are thinking this couldn't be any easier.
Just check to make sure that line (15-16) runs under (12-13) and over (10-11) and you should be sitting pretty.
Step 11
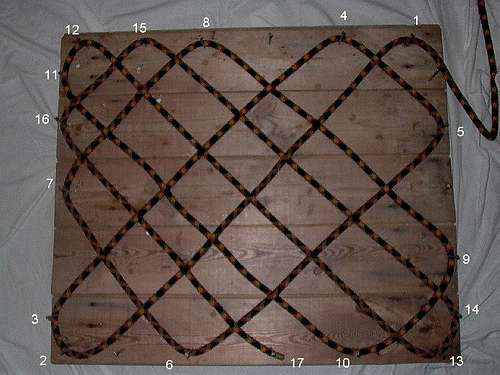
![16-17]() No 16 over to 17
No 16 over to 17
Hey this is beginning to make sense!
Step 12
![17-18]() No 17 over to 18
No 17 over to 18
Now it seems much easer eh!
Step 13
![18-19]() No 18 over to 19
No 18 over to 19
On the home stretch now!
Step 14
![19-20]() 19 to 20
19 to 20
Almost there!
Step 15
![20-21]() 20 to 21
20 to 21
The last little one!
Step 16
![21-22]() 21 to 22
21 to 22
Now you are done. doesn't that feel good.
Go get a beer, coffee, double malt or whatever is you poison.
You have passed your test and are Worthy!!
Well what now!
Well now it come to the boring part.
You simply run the other end of your rope back the way you came. Over and over again until you run out of rope.
It should look something like this.
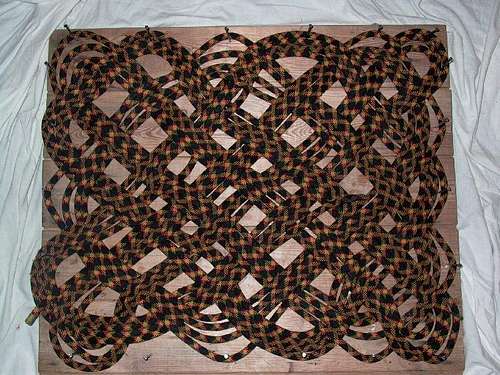
![Rope Salad??? No it is a Rope Rug!! Almost!]() Done (Well Almost)
Done (Well Almost)
A rather loose collection of lines I know. The key to remember here is you are just following the original turn so when it goes under you go under and when it goes over you go over.
something like this
![Over and Under]() Over and under
Over and under
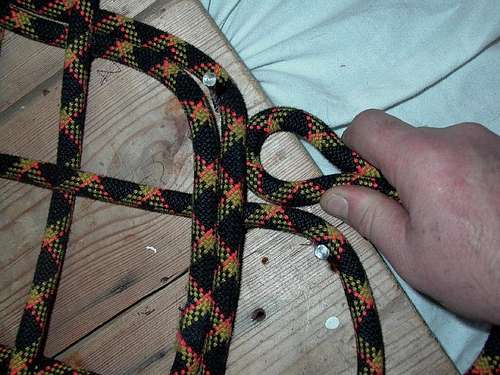
also when you are at a turn remember to place your rope on the inside like this
![Always on the inside]() Always on the inside
Always on the inside
and be consiteant in always placeing them inside the turns if you mix them up you will be spending hours trying to sort them out later.
You might notice I am pulling a bight through here and that is to save time. What I do is start on one side with the running end like this
![Pulling it together]() Running end
Running end
and then on the pass around the next turn I use a bight like this
![A Bight]() Bight End
Bight End
This is so I can pull the rope faster as it will be properly flailed for each pulling.
With two people you can get this part done very quickly even more so if the board is up on a table.
Tightening down is what you have to do now.
Now special tricks to this. Just start a one end and pull out the excess keeping the weave a little loose so you can feed in more turns.
The Bitter End
and so we are done.
As I said at the beginning this was done very loose so I took me a good 3 hours to tighten this one down.
Normally I try to peg down the first turn at about the approximate size for the mat I am making. Oddly enough standard climbing rope sizes of 50 and 60m come out at about the same size so there is no need to change you basic set up for one rope length or another.
Once you have done it a few times it takes about 35mins to create one fully tightened down but for your first one expect to spend most of the day on it.
Also to keep it simple I did not create a large number of Bights and Leads on this mat. The best results for a 10 or 11mm rope is 7 or 8 Bights with at lest 9 or 10 Leads and 3 turns.
9mm and smaller ropes you can go with more Turns 4 or even 5. With the large ropes you can go down with as few as 5 Bights. I did this once and
the mat looks nice but is not as flat as some like.
I have also tried to tie one with only 3 Bights, 4 Leads and about 15 Turns, the result was a mess that did not lie flat at all and fell apart into a rope salad if it was moved.
The problems is that with more turns, the weave gets very tight but the edges get flimsy. The optimum is about 3 to 5 turns in a mat. If you have too much rope you can just cut it off.
I have also tied one with 10 Bights and 13 Leads and only two Turns in the weave but this did not look good and it was too flimsy even when tighten down.
I have also made one with a 5 Bights and 8 Leads with 7 Turns with a 45m rope which looked very nice. Fortunately, it was a very stiff rope so the edges do not flap about that much.
So depending on your rope thickness between 3 to 5 Turns works best.
Enjoy.
For super bonus points can anyone tell me what year the rope was made in!!


Comments
Post a Comment