
-
 4779 Hits
-
 72.08% Score
-
 2 Votes
|
|
Route |
|---|---|
|
|
50.73750°N / 115.08056°W |
|
|
Mountaineering, Trad Climbing |
|
|
Summer |
|
|
A long day |
|
|
5.8-5.9 |
|
|
5.8 (YDS) |
|
|
II |
|
|
Overview/Approach

This is a 4000’+ ascent day. The ideal time to climb Mount Brock is from late May through September. Ice and snow start to build up on the route in late September. I and another SP’er with little if any alpine rock experience took 22 hours to complete this route and its descent. That does not include the 5.5 hours we slept (using the word loosely) on the mountain awaiting the light of sun to reappear. This route can obviously be a full day out and is much more difficult than SAC’s “published” description and/or neighboring Mount Blane which is given the same rating by SAC.
Follow the King Creek Ridge trail through King Canyon. You will notice markings on the wall relative to the old ranger climbing routes. If you are approaching in May, you will still see several remnants of the ice climbing routes formed by seepage into the canyon from above. You will cross back and forth through King Creek as you work your way east to a fork at the opposite end of the Canyon, approximately a 30 minute hike. There is a large owl’s nest burrowed into a cave on the north wall along the way. These creek crossings in spring like conditions can be taxing. You will find hiking poles extremely helpful in keeping you out of the torrent as you straddle downed trees. Once at the fork, turn left and follow a faint trail on the east side of this portion of King Creek. There are several trails at this juncture and it is important to stay low by the creek and follow mostly game trails back and forth for approximately another 30 minutes as you look for the south-east pillar of the west rib to come into view. The first mountain you feast eyes on as you come out of the canyon or even before you enter the canyon is Mount Blane. Mount Brock is one mountain to the left (north). It can be confusing which gully to ascend. But you are looking to run up to the base of the west rib via a gully that steepens and even forms unclimbable waterfalls at times. The first such waterfall is overcome on the left, the larger more formidable such obstacle is overcome via some scrambling on the right. Once above this area, continue to traverse the slope staying close to the gully until you can reenter the gully, which in May will be full of deep snow. Ascend to the base of an obvious rib that rises up the mountain.
Route Description


There will be a very flat sheered piece of limestone on the north side of the gully. Start left of this flat piece and scramble your way at least 60 meters up a loose gully to the start of some really firm limestone with nice, but sharp, climbing features. I used a 50 meter rope but advise a 60 meter rope to reach better stations without full run out. The first pitch heads nicely up the west side of the pillar and traverses onto the edge (corner) about half way up. These first several pitches were rather nondescript, but decent 5.6/7 climbing. I was taking up a non-experienced alpine rock climber and estimate approximately 15 pitches to the actual summit if no solo climbing is involved. After getting through the first two pitches, we were real close to topping out onto the ridge and with a 60 meter rope would have. Once on the ridge the route eases some, but you still will find plenty of exposed climbing. The majority of the time you are climbing versus scrambling.
The toughest pitch by far (the crux) was close to the west summit of Mount Brock. It might have been around pitch 10 or something as I was pitching the rope out every time for my partner whether I placed gear or not. There were only two pieces of evidence on ascent that anyone had been before in 2006. This was the 2nd such place in which a large loose boulder (the ridge deteriorates rapidly as you ascend) had some old cordellete attached to it. In front of you is a serious overhang problem, I would put in the 5.12 category. It offers little if any placement for gear with huge exposure to your right (east). The only reasonable option was to traverse left above a very steep and non-featured slab on the west side. There is a small ledge you can walk your hands over while keeping your feet firmly placed on the slab. You will really appreciate that you brought your climbing shoes on this pitch. Of course the real challenge is to protect this precarious traverse. If you fall off of it, you will also face the possibility of not being able to climb back to your position. Therefore, be ready with a makeshift ascender of some sort so you don’t spend a cold night in your harness. I placed approximately three pieces on this traverse, the trickiest one being the middle which was sort of a reach and my partner lost the piece on clean up. What you are aiming for is a loose set of blocks over 10 meters from where you left the ridge. Once on this feature, tread lightly and ascend onto slab with climbing features to the top of the ridge. This is a full 50 meter pitch as most are on this route. With a 50 meter rope, you will find nowhere to build a station, but rather position yourself into the ridge itself for the belay.
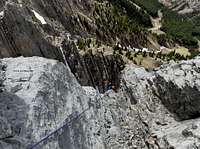
As you get through the crux and continue along the ridge, you will begin to notice how the gap between the west summit and the true summit appears more demanding than what one would have expected if you were following SAC’s description. It is not as precarious as it looks from this angle, but it is far from easy either. I have provided a clear photo showing it from the col to the main summit. Once at the west summit, down climb to the col. The first bit is true climbing over a slabby section with serious exposure to the north. Once over this section the exposure lessens. You can stick to the ridge and down climb different sections or traverse right some to a snow patch in early season. Either way, you have to continue down the ridge to the col. The toughest down climbing is the last several body lengths to the col itself which will be chock full of snow in early season.
Once through the short col, the first part of the ascent up to the true summit is the most difficult and then it eases from there. There was a summit log in 2006, but with only one entry from 2005 and very few prior to that. The ascent from 2005 appeared to be from the south ridge.
Descent

As you descend the south ridge you must ignore any idea of down climbing the ridge as is mentioned in SAC. An experienced Australian climber died in 2004 trying to down climb this ridge. I only found two existing rappel slings/pitons but added three more in 2006 and used a rock without a sling for a total of 6 raps. The first rap station is fairly immediate on descent to your left, protecting a short, but very exposed bit of slab over a loose cornice (May) on the east side. Do not be tempted to jump or land on this cornice. Stay on the rock. Continue along a ramp to the right, but stay out of the steep gullies along the way. You will be behind a large fang section to your right. Progress down the ridge through some difficult and exposed down climbing. We dead ended soon and made one rap off the east side of the ridge utilizing a large boulder. We continued back down the ridge until we reached a chimney on our right. I down climbed this chimney (some ice in May) and my partner rapped it. Traverse along the ridge from the bottom of the chimney to a short ramp and make a short rap off of a large rock on the left (left a sling and biner in 2006). Descend a loose gully to another rap down a steep slabby area (left sling and biner in 2006) This is a full 50 meter rap. Traverse climbers left to a level area and proceed down southeast where a piton existed in 2006. Rap the piton onto a snow field (May) and move down ledges and mini snow fields to the col between Mount Brock and Mount Blane.
The descent from the col is the same as it is for Mount Blane. Descend rapidly on loose scree as it funnels you into a narrow waterfall area. Scramble left out of his steep water worn rock and rap or down climb into the next gully south. Down climb out of gully over a short band of water worn rock and keep left to avoid any snow traps and jump back onto the snow filled waterway when you deem it safe for a fast glissade. Further down, grab the right hand ridge back to the creek you ascended from and exit the same.
Essential Gear
60 meter rope, not 50 meter. Cams, TCUs etc, from Metrolis 00 to a Camelot 4 that will come in handy. Set of nuts. A few hexes. Long draws. Cordellete and rap rings. Climbing shoes, harness and helmet.External Links
- 100’s of Canmore and Banff National Park multi-pitch rock climbs, ice climbs, alpine climbs and scrambles, just scroll down to routes
- OR: Best True Technical Clothing and Accessories in the Outdoor Industry
- Scarpa, has surpassed La Sportiva in terms of quality, function, value
- Osprey Backpacks, Not a Second Choice
- Great Outdoors Depot
- Mont-Bell
- Cascade Designs (MSR; Thermarest; Platypus)