This traverse is one of the prized jewels of American alpinism. To summit any one of these 14,000-foot peaks is a great thrill and accomplishment, but to string all five of them together is the climb of a lifetime. Peter Croft, in "The Good, the Great, and Awesome, The Top 40 High Sierra Rock Climbs" gives the traverse his top rating of three stars, AWESOME.
Notes on Fitness and Preparation
I’m a 56-year-old, once-a-week gym rat who does 2-3 climbing trips a year outside, rarely venturing onto terrain above 5.8. I wilt after five pull-ups and I jog at a 10-minute mile pace, when I jog at all. With this moderate fitness level—and my super solid climbing partner, Scotty—we were able to complete the Thunderbolt to Sill Traverse on the first try. This trip report is dedicated to similarly ambitious and mediocre athletes.
It has been suggested that this route can be done in a car-to-car day trip. Beware the sandbagger. In truth, a car-to-car attempt at T-bolt to Sill is only for extremely talented and über-fit athletes who have no problem soloing 5th-class. Even those climbers who attempt the traverse in a day from a base camp high up next to the Palisade Glacier often have to exit the ridge before completing the whole traverse. The trip reports tell the real story. I knew that the traverse-in-a-day style was out of reach for me, so I sought an alternative. I got some good beta by checking out what the guide services offer: a four-day trek with two nights at base camp and one night at 14,000 feet below the summit of North Pal. (Sierra Mountain Guides website: (http://www.sierramtnguides.com/program/palisades-traverse-thunderbolt-to-sill/). This is the slow-but-steady approach; one which requires a larger climbing pack but carries a greater chance of success.
Preparation is key. For advice on equipment see the detailed section below, "Notes on Food and Equipment." Before attempting the full ridge traverse, I climbed three of these peaks individually: the Swiss Arete route up Mt. Sill, Starlight Peak via the West Chute, and Thunderbolt via the Southwest Chute #1. Doing these climbs increased my knowledge of the trails and routes up and down these peaks from both sides of the range. Depending on your mountain skills, I recommend doing one, two, or all three of these ascents as a good preparation for doing the whole ridge traverse. Also, read up in Porcella's "Climbing California's Fourteeners" on the various escape routes off the ridge such as the Underhill Couloir and the U-notch on the east side, and the various chutes that can take you down on the west side. Take notes or highlight your key findings on reduced size photocopies and carry them. Carry a topo. Carry a cell phone. My partner's I-phone was receiving and sending texts from the ridge.
Itinerary and Trip Report
This trip report describes the slow-but-steady approach; one which requires a larger climbing pack but carries a greater chance of success. Since I live at sea level, I added one night of acclimatization. Overall, this flexible, five-day itinerary left breathing room for unanticipated delays and worked very well:
Thursday, July 7 - Day 1:
Scott and I got an early start at 5:30am and drove eight hours from Santa Cruz to Bishop, cruising through Tuolumne and over Tioga Pass which always charges me up. Obtained our wilderness permit in Bishop (thoughtfully reserved months earlier). Did some last minute shopping, and ate a good restaurant meal at Jack's.
Then we shuttled cars. Weeks earlier, I'd located a friendly local in Bishop who, for $100, agreed to be our shuttle driver. In our separate cars, we caravaned to the N. Fork of Big Pine Creek trailhead. We parked our car there to await us for four days and nights. Our shuttle driver then drove us and our gear over to the Bishop Pass trailhead at South Lake, 48 miles and 75 minutes away. It's awesome to arrive at the trailhead at South Lake, since at elevation 9,800 feet it is already in the alpine zone. To find our driver, I called the Sierra Mountain Guides office and also placed a free ad here: www.thesierrareader.com. Got 4 call backs!
One problem with going out on a different trail than the one you enter is the route finding on those last few miles at the end of your trip. If you haven't hiked the N. Fork of Big Pine Creek trail in a while, you may have some confusion finding your car on the hike out. Make sure you know the trail choices, as there are several and none are well marked.
It is certainly possible to skip all this car shuttle business and just hike up the N. Fork of Big Pine Creek to camp at the Palisade Glacier. From there you can ascend Thunderbolt Peak by various routes such as the class 4 North Couloir of Thunderbolt or the class 4 Underhill Couloir. My view is that since the Southwest Chute #1 on the west side of Thunderbolt offers the fastest run from the base camp to the summit of Thunderbolt, this route increases the overall chance of success. In other words, it is worth it to shuttle cars and go in via Bishop Pass because every hour matters and a fast run to the the summit of Thunderbolt could make or break your trip. It is a high priority that you summit Thunderbolt, Starlight and North Pal and descend to the bivy below the summit of North Pal before dark.
Car shuttle map
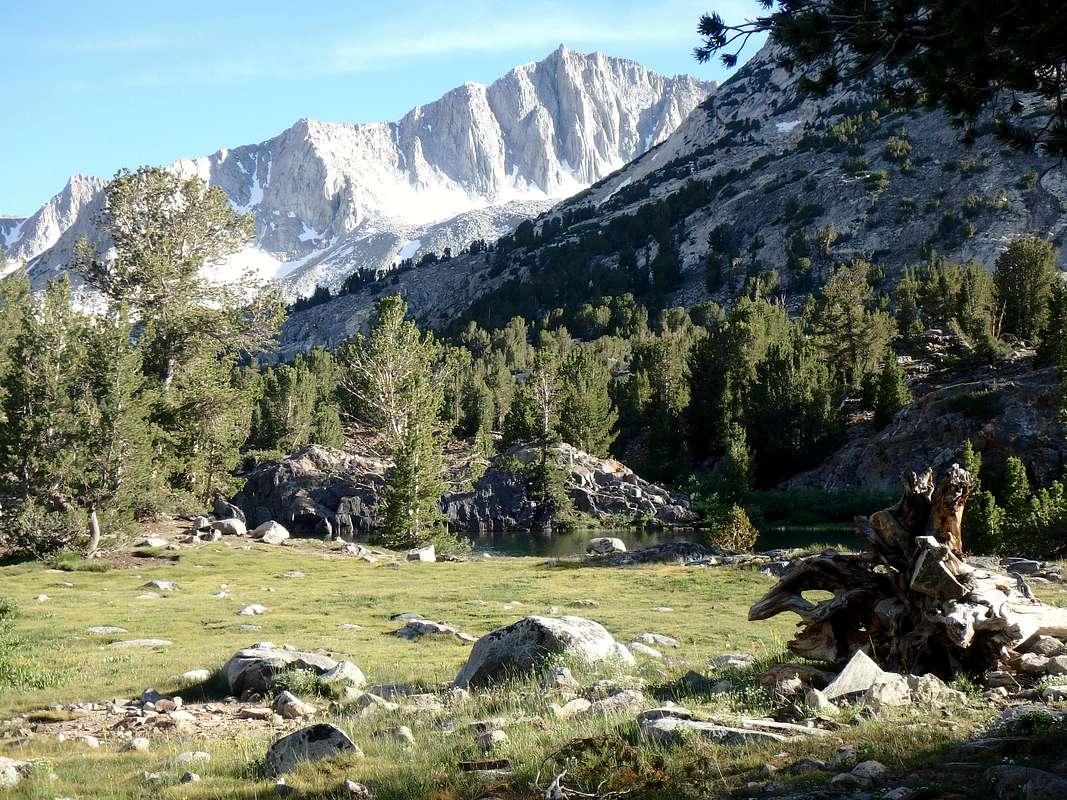
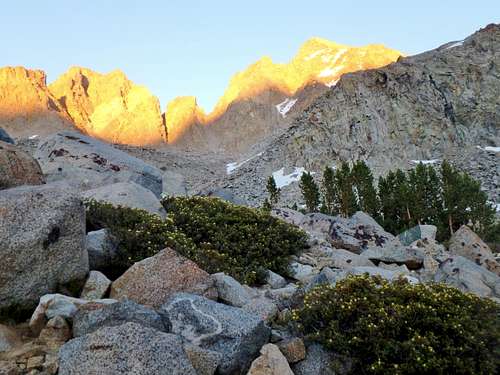
When Scott and I arrived at the the Bishop Pass Trail head, we paid our new friend for the ride and then marched a few hours up this spectacularly beautiful trail and camped below the switchbacks that lead up to Bishop Pass. Be sure to do this by daylight; it's too beautiful to miss. We relaxed over dinner, watched the sunset orange color build up like a fire on Mt. Agassiz, and breathed the 11,000-foot elevation air.
A magnificent view of Mt. Goode emerges as the Bishop Pass Trail passes by Long Lake. The beauty of this trail rivals anything I've seen in the High Sierra or elsewhere.
Alpine glow on Mt. Agassiz entertained us as we ate dinner at our first night's campsite.
Friday, July 8 - Day 2:
We slept in and ate a casual breakfast while watching a curious line of folks carrying kayaks past us and on up the trail to the pass. They were clearly suffering like ants trying to tote Hot Cheetoes. Some of the crap we do for fun is messed up. Scott and I hiked up the switchbacks toward Bishop Pass. Just before the pass, we turned left and went cross country around the base of Mt. Agassiz, and past Mt. Winchell, to Thunderbolt Pass, an obvious notch on the horizon. A stunning, massive wall of peaks will be on your left as you hike the increasingly rough terrain up to the pass. To the right are great views of Dusy Basin.
Thunderbolt Pass is the obvious notch on the horizon. A stunning wall of peaks is on your left as you traverse across the talus field on the left side aiming for the notch.
We camped 300-400 feet beyond and below Thunderbolt Pass where there are flat, established campsites. Water can be found downhill about a 5-10-minute hike from there. The location affords protection from the windy pass and provides awesome views. Since there was time, we really should have scoped out the ascent up the gully that we'd do in the early morning. It might have saved us hours the next day.
The large talus fan just to the right of me (in the photo below) marks the class 4 West Chute route up Starlight, one of three routes you might consider doing before trying the full traverse.
The grand view from our campsite below Thunderbolt Pass with alpine glow on the Palisades. The large talus fan just right of me marks the West Chute route up to Starlight.
Saturday, July 9 - Day 3:
We tried for an obscenely early start, but it was light when we left the campsite. Since we are going out a different trail, we carry everything. From Thunderbolt Pass, Southwest Chute #1 starts just around the corner to the left. If ascending in mid–July, do NOT expect your experience to match published descriptions of Southwest Chute #1. Porcella and Burns rate the chute class 2 with one set of class 3 moves to bypass "a boulder choked section of the chute." Secor similarly describes a simple bypass for this section. The conditions I've encountered in recent years differed from the books' reports. Here is the best case scenario where the snow and ice are not present:
Best case scenario: the bypass is free of snow and ice.
undefined
In reality, hard snow and ice have been clogging this chute in early to mid-season, and the area around the boulder choked section is especially sketchy. In these conditions, expect to use both ice ax and crampons to ascend the gully in July. You may have to do a 100-foot 5.7 trad climb up a somewhat loose wall, taking care to find reasonable gear placements (see next photo).
Moving up the Southwest Chute #1 route to Thunderbolt Peak. Crampons and ice ax required.
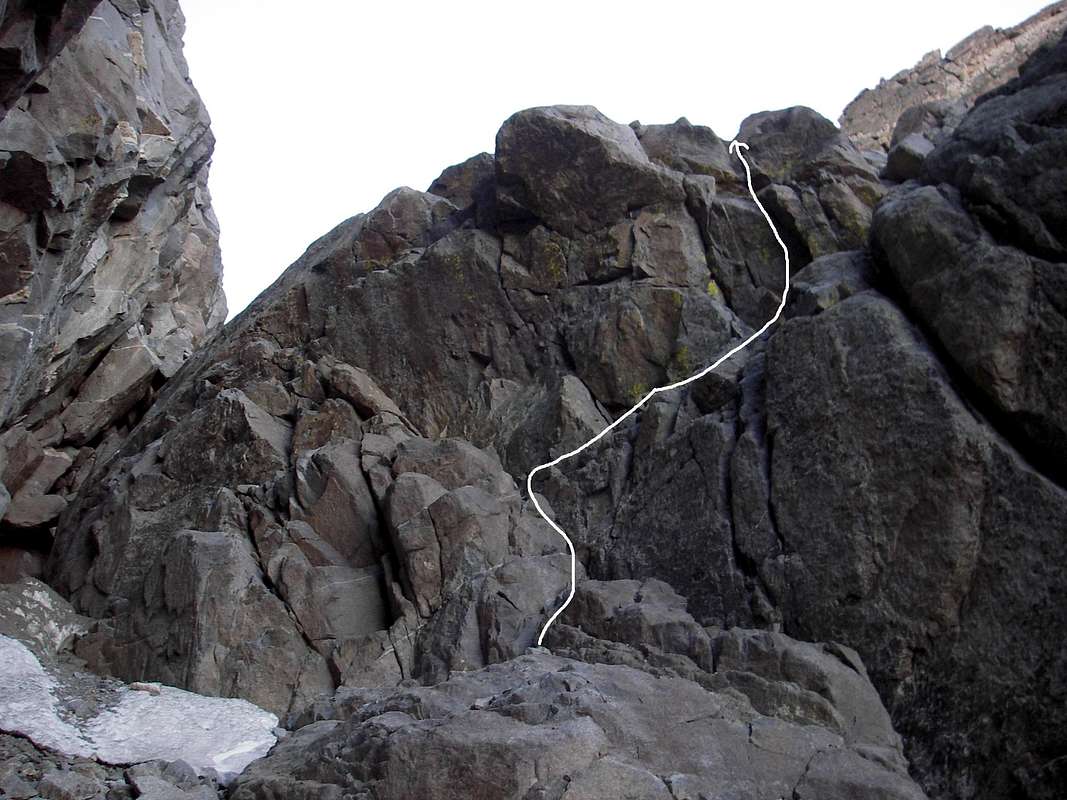
When snow and ice conditions block progress above, find the bypass by scanning the right wall ~200’ feet below the boulder choked section for a trad route that leads up to the ledge 150’ above.
The photo below shows the 5.7 trad route on the right wall that can take you up to the ledge system above. From my position in the photo, traverse left into the corner and up to easier ground. Creating a belay anchor above may require a long cordelette around a boulder since the terrain is pretty loose.
This is the 5.7 trad route on the right wall of Southwest Chute #1 that bypasses the sketchy ice conditions below the giant chock-stone higher up the gully.
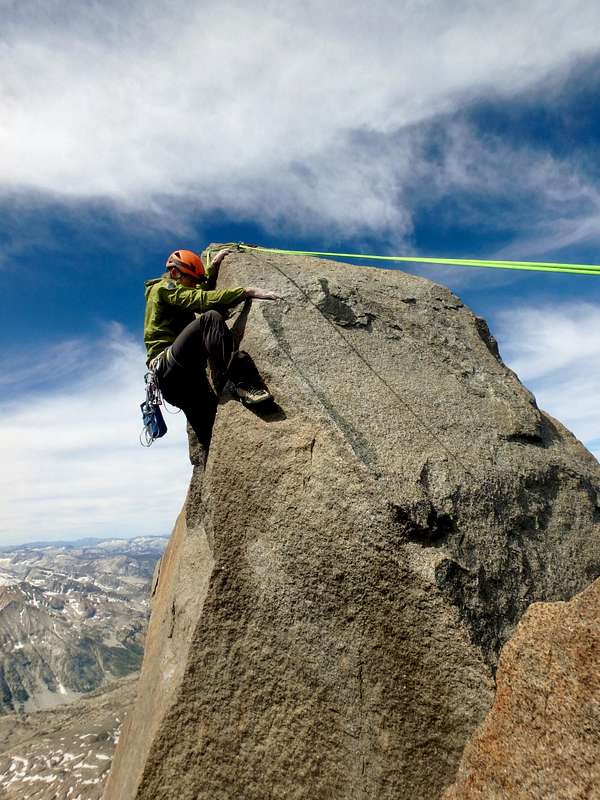
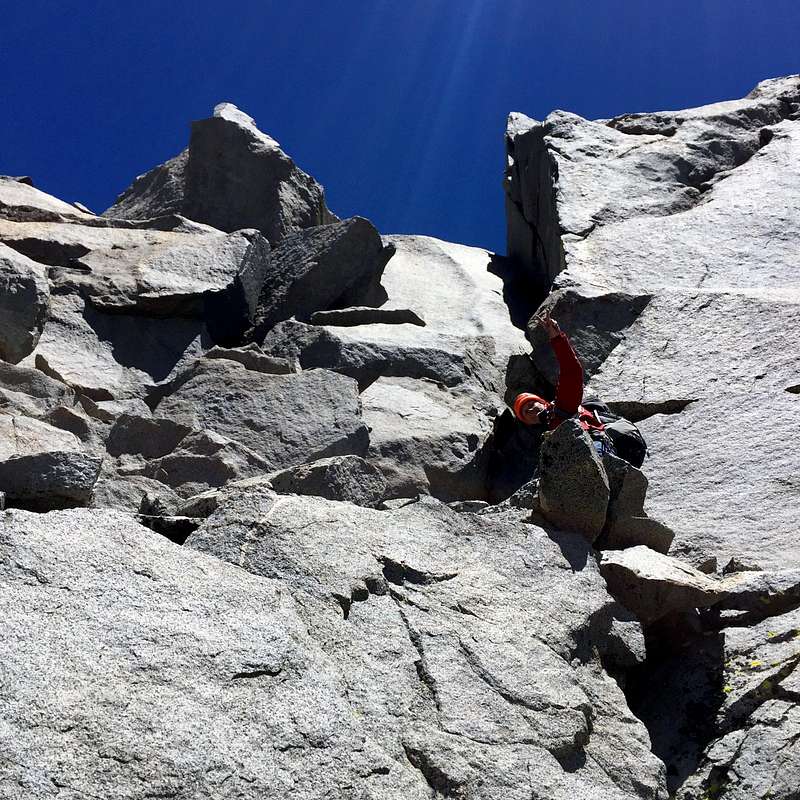
Upon gaining the ledge, we traversed left and up to rejoin the main chute upward. Generally keeping right, we followed the signs of human passage up the loose 2nd-3rd class incline until reaching a squeeze hole, which landed us on a notch in the summit ridge with a stunning view of the east side. Two young women were there having a snack. After a brief hello with names exchanged, they packed up in seconds and launched up the class 4 wall on our right toward the summit block. A minute later, Scotty and I ascended the same wall, unroped just as the women had. After about 25 feet it flattened and we turned right. Just above was a very exposed, but easy, class 3 traverse that leads to the base of the summit cap. Having done this traverse one year earlier, I eagerly moved onto it with calls of encouragement to Scotty and a moment later saw the 15-foot summit block. There I saw the women packing up to leave. "Aren't you going to do the summit?" I asked; "we're about to set a belay," I kindly offered. "We're done," answered the bolder one. I held my tongue in disbelief; they'd had five minutes at best for them both to summit. As the women cleared off, I set a good anchor on the protruding flake on the right. I gritted my teeth and pulled the run-out high-step and strenuous mantle. Hanging from the belay bolts of the summit, I found the summit register. There, beneath the current date, was the woman's name just as she'd introduced herself to me minutes earlier. Leaving her climbing rope in her pack, she'd free soloed and down-climbed the sketchy summit block, which neatly hangs out over a perfect fall to oblivion. If you are less confident, do as I did and memorize these Youtube videos to learn the summit cap moves:
It goes nicely by just sticking to the few good holds and using them as shown in the videos. It is not entirely protected, since the belay won’t stop you slamming into rocks. This is by far the hardest move on the whole traverse.
Having run into trouble in the gully with the aforementioned ice and snow around the boulder, we took way too long, topping out at 10:40am. Even knowing the rock had just been casually soloed, pulling this technical, run-out, 5.9 move at 14,000 feet to summit a major peak was a chest-pounder moment. The bolt on top affords a safe belay for lowering off and for the second summiteer.
The crux of the whole traverse: Scotty pulling the 5.9 mantle move on the summit block of Thunderbolt.
After summiting Thunderbolt, we moved south on the ridge until we had to choose to go left or right. We proceeded left down a sketchy class 4 “chimney” down climb. There was a belay anchor which aided us down the last 20 feet. Then there was an exposed traverse heading west that took us to the “easy” unroped slab descent. The right hand option is supposed to be a 5.6 chimney down-climb. I suspect the 5.6 chimney down-climb can just be rappelled down to the easy slabs though I can't recall where I read that.
From Thunderbolt, traverse south along the ridge. The middle finger of Starlight is beckoning, er, gesturing on the skyline.
The easy slabs led down to the notch. From there we followed the path of least resistance trending to the right until reaching a steep but easy 5th-class wall that went up toward the ridge and the base of Starlight's summit pinnacle.
Class 4 truckin' on the way to Starlight.
Typical moves on this mile-long ridge.
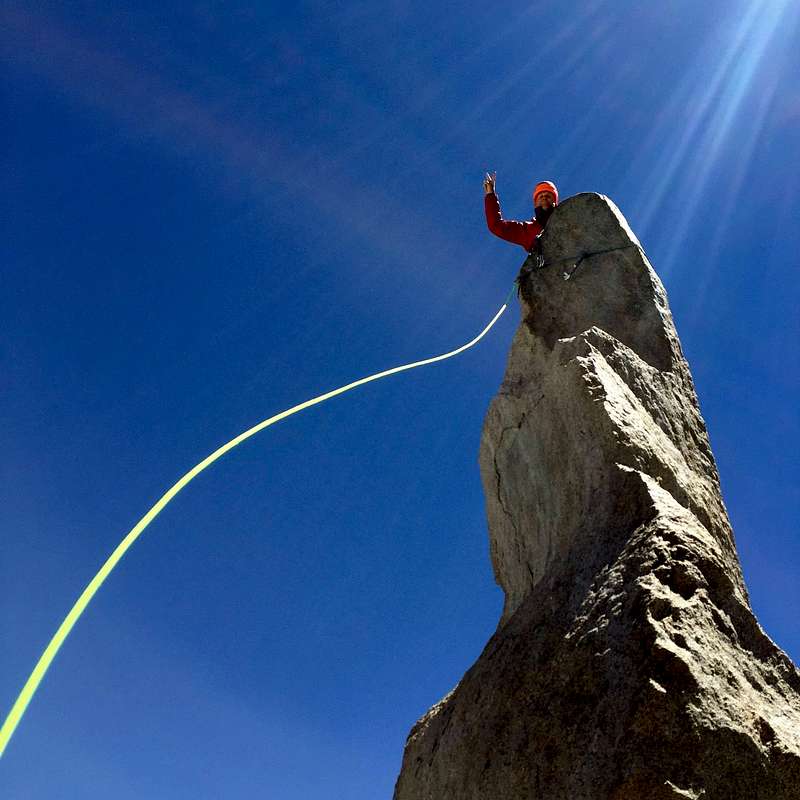
Starlight is described as a “milk bottle,” but for the sake of climbing think of it as a giraffe. Circle left around the steep side shown here toward a narrow gap in the rocks near the tail of the giraffe. Cross over the gap to the left rear of the giraffe. Mounting the rock seemed to be the hardest part. The highly exposed moves up the rock were surprisingly easy, 5.4-5.6.
Starlight Peak
The amazing Starlight summit
After summiting Starlight, we continued through the narrow gap at the rear of the monolith to catch the trail to North Pal.
The next section is class 4 and not trivial. Again, we trended right when in doubt. We reached a wild rappel into a gap with an airy step across. The wind was blasting such that if I hadn’t been wearing all my layers of clothing, I would have gotten hypothermic. The video below captures the moment pretty well.
View toward North Palisade from Starlight
We ascended the route of least resistance and summited North Palisade without mishap. Unfortunately, I can't remember any of it! Good thing I took a few good photos like the one below. We topped out at 5:40. It took us three hours to travel from Starlight to the top of North Pal.
Summit view from North Palisade. Starlight's summit pinnacle is clearly visible.
From the summit, we moved south a short distance on the ridge and found rap slings that drop to the south side. One easy rap landed us right onto our bivy ledge!
We were at the bivy ledge by 6:10. The wind gusts were ripping loud and hard all night long and well into the morning the next day. I was glad that we were not traveling "fast and light," but rather, were prepared with real bivy gear. We would certainly have been pinned down and been dangerously hypothermic by morning without our gear.
If you reach the summit of North Palisade earlier in the day and want to continue, the next good bivy options are: (1) just after Polemonium Peak, (2) on the plateau below the L-shaped couloir and, (3) below Mt. Gayley after crossing off the Palisade Glacier.
Nice bivy ledge one rap below the summit of North Palisade.
Sunday, July 10, Day 4:
We got a very late start after a rough night and morning with high winds that pinned us down in our sacks for over 12 hours. While it was still blowing, we moved over to the protected east side of North Palisade to melt snow and make breakfast. By 11:30am, the winds had subsided and we were back on the west side of the ridge moving toward Polemonium.
Our final objective, Mt. Sill, stands tall before us with the Palisade Glacier descending from its base. Even the melt pool is visible on the far left. We are here catching morning sun on the east side of North Pal. Strong winds had pinned us down such that we'd run out of water and missed dinner the night before.
Pictured here is the north face of Polemonium as seen from North Palisade across the U-Notch. The outlined route seemed to us to be the most natural direct line. It was mostly 4th class with a few 5th class sections, which justified a belay for us.
The north face of Polemonium as seen from North Palisade across the U-Notch.
From the top of Polemonium, we descended the exposed ridge, which landed us on some relatively flat terrain. There are good bivy sites there to use if you had a faster first day.
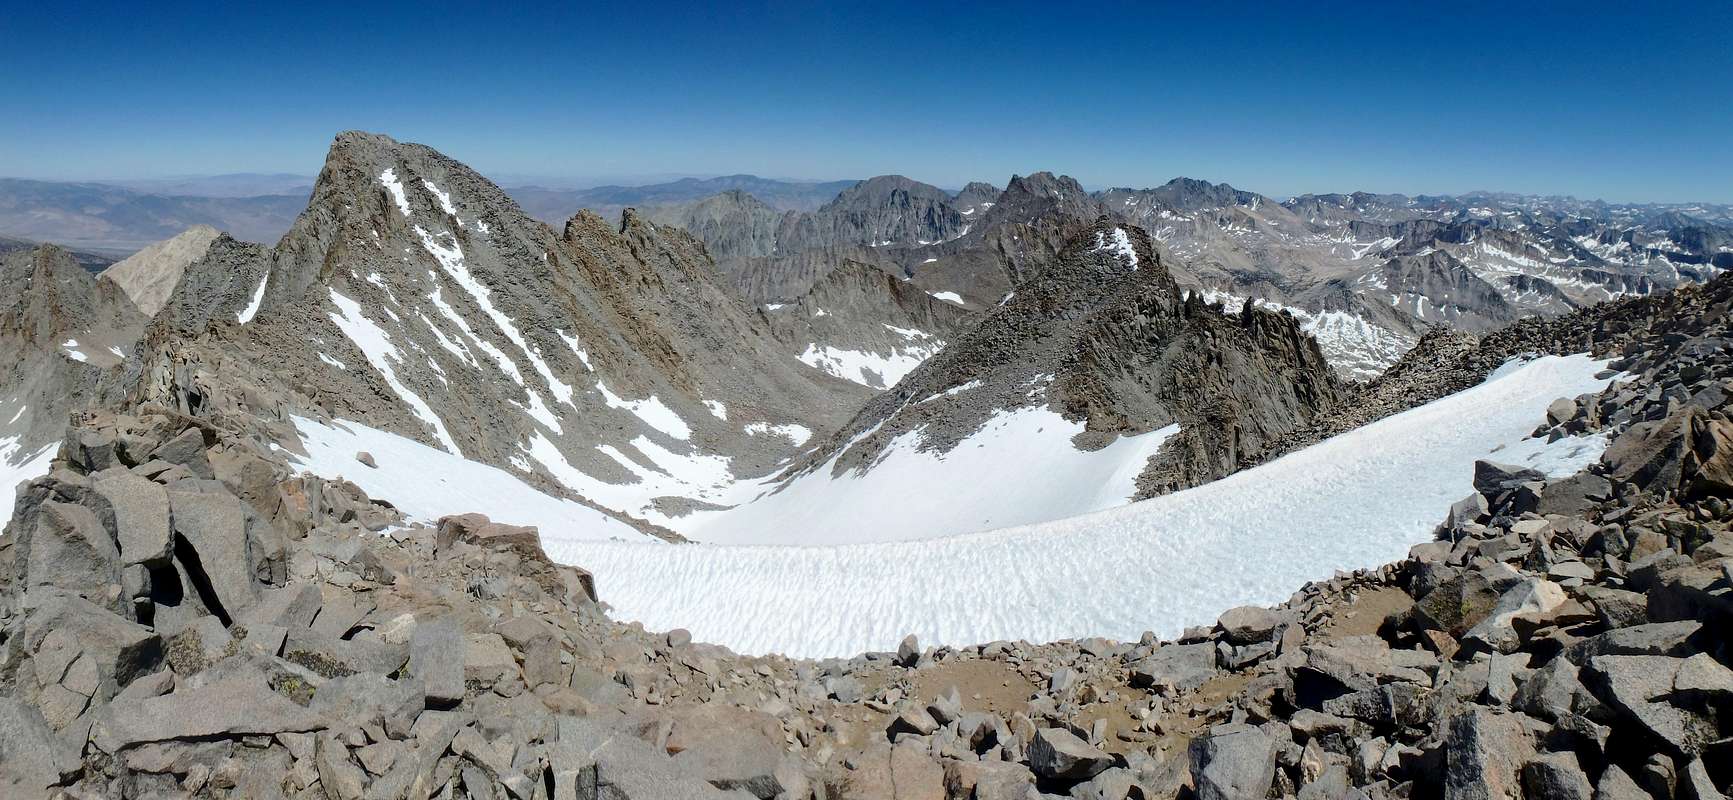
Before us was the top of the Polemonium Glacier with beautiful sculpted ice ridges. Ahead we saw a sea of talus to cross to get over to Mt. Sill, that big shark fin. We passed above the V-notch and never saw it. We tried to go fast and make time, but the ridge took a considerable amount of work to cross. It was worth it. Sill has the best views of all 5 peaks.
Polemonium Glacier view after descending from the summit of Polemonium. Mt. Sill, the giant shark fin, awaits across the class 2 ridge. Note the good bivy sites.
Drawing near the summit of Mt. Sill, the trail funnels onto the true edge of the ridge. Along this edge, notice a large cairn at the spot in the photo, below. Packs can be dropped here and retrieved on the way down. The summit is a just few more minutes of class 2-3 moves.
The big cairn here marks the descent route to the notch with Apex Peak.
We summited Mt. Sill at 5:00pm on our second climbing day in perfect windless sunlight. Scott had never been to this area before, and in one trip he summited the whole ridge!
From the summit, we retraced the line of ascent down to the large cairn. Dropped down the ridge there and found the anchor. Rapped down maybe 20 feet from the anchor to easier ground. Traversed right toward the notch between Mt. Sill and Apex peak. From here descended the L-shaped snow field to the relatively flat plain between Mt. Gayley and Sill. Crampons and ice ax were necessary.
View from Mt. Sill, our 5th summit. Scott had never been to this area before, and in one trip he summited the whole ridge!
With only one set of cramp-ons for the two of us, it took awhile to descend the couloir. The rope here is for returning the crampons to Scott after I descended 200 feet. The strategy of carrying just one set of crampons and ice ax between us "just in case" did not work well for us. We lost several hours of climbing time by not having two sets. Luckily, the weather was kind enough and our schedule flexible enough that we could afford the delays.
We were glad to bivy on the plateau between Mt. Gayley and Mt. Sill. There was plenty of snow to melt and we melted down a gallon for each of us. This was our fourth and last bivy of the trip.
About to descend the "L-shaped Couloir" from the notch between Mt. Sill and Apex Peak. I'm pretty psyched here that we'd topped out on all five summits. I'd been laying the groundwork for this climb since 2011.
Monday, July 11 - Day 5:
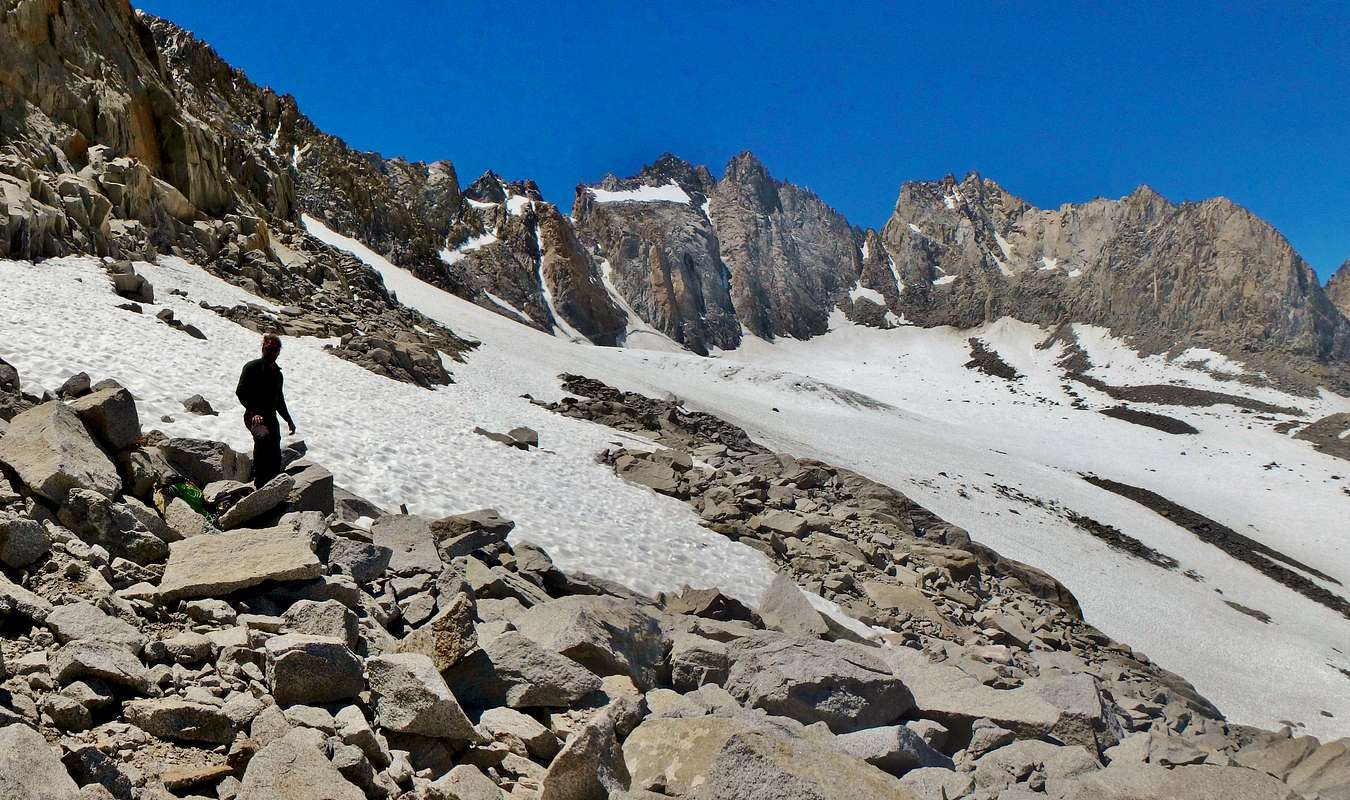
Right where the ground first starts to level off below the L-shaped snowfield, there is a gully on the left that leads down to the Palisade Glacier; this passage is called Glacier Notch. Though the gully had melted dry, crampons and ice ax were required to descend the glacier below.
This is the top of the descent trail from the ridge between Mt. Gayley and Mt. Sill. This weakness in the ridge is called Glacier Notch.
Once on the glacier, we turned right and headed east away from the cirque of 14ers we'd just traversed and walked the glacier with the cliff wall on our right. After traversing off the glacier, we saw many bivy sites along the moraine near the cliff wall. Now just nine more miles to the car. We talked a while with some climbers there. With their help we found the best trail down which was to just basically keep walking downhill. We continued straight down the hill on glacier polished slabs following a well-cairned descent to Sam Mack Meadow.
The real hiker's trail begins at Sam Mack Meadow and, if necessary, it can be descended without difficulty by headlamp from there. Above Sam Mack Meadow, the trail that descends from the glacier is not obvious by night and would require good high beams on your headlamp and careful spotting of the cairns as you cross talus and slabs.
A daylight exit is much preferable since this trail descends past the incredible Temple Crag and out the beautiful drainage of the North Fork of Big Pine Creek. Why rush through this rare and amazing place?
On the Palisade Glacier with five 14ers behind and nine miles of downhill trail ahead.
If you parked at the free public lot, stay on the high trail. We had driven up the road a half mile further to park at Glacier Lodge and paid the $5.00 a night fee, so we dropped down the hill at the fork and took the single track trail and fire road to get to the lodge. We grabbed a quick pizza in town and then drove home sore but happy.
Passing Temple Crag on the nine-mile hike out. There are several classic routes on this stunning formation.
Notes on Food and Equipment
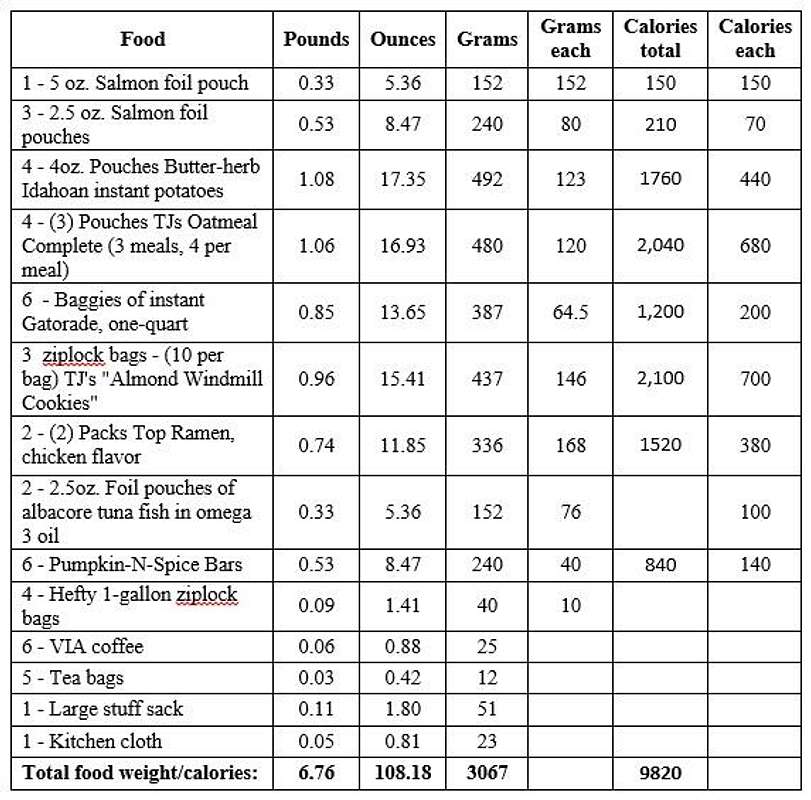
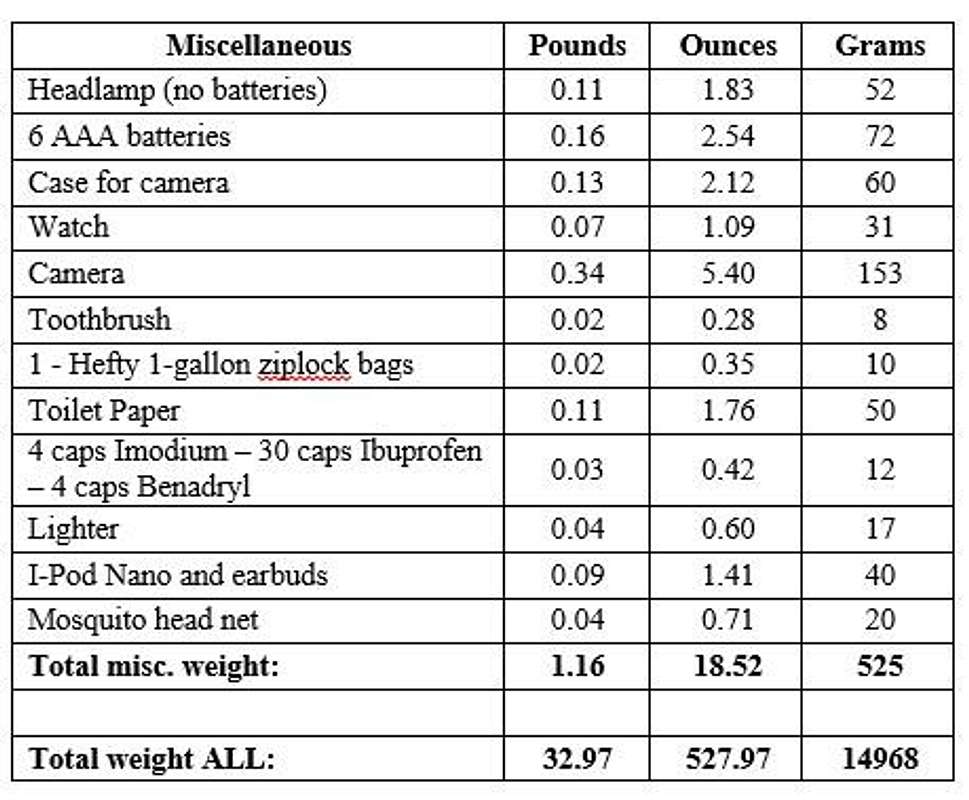
If you are going to attempt the slow-but-steady style of climbing the Thunderbolt to Sill Traverse, then you must spare no expense to lighten your pack. If you aren’t willing to upgrade from the standard clunky backpacking stuff, then don’t try this climbing style. I’ve detailed below my complete gear list with all the weights. A Jet boil stove and a big 230mg fuel can is required to melt snow on the ridge. We melted over a gallon of water per person during our last two days. There must be sufficient climbing gear. There must be sufficient sleeping/bivy gear and food. Wearing enough warm clothing to bed can allow for a two season down bag to suffice. For traversing the ridge, a pack should be UNDER 30 POUNDS. Carry no cotton clothes, not even 50% cotton. It is a good idea to acquire a gram scale. I created an Excel sheet with three columns as below. As I filled in the gram weight the converted values for ounces and pounds appeared for easy comparison. Naturally, all weights are totaled at the bottom. Evaluate each piece of gear to determine where to trim weight most easily and cost-effectively. Then start shopping.
My food choices may not fit your taste, but a few things to note: overall calories are 10,000 with a weight under 7 pounds, the food is simple, natural fare when possible, and I carry premeasured Gatorade powder to throw in my 32oz. bottle. It is often hard to keep up the calorie and electrolyte intake during extreme activity, so consider drinking this instead of water. Eat and drink right out of your Jet Boil can instead of bringing extra bowls and cups. Have your partner carry his own Jet Boil can so you don't have to keep emptying it out. Bring food that cooks instantly, or quickly, in boiled water, like instant potatoes, instant oatmeal, or Top Ramen. Skip any foods that require a simmering cook time.
My Really Boring Menu
Day 1 - Dinner: Salmon potatoes, tea
Day 2 - Breakfast: Oatmeal
Day 2 - Lunch/snacks: Ramen tuna, cookies, bars, Gatorade
Day 2 - Dinner: Salmon potatoes, tea
Day 3 - Breakfast: Oatmeal
Day 3 - Lunch/snacks: Cookies, bars, Gatorade
Day 3 - Dinner: Salmon potatoes, tea
Day 4 - Breakfast: Oatmeal
Day 4 - Lunch/snacks: Ramen tuna, cookies, bars, Gatorade
Day 4 - Dinner: Salmon potatoes, tea
Day 5 - Breakfast: Oatmeal
Day 5 - Lunch/snacks: Ramen, cookies, bars, Gatorade
Shared items, (rope, stove, etc.) count at half their true weight in the final total below since my partner carries half of them.
Really enjoyed reading this. I repeated that traverse when I was 55. Whew. The extra 10 years of age showed. Used a rope and would not have wanted to be solo for sure!
Thanks for posting this.
I really liked reading your perspectives on the "camping" on the ridge approach. Good job and congrats on getting out there and living the dream.
- Jack
Thanks for taking time to read and share your thoughts. Did you manage to go the ridge in one day at age 55? I'm wondering if I should try again next year with more training and an earlier start!
Ha ha. That made me laugh. Yes, I did it in a day, car to car, but I was thinking while reading your report how YOUR approach was so much better! I'm just a little envious of you getting to camp on the traverse, thinking I should go back and repeat it with camping gear. I think that's super cool.
I left South Lake with a buddy about 5 am... reached the parking lot down the road from Glacier Lodge about 10:30 pm. We carried 100' of 8.5 mm climbing rope, 7 or 8 carabiners, some stoppers and a couple cams.
But if I do it again, which I probably will, I'm gonna do it YOUR way.
I thoroughly enjoyed your report; it brought back such memories. Two buddies and I did it in one push in Aug. '08. I was 61 years old. We went from South Lake to Glacier Lodge. My buddies made it just in 24 hours and it took me 25 hours. In short, the traverse in a day for someone in his sixties is still possible. I did skip Sill, but led the Milk Bottle. I must say, to do it in one push requires comfort in soloing low 5th class. So we only used our rope for the two summit blocks and the rappels. The hike out was horrendous though. We made it to Sam Mack Meadow just as it got dark and then stumbled our way to Glacier Lodge. Your bivy plan makes a lot of sense--you were able to enjoy the the route more than we did! [Our TR is under SP user "bechtt" called "Our Palisades Traverse."]
I'm in awe of you guys daytrippin' this, congrats on your fitness at 61!!! I just enjoyed reading your TR. Grandeur and a little suffering! We suffered a little, too, but mostly we were able to savor the beauty. Thanks for reading and sharing!
Inspirational! I will be 53 when next summer rolls around.
Started climbing the Cali 14ners in 1986 with my first summit of North Pal. Many years later I find myself going for the new world record of MOST time taken to climb all 15! And wouldn't you know it, 4 of the last 5 I need to summit are T-Bolt, Starlight, Polemonium and Sill.
Mix into this a torn Achilles tendon surgery in 2009, with post recovery summits of Split, Williamson, Tyndall and Middle Pal.
And now I'm currently recovering from another surgical repair, this time of a ruptured Patellar tendon torn in a freak fall.
And so the timing of reading your TR is perfect. My recovery goal for this summer was to summit Sill, and possibly make the traverse to Polemonium. You have given me the inspiration to think beyond those goals!
Congratulations on the completion of an awesome climb! Thanks for the great TR!
Hi Baja Andy,
I enjoyed reading about your ascent in Baja. I didn't know that even down there. Cool adventures! I was worried about my knees on this trip, but they held up! I hope yours do too!
Thanks for your feedback!
Thanks for reading even though it reads like a bad route guide. The route itself is truly fine! I wish I knew what our total gain was with ups and downs but I didn't carry a device to measure that. I can only say that starting point was 9,800ft, and the high point was 14,250' apprx. Happy climbing!
I did the same thing as you; I actually spent two nights on the crest in addition to one below.
It's in vogue to do routes fast and I get that. But bivying up there was really cool. I've climbed the Regular Route on Half Dome in a day and also as a multi-day ascent and while both trips were really fun it's the multi-day that I value the most. I barely remember the one day trip!
I suppose as one increases their abilities they can simply do longer or harder things to get that multi-day experience. But I wonder if it's really better or just harder.
I think there is something to be said about being a lightweight gumbie.
Hi JD,
Thanks for your thoughts. I guess the satisfaction from climbing comes from more than one source. There is the accomplishment of doing something really hard and dangerous, and also there is the appreciation of the mountain beauty from the rare vantage point where it is not always possible to linger. I enjoyed those two days on the ridge!
Children refers to the set of objects that logically fall under a given object. For example, the
Aconcagua mountain page is a child of the 'Aconcagua Group' and the 'Seven Summits.' The
Aconcagua mountain itself has many routes, photos, and trip reports as children.
Related objects are relevant to each other in some way, but they don't form a parent/child relationship. Also, they don't necessarily share the same parent.


Comments
Post a Comment