
|
|
Route |
|---|---|
|
|
47.56980°N / 12.31210°E |
|
|
Trad Climbing |
|
|
Summer, Fall |
|
|
A long day |
|
|
5.10c (YDS) |
|
|
UIAA VI+/A0 |
|
|
23 |
|
|
III |
|
|
Overview
 The route as seen from the Kleine Halt
Located away from the popular climbing areas in the Wilder Kaiser, the route faces a somewhat lonesome cirque. Other parties in the area are likely here for this route, though plenty of challenging lines have been forged on the wall in the 98 years since Dülfer's climb!
Dülfer considered the wall a great problem, and went to great lengths to understand how to climb it. In early summer 1913, he rappelled down the whole wall, the better to inspect what seemed to be the crux "Nose Traverse." Is he a sport climber, or what? This preview of what was to come apparently helped greatly. When he and Willy returned in late summer for the ascent, they managed it in just 7.5 hours, a mind-boggling achievement for the time.
Getting There
 The route starts at the snowpatch.
The best way to approach is to drive to the village of Grisenau, and take the toll road to the Griesener Alm. Park in the large lot here, and hike up to the Stripsenjochhaus (1577m). The hike takes a bit more than an hour.
From here, descend 120 meters or so in switchbacks, turning off towards the Totenkirchl on a little path at the 3rd switchback. Follow a scrappy trail (fixed lines, ladders!) across rugged sub-alpine terrain up into the basin below the West Wall of the peak.
The route begins in a (permanent?) cone of avalanche snow coming out of the Winklerschlucht. It can be ascended with tennis shoes if you take a bit of care, perhaps using a sharp rock to chop a step here and there.
 Looking up at the West Wall.
Route Description
Climb any snow to get up onto rock in the Winklerschlucht. Climb easy terrain (II-III) for 80 meters or so to what is commonly considered the first pitch of the climb. A bit of snow
 Scrambling begins
Pitch 1, IV+, 8m: The gully narrows and steepens such that a side gully on the left offers a short pitch to get above the constriction.
Pitch 2, IV+, 20m: Continue up the gully, looking for a weakness on the left to escape. Our party thought this pitch was grade III.
Pitch 3, III, 40m: Easy climbing, but difficult in determining where to exit the Winklerschlucht, and where to end the pitch in order to turn back up. Basically the view on your left will open up a bit, at this point follow your nose up and left, then once properly out of the gully, traverse horizontally another 20 meters. You'll see parallel buttresses going up with a moderate difficulty. An anchor at the base of a buttress is a marker for the point to turn up.
Pitch 4, III, 40 m: Go straight up easy terrain.
Pitch 5, III, 40 m: Continue. In general, stay just on the left side of a large buttress.
Pitch 6, III, 40 m: Continue as before, coming to a belay where the wall steepens at the base of a crack.
Pitch 7, IV+, 25 m: This is the 17m-Riss (17 meter Crack) pitch. Climb the enjoyable crack to a belay atop a little buttress.
 On the main wall
Pitch 8, V+ (IV+/A0), 40 m: The "First Traverse" pitch. The crux is climbing a bit down and across a fairly blank slab, only a few meters out from the belay. The rest of the pitch is easier, ending by going up scrappy terrain to a belay.
 Jesse leads the first traverse
 Another scene on the first traverse
Pitch 9, V, 35 m: Climb on the right of two narrow parallel buttresses. There are several bolts on this pitch.
 Michael heading up.
 There was some loose rock on this pitch
Pitch 10, IV, 30 m: Continue up the buttress to where it melts into the face and the gray slab of the "Nose Traverse" becomes visible on your left.
 Pitch 10: approaching the 2nd traverse.
 The "Nasenquergang"
Pitch 11, VI+ (V+/A0), 40 m: Climb down and left onto the slab, then work your way up and left towards the "Nose" that is the end goal. This pitch has bolts for protection, and is an exciting free climb. Once at the nose (bomber holds here), pose for a picture and climb over the nose to a belay on top. Double ropes come in handy for protecting the follower.
 Just finished the crux here
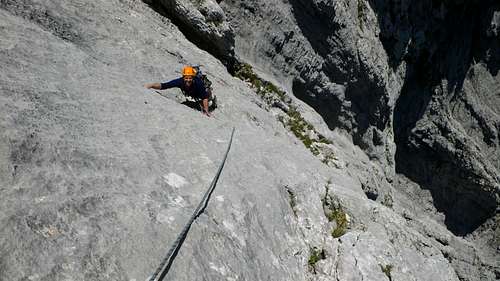 Jesse on the Nasenquergang
Pitch 12, V+, 28 m: The Zickazckwandl ("Zig-zag Wall") pitch. Steep and interesting climbing up and leftward to a belay on a buttress.
 The belay at the start of pitch 12
 Jesse on the Zigzag Wandl
Pitch 13, VI (V+/A0), 40 m: The Schluchtquergang ("Gully Traverse") pitch. Climb straight up from the belay to a lower-out point at the top of a tower. About 5 meters below on the left begins an interesting experiment with old slings and a mix of free and aid moves as you try to enter the broad gully that ends the pitch. I found it pointless to climb it free because of the 5 meter (difficult) downclimb at the start...a follower shouldn't be subject to tricks like that! If you want to climb it free in good conscience I suggest making a belay after the lower-out point and right before the leftward traverse.
 Finishing pitch 13. This image doesn't convey the weirdness of the pitch.
Pitch 14, IV, 30 m: An easy pitch climbs the gully to a belay at the base of a wall on the right side. There is a nice view of some rather sad "bivouac holes" here. It makes a good lunch spot.
 Pitch 14, the "Schlucht"
Pitch 15, II, 20 m: Easy (almost walking) traverse rightward away from the broad gully.
Pitch 16, IV, 30 m: The Dachquerung ("roof traverse") pitch. Easy but very scenic.
 Traversing to the exit cracks
Pitch 17, V+, 25 m: Now you are below the great final gully, where the rock looks very clean. Climb a short chimney above the belay then traverse right to set a belay on the right side of the gully. You negotiate a small overhang along the way.
 Pitch 17: entering the Exit Cracks
 After the overhang
Pitch 18, IV, 20 m: Go straight up on the right side of the gully.
Pitch 19, IV, 30 m: Continue as before. Possibly 18 and 19 can be combined.
Pitch 20, VI- (V/A0), 45 m: The Ausstiegsrisse ("Exit Cracks") pitch. Enjoyable and challenging. Climb the obvious crack straight up to a belay.
 Michael in the Exit Cracks.
 Pitch 20: Looking down the Ausstiegsrisse (VI-)
 A climber improves the perspective.
Pitch 21, V+, 30 m: The terrain here becomes indistinct. The protection points are few and it's hard to find the best line. Try to go up and hold to the grade. For example, a steep lieback crack on the right is not the right way.
 An uncertain pitch
Pitch 22, V, 40 m: A short overhang with good holds leads into a chimney that climbs to a terrace.
 Into the chimney
Pitch 23, IV, 40 m: Follow cracks the easiest way up to the summit. Our topo showed a "walkaround" but we couldn't find it. This way is perhaps more aesthetic. Good clean cracks, no bolts until the summit cross.
 Resting below the final pitch
 The summit block. We climbed cracks in the center of the pitch, going left at the end (IV).
Getting down
 Your goal: The Stripsenjochhaus
Descent the mountain via the Führerweg, which goes down the easiest way towards the Stripsenjochhaus. Expect to take 2 hours for the descent, which could be very difficult in darkness.
Hike and scramble down from the summit for several hundred meters on a path with occasional down-climbing steps. Eventually rappel stations direct you over a steep wall for 2 or 3 rappels (easier if you have double ropes). Below the rappels, follow a trail around to the left and a few more rappels to enter a scrambly basin. After this second set of rappels, you should be able to scramble down to the ridge crest, and follow trail up and down along it to the Stripsenjochhaus.
 Rappels
Essential Gear
 Looking back on pitch 11
Bring some medium and long slings, they can come in handy for the scrappy mixed free/aid Schluchtquergang pitch (pitch 13, the "Gully Traverse").
Double or twin ropes are essential. In case retreat is required, there may be considerable difficulty holding the line of the route due to the traverses. If you do have to build anchors, you'll want pitons and a hammer.
For hot summer days, bring plenty of water and start early.
External Links
 Endless climbing.
- Markus Stadler's page and topo of the route
- A nice photo essay of the route (in German).
- Hartwig Erdenkäufer's amazing film about climbing the Westwand in the 1950s and again in the 1980s. This is a great mountain film and I enjoyed it tremendously.
- Tips for safe travel in the mountains - a very good general purpose link for alpine travel.