
|
|
Route |
|---|---|
|
|
27.86062°N / 86.86094°E |
|
|
Mountaineering |
|
|
Spring, Fall |
|
|
Expedition |
|
|
Alpine 6 |
|
|
5.8 (YDS) |
|
|
VI |
|
|
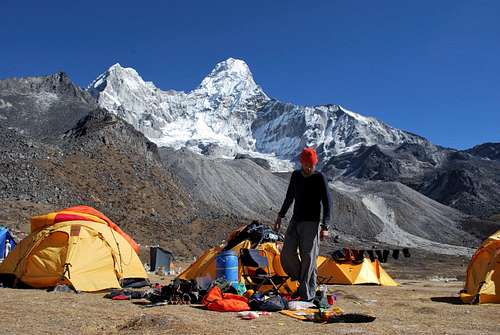
Overview
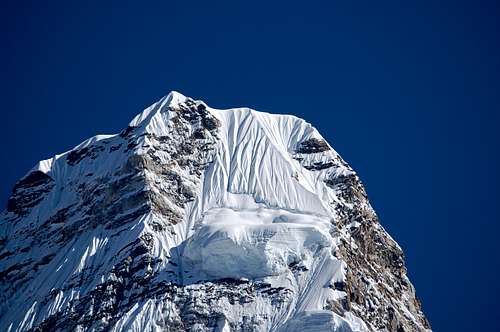
Climbers Approaching the summit of Ama Dablam 6852M
Ama Dablam is a very popular Himalayan peak for expeditions. The most popular route by far is the Southwest Ridge Route. Climbers typically set up three camps along the ridge with camp 3 just below and to the right of the Dablam. Any ice that calves off the glacier typically goes left, away from the camp. However, a 2006 avalanche proved otherwise. A climbing permit and a liaison officer are required when attempting Ama Dablam. The best climbing months are April–May and September–October.
This is a major mountain expedition but it is still fixed with static rope from Camp 1 to the Summit. This work usually falls on the shoulders of the climbing Sherpas of the larger teams. If you are planning on going alone or with a small group it is mandatory that you plan on contributing rope, pitons or other climbing gear at base camp. Your generosity and honesty will go a long way.
Getting There & Visas
All expeditions to Ama Dablam start from Kathmandu Nepal. You will need to book a flight there from your country of origin. There are a lot of daily flights to Kathmandu but I still recommend booking early as they fill up quickly during the main climbing seasons.
VISAS: Pretty much any country can get a visa on arrival from the airport in Kathmandu. Ask for a 90-day expedition visa, this will cost you 100usd. If you are planning on staying longer than this please be aware that Nepal only allows tourist visas for a maximum of 150 days per year. No exceptions. Don't overstay this time period, you will face a very serious fine and barring from Nepal for the following year.
A domestic flight to Lukla is also a major part of the trip. Be prepared for delays due to poor weather and operational problems.
Route Description
Climbing on the South West Ridge of Ama Dablam
Use 2 camps above the 4600M base camp:
- Camp One – On snow, or rocks 5650M
- Camp Two- On snow and rocks, 6000M
After an appropriate resting period, venture towards camp one with no loads save for some water, food and camera for the days climb. The climb although relatively easy, will be a challenge for everyone on the team. Our Ama Dablam acclimatization has only just begun and will be feeling the effects of the thin air up to over 5600M.
The Sherpa team will carry all of the ropes, hardware, group sleeping and cooking equipment for the high camps the leaders and members will aim to spend at least two nights at camp one and one night at camp two. Pushing any higher at this point would only serve to weaken everyone and risk complications associated with extreme altitudes. Therefore, slowly descend all the way back to base camp or Pagboche for an extended period of rest. During which time, our Sherpa team will ensure the climbing route is in place and also prepare and stock all of the high camps for the summit push.
A NOTE ON CAMP 3 AND CAMP 2.9 ON AMA DABLAM
The choice to make a summit bid from camp 2 is not only a safer and healthier option but also serves to save the time and energy required to move the team up to another high camp. This methodology allows up another chance at the summit of conditions on the route do not permit us to top out on the first try. Regardless, an 856M summit day is hardly extreme for any Himalayan giant such as Ama Dablam.
Once a favorable weather window is predicted, the team will advance with the Sherpa team at a rate of one camp per day. If all goes well, we will be standing on the summit of Mt Ama Dablam three days after leaving base camp. If the weather and/or conditions on the mountain fail to co-operate, we will have ample opportunity to make another bid for the summit.
Base camp to Camp 1
4-8 hours
Stay on the path and stay high. Try not to be tempted to drop down to easier ground as you will just have to make it up later. This is easy rock scrambling that presents little difficulty to a competent climber. That said, it is awkward and annoying. Be on your toes for shifting blocks and slippery slabs. Trend left and high until you see the traversing path to the bottom of the slabs.
The slabs are located right below camp one and are the beginning of the fixed lines. Most people do not need to rope up for the slabs but if you have any doubts, do it! No one will care and safety is the top priority here. The slabs are typical 4.11 climbing. (joke). Fatigue is the main challenge here, if you are tired, rope up and jug up the lines into camp one. It is about 2 rope lengths in total. easy and fun. Be safe, wear your helmet and enjoy!
Camp 1 to Camp 2
2-5 hours
This is some of the best climbing on the route. On a good day you will have the time of your life and love every second of it. Try to leave camp one early if there are crowds and very early if you plan on just tagging. You should be able to do this in approach shoes and carry your big boots. There is little or no snow here and the track will be well defined, follow the ropes.
The first hour is mainly traversing granite blocks. Trending slowly upward and onward, enjoy the views and love the exposure. There are a couple of spicy spots before the Yellow Tower but just stay stoked and you will be fine. The whole route up to the bottom of the Yellow Tower is barely 5th class, aka 4.11. Just fun and exposed.
The traverse to the bottom of the Yellow Tower is pretty unnerving. Keep your tension on the ropes and don't climb up too high. Stay low until the rise to the bottom of the tower.
The Yellow Tower is the technical crux of the route. free climbing it is an easy 5.8 but at nearly 6000M with a pack and no climbing shoes, it is a different story from your home crag's tourist routes. Try not to use your jumar too much here folks. The holds are there and take your time, breathe a lot and you will be fine. The Yellow Tower is about one pitch with mega exposure. Don't look down. After you top out this pitch it is a relatively straight forward move up to camp 2, 6000M.
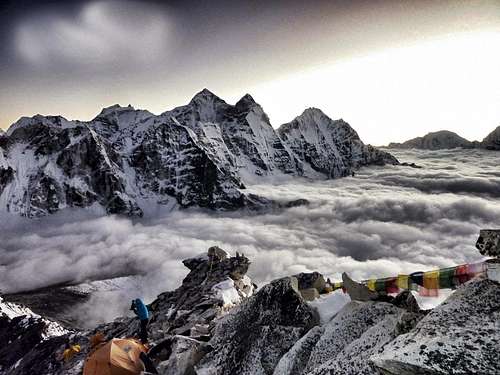
Camp 2 to Camp 3
3-6 hours
The top of the Grey Tower, just outside of camp 2 on Ama Dablam
After the Grey Tower, an amazing airy traverse leads to the Mushroom Ridge. Walking a tight rope at 6200M. Stunning. Amazing. surreal. Camp 3 is really dangerous so don't sleep there. Go to the summit from Camp 2. Ignore anyone who says it is safe. You will use a lot more energy advancing your camp than you would adding an additional 4ish hours to your summit day.
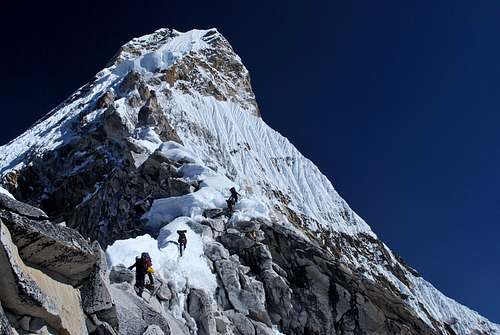
Camp 3 to Summit
3-6 hours to the summit

Climbers entering camp 3 on Ama Dablam in the early morning light. cr Ganesh Adventures 2012
The climb above 6400M, camp 3 is a mixture of ice and snow depending on the season and conditions. It does get very cold and it is recommended to try to reach camp three at about 0530-0600 in the morning. This way, you will benefit from the warmth of the sun.
It is very east to freeze fingers and toes so be sure to keep wiggling those toes and fingers and turn back if you lose feeling. Depending on your speed, you will reach the summit after about 4 hours of climbing. There are no false summits on this route and you top out right onto the summit. Amazing.
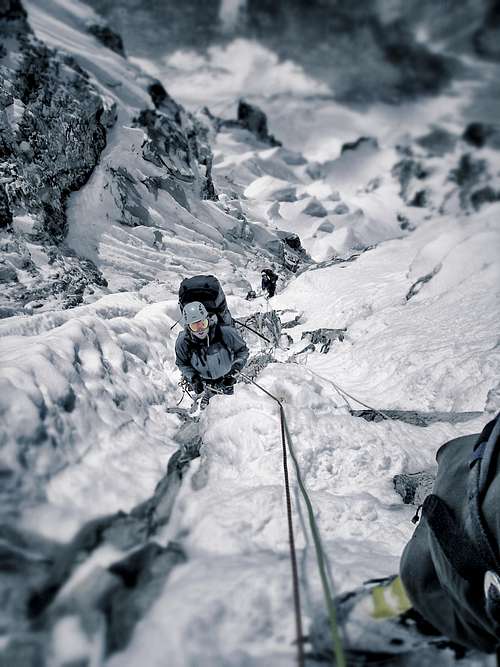
Descent
It is highly recommended to descend as far as possible after summiting any high altitude mountain. A strong climber should be able to get all the way back to base camp after summiting from camp 2. Usually though, people return to camp two or three and sleep for the night before descending early the next morning. It is very important to stay alert and switched on during the descent as any false more with the ropes will result in certain death. The exporure on this ridge in incredible and there is zero room for error.
This is why it is highly recommended to go with an expedition provider who offers detailed and structured training on the use of the fixed ropes specifically on Ama Dablam. As you can see from the photos, this is no snow slog for beginners. This is a serious route with objective dangers and a lot of ways to ruin your day. Don't let this scare you though, it is the best route out there! Enjoy and play safe.
Ama Dablam Base Camp
Ama Dablam Base Camp
The 4600M Ama Dablam base camp has been described as the best in the world. It is set at the foot of the mountain in a green meadow with a small stream flowing through it. The SPCC has installed out houses for climbers and trekkers to use. This goes a long way in helping keep this stunning environment clean. There is also a small tea house located about 10 min from the true base camp. It is pretty basic but still offers a hot meal and a hard bed for those in need.
Essential Gear
Below is a detailed equipment and packing list for your Ama Dablam expedition. On the approach, each member is allowed a maximum of 45 KG of personal gear. This should be more than enough for the trek in and the climb. That said, if you are only a couple of KG over, we can shuffle things to make it work but any major overages will be charged to you.
Also, please keep in mind the ‘light is right’ adage. Grams add up to Kilograms and believe me, they add up very quickly. Please don’t forget that this trip is an investment and skimping on a few bucks at the front end might just end up costing you 1000′s more in the long run. Ama Dablam’s Southest Ridge is a route where members are required to carry loads on very technical terrain up and down the mountain. It’s really amazing how little one actually needs to climb these mountains.
PACKING NOTE FOR AMA DABLAM
We ask members to separate their loads into two bags before the expedition begins. One bag we call the base camp bag contains: All climbing gear, second sleeping bag, food, extra clothes, ect. The second we call the trek bag contains: Everything needed for the trek in. Although our bags will travel with us for the first part of the trek, they usually get sent from Namche to Ama Dablam base camp on yaks while we rest and acclimatize. Bring a change of clothes, your electronics, warm jacket, sleeping bag, and anything else you feel you might need on the walk to base camp.
EQUIPMENT LIST FOR AMA DABLAM
FEET
[] Mountaineering Boots - La Sportiva Spantik, Scarpa Guide or Phantom 6000, Millet Everest or La Sportiva Olympus Mons. Single leather boots are not recommended or allowed on this climb. Used on the mountain above base camp.
[] Approach Shoes - La Sportiva B5, Scarpa or Solomon trail runners. Used on the approach in and lower down on the mountain.
[] Down booties (optional) - Something with a decent sole, lightweight. Used in base camp & possibly high camps for sleeping. This is an optional item.
[] Flip – Flops - Teva makes good ones as well as Scarpa.
[] 6 Pairs of merino wool socks - 2 medium, 2 light and 2 heavyweight merino wool socks. Merino wool does not smell and is exceptionally warm and comfortable. Icebreaker is the best.
HEAD
[] Sun hat - Used for the trek in and on the hill where the sun can get really hot.
[] Buff - Used everywhere for everything from a hat to a balaclava and everything in between. An essential piece of equipment.
[] 2X Winter Beanie - In Canada we call it a touque. Others call it a winter hat. Merino wool or wind stopper fleece is best. It never hurts to have an extra one of these on the hill.
[] Snow goggles – Used in bad weather. Some prefer a good pair of glacier glasses instead.
[] Glacier Glasses - Julbo Sherpas are my personal favorite. Anything that is either Cat 3 or Cat 4 and does not let any light enter in the sides of bottom of the glasses.
[] Sun Glasses - Something for in town and also as a spare set of shades in case you lose or break your first pair.
HANDS
[] 2 Pairs Liner Gloves - Thin to mid weight liner gloves either fleece, wind-stopper or merino wool.
[] Gore-Tex Lined Gloves - Basically a good ski glove. Gore tex is good for waterproofing or soft-shell for superb breathability and comfort.
[] High Altitude Mitts - Large fitting down or synthetic gauntlet mitts. The Marmot Expedition Mitt is the best choice in my opinion. This synthetic mitt is amazingly warm and light.
BASE LAYER
[] 2X Mid Weight & Light Weight Long Underwear Bottoms & Tops - I highly recommend merino wool products from Icebreaker. They dont get smelly like synthetic pieces. Although they cost more, they last longer and usually take the place of 3 pieces of synthetics due to their ability to avoid odor and discomfort. Other Merino wool products will work as well. I recommend one set of light weight and one set of mid weight base layers.
MIDDLE LAYER
[] Heavy Weight Fleece Top - Mountain Hardware Monkey man fleece is the best piece of gear currently available. Light weight, comfortable and affordable. I do not recommend wind stopper fleece tops as they are too heavy and not at all versatile.
[] Fleece Pants (optional) - Something simple and light weight. No need for side zippers or wind stopper. Good for Ama Dablam base camp or a summit day piece worn under gore-tex pants.
OUTER LAYER
[] Wind breaker - The Patagoinia houdini is amazing. Anything super light and ultra packable. Used for the trek in and lower down on Ama Dablam.
[] Gore-Tex Pants & Jacket - Lightweight waterproof and breathable gore-tex or equivalent material. (conduit) Not lined with anything at all.
[] Soft Shell Pants & Jacket - Simple soft-shell, unlined tops and bottoms. No windstopper. Used throughout the expedition.
[] Expedition Down Jacket - Large good quality down jacket with hood. Used for summit day and around base camp.
TREKKING & TOWN CLOTHES
[] 2 T-shirts - One merino wool and one cotton t-shirt for the trek in.
[] Shorts - Soft shell shorts are the best. Something synthetic that is not made of cotton is the best choice.
[] Ball Cap - Lightweight running hat or baseball cap.
SLEEP SYSTEM
[] 2x -18C Down Sleeping Bag - Good quality -18-30C down sleeping bag. Marmot is the best in my opinion. Make sure the sleeping bag isn’t too big for you as the extra air space will create cold spots. If you sleep cold at night, it is recommended to get a bag closer to the -30C range. It is also recommended that you bring a second sleeping bag for base camp only. This can be heavier and larger. It is cold in Ama Dablam base camp, bring something warm and comfy.
[] Foam Sleeping Pad - Thermarest Ridge Rest, Carimat, Z-rest or any other good quality closed cell foam sleeping pad. This is the back up in case your inflatable pops.
[] Inflatable Sleeping Pad - Lightweight Thermarest or even better, the Exped Down mat for those who demand serious comfort. (Just like me!)
[] Pillow (optional) - Bring your own pillow for trekking and base camp. I do!
CLIMBING EQUIPMENT
[] Climbing Helmet - Any light weight climbing specific helmet will do. Be sure you can wear your head insulation under it. We wear a helmet from Camp 1 to the summit and back.
[] Trekking Poles - Good quality trekking poles. Used for the trek in and on the mountain up to just below Camp 1. Light is right.
[] Steel Crampons - Heavy duty steel crampons that can take the abuse of extensive climbing on mixed ground. NO ALUMINUM PLEASE. Make sure they are well fitted to your boots before the trip. Use a Puralator shipping bag as a crampon bag. Cheap, lightweight and surprisingly durable. Camp Vector Nanotech are light and strong, perfect for Ama Dablam.
[] Climbing Harness – Lightweight harness with adjustable leg loops. The camp Air CR is the best in this category. Please keep in mind that on Ama Dablam, there is a lot of jumaring. Be sure you can hang comfortably in your harness with a 15kg load.
[] Jumar- Petzel is the only jumar in my opinion. The Black Diamond version is not suited for this expedition.
[] Technical Ice Tool- Bring one or two technical ice tools. They are only really used above camp 2. A leash or teather is essential. If you drop your tool, its gone.
[] Figure 8- No ATC, or plate belay systems. A figure 8 is essential for use with fixed lines.
[] 4x Locking Carabiners- Petzel Attache is a great choice. Be sure to mark your technical gear to keep it from being mixed up.
[] 4x Wire Gate Carabiners- Bring wire gates as opposed to standard gate biners. They are lighter and have far less gate flutter.
[] 15M 6-7mm Cord- This is for your personal jumaring and fixed line system. We will all set this up at base camp together.
[] 20cm Ice Screw- This is a safety backup for summit day in case the fixed lines disappear. Very unlikely, but it has happened.
[] Daisy Chain- Used as a second safety and also for traversing the less technical, but very very exposed sections.
[] Knife- Always have a knife on your harness. A simple small lock blade will do but be sure to figure out a way to clip it to your harness.
PACKS & DUFFEL BAGS
[] Small Trekking Pack - aprox. 25L alpine climbing bag. Very light weight, no bells & whistles. No school book bags please. Used as a flight carry on, trekking bag and summit day pack. The outdoor research summit sac is a good choice.
[] Expedition Pack - aprox. 65L lightweight expedition climbing pack. Mountain Hard Wear South Col, Arcteryx Bora 70 are good choices.
[] 2 Large Duffel Bags - Good quality 80-120L duffel bags. These are used for your porter & yak loads and it is important that they are good quality and very durable.
REPAIR KIT
[] Leatherman with scissors - Swiss army knife, Leatherman or other good quality multi-tool.
[] Duct Tape - Good for everything. Bring a small roll for yourself.
[] Seam Sealer – Rubber glue for repairing holes and fixing boots.
[] Plastic Ties - Used to lock your bags on the trek in as well as repair all sorts of things.
[] Ripstop Tape - Excellent for repairing holes in jackets and sleeping bags.
[] Mesh Bag - Small mesh bag to carry it all in.
PERSONAL CARE
[] Sunscreen - 30-60 spf waterproof sunscreen in a large & small tube.
[] Lip Therapy - Something with sunscreen and alovera in it. Burts bees, Badger brands.
[] Tooth Care - Whatever you need to keep your mouth and teeth clean.
[] Foot Powder - Any foot powder will do. This will make your tent mates very very happy.
[] Personal Deodorizer & Soap - Something to keep the funk down to a manageable level. Axe spray is a good one.
[] Hand Sanitizer - A great habit to get into on any holiday.
[] Personal Towel - Nothing fancy, just a towel for drying yourself. Camp towels work well enough and also save on weight.
[] Water Purification - Pristine Drops, Iodione Tabs or even one of those fancy IR Pens. Used through out the expedition.
OTHER ESSENTIAL EQUIPMENT FOR AMA DABLAM
[] 2 Head Lamps - One high powered lamp such as the Myo XP from Petzl and one LED lamp such as the Tikka from Petzl.
[] Lithium Batteries - I strongly recommend lithium batteries for their weight, ability to resist cold and life span. More expensive but well worth it on those cold days when other batteries freeze solid. Bring 3 sets for each of your head lamps.
[] Camera & Memory cards - In the digital age, take as many photos as you can and delete the ones you dont want. Bring lots of memory and a good camera case. Light is right.
[] 12V Camera Charger - Ganesh Adventures supplies 12V solar charging to all of our members. You will need a 12V, car charger adapter for all of your electronic devices. NO INVERTERS, they do not work with solar. Please contact us about your specific charging needs.
[] Personal Entertainment - iPod, books, sudoku or whatever else you might need to keep yourself stimulated during the down days and late evenings.
[] 3 Water Bottles - Three wide mouth water bottles made of either plastic or metal.
[] Pee Bottle - Nothing fancy, just an old nalgene or something. Women may also want a freshette or equivalent funnel system.
[] Personal Documents - passport and passport copies. Insurance details. Flight tickets. It is also a good idea to email all of this to yourself in case of a total disaster and you lose everything.
[] Money - US dollars are the easiest to exchange into Nepali Rupees. It is also possible to withdrawal from ATMs on either your bank card or credit cards.
[] First Aid Kit - Bring a compact first aid kit for all of your personal needs. Ganesh Adventures supplies a comprehensive first aid kit but members are required to bring the following personal items:
[] Diamox (Acetazolomide) 250mg X 20
[] Dexamethazone 4mg X 10
[] Ibuprophin 200mg X 50
[] Acetamenophin 200mg X 20
[] Ciproflaxin 500mg X 10
[] Blister control
[] Wound Management
[] Alovera gel or sunburn cream
[] Antibiotic ointment
[] Personal prescriptions, vitamins, ect.
COOKING AND EATING ITEMS
[] Coffee Mug
[] Spoon, Spork, Fork or Chopsticks
[] Eating bowl with lid, Fair – share mug
[] Good Coffee & Press (optional)
[] Your Favorite Snacks & Power food
[] Thermos (optional)
MOUNTAIN FOOD
(if you request to bring your own)
[] 8-10 full days of food for the Ama Dablam SW Ridge Expedition.
nathan.berry4@gmail.com - Nov 30, 2018 9:33 am - Hasn't voted
Guide services additionIMG, or International Mountain Guides, based in WA, has been guiding this mountain for over a decade. They are well known and should be added to the list of companies that guide it. Thanks!