
|
|
Route |
|---|---|
|
|
38.71700°N / 111.025°W |
|
|
Technical canyoneering |
|
|
One to two days |
|
|
Canyoneering 3A-III (pitches up to 5.6) |
|
|
Getting There
There are several possibilities for starting the trip. For simplicity, I will use the same description as the one for the West Fork of Gem Canyon. I must admit that last time I was there we missed the junction with the hill and cairn mentioned below and we were lost for a little while. A GPS is highly recommended if not absolutely necessary. The maps do not show the roads, but at least you will know where you are!A journey to out in the middle of no-where............
Upper Trailhead
As mentioned, just finding the trailhead is a navigational challenge. You must do the vehicle shuttle the day before the trip as it will be a long day just getting through the canyon. You absolutely must have the 7.5 minute quads (maps) Big Bend Draw and Ireland Mesa for the drive to the trailhead. Even then, the maps are inaccurate especially near the trailhead. A 4wd is also required. The 63 mile shuttle took us 3.5 hours, but we already knew how to get there, having been to the head of the canyon before. Expect to take longer.
To get to the trailhead at the head of the canyon, drive west from Green River, or east of the Emery area along I-70 to exit 105. You must carefully follow the topo maps for the remainder of the drive. Take the southbound gravel road and veer right after a short distance. Stay on the main road until you reach Kimball Draw at an intersection with a sign. This is at about co-ordinates N38*47'16.47" W111*5'52.69". Turn left onto the dirt road signposted for Copper Globe. After following the bottom of the wash for a while, you will reach an intersection (no sign and it can be hard to spot) at about co-ordinates N38*47'4.42" W111*4'34.19". Turn right onto a seldom used track. Follow the track in and out of several drainages until you reach an intersection at a top of a hill at about co-ordinates N38*46'24.02" W111*3'57.04". Turn right here.
The road weaves in and out of drainages and scenic and colorful badlands and is one of the most interesting pieces of road construction I've ever seen. There are some sections of the road that pass through sparkling gypsum beds. Not too far after the road climbs out of Dizzy Trail Canyon (see the topo map), you will reach a junction next to a small hill with a cairn (pile of rocks) on top. From here on, the topo map is inaccurate as far as showing the many tracks go, so pay attention closely to the topographic features on the map. There are many routes to the trailhead, but here's the route we took. Turn right at the junction with the hill and cairn. You will cross a few very rough spots in the road while crossing two washes. After the second wash, make a very sharp left turn onto a track that heads east [update: this track was just about invisible when we were here in 2007, so see the alternate route below]. The trailhead and where you're aiming for is very near the 6350 elevation marked on the Ireland Mesa quad NW of the word "DIKE" on the map. Park here.
Note #1: In 2004, I found an alternate route to the trailhead. The road is not as rough from this alternate route, but the trailhead can be harder to recognize from this direction, as this route has no landmarks near the trailhead. At the hill with the cairn, continue straight instead of right. Look for a faint track to the right not far beyond the hill with the cairn. This road leads to the trailhead, but it’s hard to recognize. Hopefully the cairn I left will still be there!
Note #2: The main track that continues straight from the junction mentioned in the paragraph above dead ends at Horizon Arch. This is a scenic place and if you hike over the hill and slickrock, you will have an incredible view of the San Rafael Swell.
Exit Trailhead
Unless looping out via Dizzy Trail Canyon or Poncho Wash, you must also leave a vehicle at the exit trailhead. You must also have a map to drive to this trailhead. Perhaps the best map is the Trails Illustrated-National Geographic Map San Rafael Swell. Another good map is the one in DeLormes Utah Atlas. Briefly put, you will exit I-70 at exit 131 and head south on gravel roads while following signs to Tomsich Butte and Muddy Creek. Most intersections are marked with signs.
From exit 131 on I-70, follow the southbound gravel road. The road first heads west and then south. Stay on the main road at all junctions for the first 9.9 miles. At 9.9 miles turn right on the road marked Reds Canyon. Continue on the most used track to another junction at mile 13.5. This is a loop road and either fork will get you to the trailhead and both forks are about the same distance. Follow the road and map to Tomsich Butte. On the north side of Tomsich Butte, you will notice a faint track heading west. This is the best route to the trailhead. The track is a very rough 4wd track and you may prefer to walk. Follow the track west to its end. There is an old mining cabin near the end of the track. Park here. Notice your surroundings so you will recognize the place when you reach it on foot at the end of your trip. Hint: Notice the "layer cake rocks".
Make sure to leave Green River or Castle Dale with a full tank of gas! This area certainly is out in the middle of no-where!
 Approximate route into the canyon.
Route Description
Finding the head of the canyon is also an adventure in route-finding. It is highly recommended that you scout out the route from the trailhead to the head of the canyon the day before the hike, as the trip is a very long day hike, and you don't want to spend too much time route-finding around trying to find the canyon on the day of descent. Make sure to follow your maps carefully to make sure you head down the correct drainage. You must be proficient in route-finding; there is no marked route, and the many drainages can make navigation very confusing.Note #1: Finding this canyon is truly a challenge (even more so than the North Fork) and I must admit that we got lost, at least for a little while trying to find the head of the canyon, even though I know the area fairly well. A GPS is highly recommended, if not absolutely necessary.
Note #2: The topo maps are an absolute necessity, but be aware that they are often inaccurate. Drainages are usually in the correct place, but road information and contours are often way off the mark! This un-explored area has not been surveyed accurately, and the nearest benchmark is a long way away!
From near pt. 6350, there is no one route, nor an easy way to describe a route. Prepare to get lost, at least for part of the time! There are several routes and you must follow the map carefully through the maze of drainages. The place you are aiming for is pt. 6675 on the topo at N38*43’25.306” W111*0’48.482”. You will probably get lost a few times, but the reward from pt. 6675 is an incredible viewpoint. Few viewpoints in the world can match those found here. There are countless towers, cliffs, and canyons visible. Poor Canyon is 1400 feet down below. Notice the small drainage just northeast of point 6675. This is your route to the bench below. After reaching the bench, contour around the cliffs until you can follow the bench west and slightly north for over a mile to two little buttes which you will pass just north of at N38*43’7.005” W111*1’30.130”. Make sure to check out the huge headwall of the East Fork along the way. After passing to the north of the buttes, contour south along a precarious route until you can descend into the canyon bottom. We found a place with only a 30’ rappel. The presence of bighorn sheep tracks indicates that there must be a low 5th class or 4th class route to the canyon bottom, but I haven’t found it. Continue down canyon. I had expected a wide but scenic canyon, but we were surprised to find the canyon diving into a deep slot that didn't show on the topo and that is invisible from above. One section of the slot is striped and similar to the Zebra Slot in Escalante Utah. There are more varieties and different colored layers of the Navajo sandstone that I have seen in other areas, as the Navajo is not a uniform formation here in color or texture. The Navajo Sandstone is also over 1000 feet thick in this complex. The slot has several 5th class drops, but we managed to down-climb all but the final 30 foot overhanging drop. It is an awkward overhanging start off a chockstone, but we negociated the drop with out a problem. There is at least one pool in the slot as well, but since I'm 6'tall, I could just barely span it (with much grunting). Others who are shorter may have to wade. The slot ends with a cool log jam overhead.
The canyon is now wider, but still scenic. After a fairly easy and pleasant section, you will find yourself at the big drop of the canyon. We named the place Bighorn Falls as more bighorn tracks were observed at the bottom of the falls. There is a shallow pothole-laced slot at the top of the Bighorn Falls.
The drop to the first drop of the two-tiered Bighorn Falls is 50m(165'), mostly overhanging and followed by an overhanging 9m (30') drop. A 60m rope will would just reach the bottom of both drops, but that can make the rope difficult to pull from below to retrieve the ropes. Since there are no anchors between the two drops, you must do both drops with the same ropes and from the top anchor. Static lines are recommended. We went off the north side of the drop and off a chockstone. Pulling the ropes from below can be difficult, so make sure you set the rap anchor so as the ropes will pull from below. After bighorn Falls are a few short falls that can be bypassed, and then hiking the canyon is fairly easy until the confluence with the West Fork. Scorpion Falls is a short distance up the West Fork if you have anny spare time. The next section of the canyon is also spectacular and contains a nice surprise. There are several huge Ponderosa pines lined up against the huge north facing cliff face in this section of the canyon. This is a really rare site in this hot desert area. The final obstacle is a 15 foot rappel over a flowing waterfall (which may dry up at times). This is the shortest rappel, but also the trickiest because it is over an awkward overhang. You will likely show your klutziness on this one. Try and see how many limbs you can get straight into the air while on rappel. There are no more technical obstacles, but the scenery is still great. Follow Gem Canyon down to Muddy Creek. There are fantastic erosional features. Keep a keen eye out for Elephant Rock (see photo). When you reach Muddy Creek, head down stream. It is then a pretty easy walk down along Muddy Creek down to Tomsich Butte. Muddy Creek is usually ankle deep, but in a very wet year it may be deeper in April and May. The scenery along Muddy Creek is great. You will pass Poor Canyon coming in from the left and then the Merry Go Round rincon (former bend in the stream) before reaching the trailhead. Hopfully you recognize where you left your vehicle.
There is an alternative for those who don't want to do the long car shuttle, but it will take much planning and has special considerations. You could do the canyon as an over-night trip and hike up Muddy Creek and exit via Dizzy Trail Canyon and then hike back to the vehicle. See the route description posted for this alternate route. This will take two long days minimum (3 days may be better if you can pack very light). The problem with doing an overnight trip is that the slot section of the canyon is so narrow that it will be very difficult to take an overnight pack through. If you did attempt it, take as small as pack as possible (leave a tent and stove behind!) and expect some possible pack damage. The only water available for camping is in Gem Canyon near Muddy Creek. Muddy Creek doesn't taste good, but could be used if you ran out of water (but treat the water!). You could also hike up the North Fork Gem Canyon to Scorpion Falls for a possible grungy water pool.
You could also hike up Muddy Creek to Poncho Wash and exit via a rigorous chute. This is one very long day trip and very tiring. See the additional route pages for more information on these options.
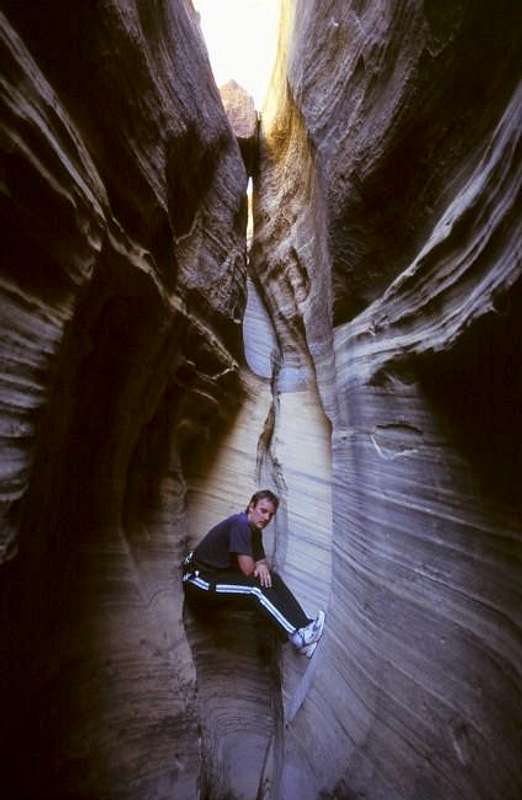 Down-climbing a short 5th class pitch in the slot section.