

|
|
Route |
|---|---|
|
|
42.48609°N / 19.75981°E |
|
|
Trad Climbing |
|
|
Summer |
|
|
A long day |
|
|
5.10 (YDS) |
|
|
VII- A0/AF (UIAA) |
|
|
7 |
|
|
III |
|
|
Overview
We climbed the Balkans Peace Park route making the first ascent of Maja Lagojvet on 31 August 2009. There was neither any sign of human presence at the summit, nor have we found any records of earlier attempts to climb this mountain.I made one attempt solo with self-belaying in August 2008, trying a line just right of the chimney in the north face, but bailed out from the first pitch because of lack of time and gear. I have scouted the mountain from different sides and to the best of my knowledge there is no non-technical access to the summit. (Kamil)
The north face of Maja Lagojvet towers above Grbajski Zastan and is about 160 m high in its lowest part (where our route goes), reaching about 200 m in its left and about 250 m in its right-hand section. It is split in two parts by a chimney in the middle. Our route goes up the middle of the right-hand half of the face, topping out at the little notch just left of the main (western) summit.
|


The eastern summit, seemingly higher when looking from the bottom, is in fact at the same height as the topping-out notch. The ridge between them looks extremely eroded and dangerous. We only went to the main summit without climbing that ridge to the lower one.
We tried to find a fine line between accessibility and rock quality (safety). The result is a route that has one hard but relatively well-protected pitch in its lower half and several pitches of choss fest from hell in the upper half. My preliminary scouting showed that the north face should be the easiest side, but it is difficult to tell whether there are any easier and/or safer lines to be climbed on this side of Maja Lagojvet. The chimney might be an option but chimneys, especially those facing north, are usually wet, rotten and nasty by nature. And any route in the middle or left-hand part of the face would involve climbing the rotten summit ridge if you would like to climb the main summit. In good weather and with right preparation a climb and return can be made within one day if you camp at the highest part of Zastan. Due to poor rock quality the climbing can be slow.
As first ascents usualy take longer time however, we ended up having an unplanned bivy below the summit and putting off the dangerous descent till next morning. During the preceding two days we were twice literally washed down from the lower pitches by torrential rains and thunderstorms. Weather in the Accursed Mountains can change in a blink of an eye...
Approach
From Grbaja valley walk up to the corrie of Grbajski Zastan.For more details see the Maja Lagojvet main page.
Grbaja is connected with the town Gusinje with a narrow asphalted road which turns into a bad dirt road (passable by an ordinary car with some difficulties most of the time) towards the end of the flat part of the valley that is called Treća Livada (Third Meadow). Near the end of asphalted road there is Branko Kotlajić hut (open only when inhabited by members of Radnićki mountaineering club from Belgrade) and Eko-katun (restaurant and simple accommodation in bungalows). You can take water there. Last permanent water spring is further up the road to your left.
Accommodation in Grbaja valley is in Branko Kotlajić hut (when open) or Eko-katun. You can park your car there for free. Wild camping should also be possible. See more details.
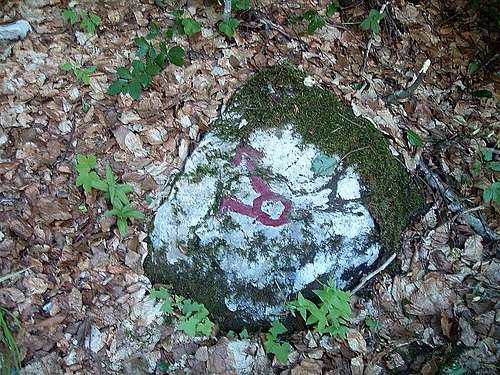
From Treća Livada there is one trail leading to the lower part of Grbajski Zastan. Find the stone with a pole with arrows. Counter-intuitively, DO NOT follow the arrow showing ‘Zastan (Peskovi)’ (it may show an old trail that was still barely passable when I went there back in 2005 but is completely overgrown with lush vegetation nowadays). Instead, follow the arrow showing ‘V. Kotao-Snježnik’ to your left (facing south). The beginning of the trail is not marked and may be difficult to find - look for the most obvious path entering the forest. After several hundred metres you should find a fork in the path with a red mark on a stone. The path going left (to Veliki Kotao and Snježnik) may have branches lying across it, as if saying ‘do not go there’. And that’s right - take the path going right.
|
|

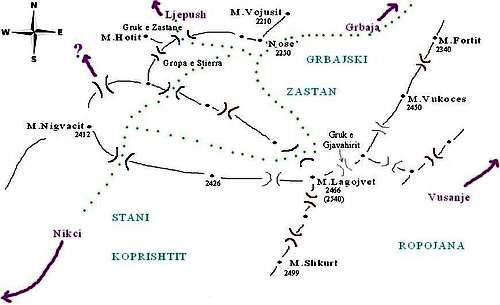
From now on there will be some scarce red marks on trees and stones. The path is very steep, sometimes you have to use stones and trees as handholds, especially if you carry a heavy backpack. In one place there is a rope that you can use as a handrail that was left there by a Polish caving expedition.The marked path ends at the upper edge of the forest. Getting here may take from 1 to 2.5 h depending on your fitness and weight of your pack. (The above info refers to summer 2009, the state of the trail may change!) From there you have to keep the SW direction, more or less paralelly to the walls of Karanfili to your left, sometimes using a hardly visible trace of a path. Shortly above the forest there is a water spring near a big boulder (sometimes marked with two upright sticks) that is however likely to get dry at times. Further up you will see a V-shaped col to your left (Ropojanska Vrata) that separates Karanfili from Maja Fortit. Start changing your direction slightly towards the middle of the slope, towards a characteristic nose-shaped rock face, choosing the best passages. Reach the base of this face, turn left along it and then you can descent slightly, looking for a place to set a camp. From Treća Livada it took us about 6 h to get here when we carried about 35 kg each. When going light you should cut this time by half. There is no water in the corrie but even in summer there is usually some snow that can be melted.
|

We recommend camping at the bottom of the upper corrie of Grbajski Zastan. Snow can be usually found nearby even in the end of summer. From there the approach to the north face is a walk and easy scramble across meadows, snow or scree fields (depending on the season) and rocks and takes an hour or less.
|
Red Tape
Grbaja valley lies in Montenegto and the upper corrie of Grbajski Zastan is in Albania. Crossing the border in the mountains outside regular border crossings is illegal. I have heard contradictory info on that - apparently the Montenegrin border post at Vusanje (Ropojana valley) may serve as a semi-official crossing for mountaineers going to the Maja Jezerce area and intending to return the same way, but this does not apply to Grbaja. The situation with permits from Montenegrin police is also unclear. See more details at the Red tape section of the Maja Lagojvet main page.In 2005, 2008 and 2009 I crossed the border without a permit on foot several times in the mountains. I do not encourage anyone to do it as you may be arrested by Montenegrin or Albanian border police. Do it at your own risk if you wish.
In order to stay at the right side of the law, it is possible to cross the border by car at Grnčar/Bashkim, drive along unsurfaced roads to Bordolecit or Ljepush and walk up to Grbajski Zastan from there. I did it once in 2008. A more detailed description can be found here in the section 'Getting to Grbajski Zastan from Bordolecit/Ljepush'. (Kamil)
|

Route Description
|
|
| Pitch 1 III UIAA (low class 5 YDS) 50 m Climb diagonally rightwards on solid, easy and not very steep slabs with nicely protectable cracks and karstic fluted rock. Belay from a peg and a nut or friend at the left end of the big wide ledge. Goes a bit stretchy with 50 m ropes. We left a peg for abseil. Had we known the route, we would probably simul-climb this pitch. Pitch 2 IV- (5.5) 20 m This pitch can be treated as moving the belay stance with just the last 3m of IV- ground, however we normally belayed on it. Either scramble an easy slab diagonally rightwards (I-II) or walk to the right along the wide ledge and turn sharply left to scramble to the point several metres below a niche. Climb the last couple metres (IV-) and belay in the niche from pegs and a nut or friend. We left one peg there but finally we didn’t abseil off there on the way down. |
|

| Pitch 3 VII- (5.10b/c) A0/AF 20 m (the crux) Climb out of the niche several metres up a diagonal leftward crack (V, pegs and nuts/hexes) until you stand on a tiny ledge (alternative belay stance). That’s as far as I climbed in our 2nd attempt before bailing out in a storm and left the rope for prusiking for the following day. In the final successful attempt we started the pitch from there. One peg should still be there. From this ledge traverse precariously to the left, lowering slightly, for several metres (V, chossy, a bit scary, one small knifeblade should be possible for pro), then climb straight up a small corner and slightly to the left (VI+, cracks for pegs and small wires, watch out for rope drag). Stand on easier ground below the overhang to your left and hammer in a solid U-shaped channel peg, preparing for the crux and a bit of runout. |
|

| I first tried climbing straight up above the peg and then pulling on a razor-sharp hold for left hand (crumbly rock). I couldn’t find any hold within my reach, got pumped out, tried to downclimb but slipped on wet rock and took a flyer, badly cutting my left hand on the razor jug. Tried the same way again with no success but managed to downclimb safely this time. Finally I lowered myself a bit below the peg, made a little pendulum to a far right sidehold (A0/AF, perhaps would be a bit harder than VII- when freed) and climbed rightwards up the slab with big runout (VII-, holds are not bad but few and far between, the rock was wet), finally traversing back to the left to place a friend above the difficulties. This was an improvised way of climbing the crux, it would be a lot easier on dry rock when perhaps it might be possible to climb straight up above the peg. Obviously we had no time to waste on trying to free the pitch. After reaching the easier ground climb several more metres diagonally left and set up a belay from pegs and a nut or friend on a nice grassy ledge. On the descent we left 2 pegs and some abseil slings there. We have not tried it, but with two ropes and careful ropework to avoid rope drag it might just be possible to combine pitches 2 and 3. |
|

| Pitch 4 V (5.8) 25 m (the choss fest) Climb more or less straight up, slightly rightwards, looking for best passages (V, very loose rock, cracks for pegs and nuts), use long slings to avoid rope drag. Belay on a small ledge from pegs and a nut/friend. We left a peg or two there. Pitch 5 IV (5.6) 25 m (the ultimate choss fest) Start up choosing a line that gives the least chance of burying yourself and your partner in a stone avalanche (IV, extremely chossy, peg and nut placements). After about 10 m turn diagonally left on loose rock and grassy ledges (III-IV). Belay on a convenient grassy ledge from knifeblade and/or lost arrow pegs. We left 2 pegs, a screw lock crab and abseil slings, and one U-shaped channel peg on the pitch that didn’t want to go out. It is not advisable to connect the pitches 4 and 5 because of dangerously loose rock and rope drag. |
|

| Pitch 6 III (low class 5) 50 m Climb straight up on grass and loose rock (II-III, scarce pro placements, easy but chossy ground). Go full 50m rope length, second half of the pitch runs in a wide depression, belay on a long sling at a large block, doubled with a hex or a friend. Pitch 7 II (class 3-4) 20 m Continue straight up the depression to a small notch in the summit ridge (I-II, chossy). It can be easily soloed. Some dodgy anchors can be found in cracks in a large block at the notch. Leave the ropes and gear and follow the easy but chossy ridge to the right towards the summit. Luckily the east summit (to the left) is several metres lower (actually at the level of the notch) and you needn’t climb it, ‘cos the ridge leading to it looks so rotten that the very thought of putting your hand or foot on it scares the living hell out of ya... |
|

The UIAA -> YDS conversion is only approximate as we have no first-hand knowledge of the latter.
Descent
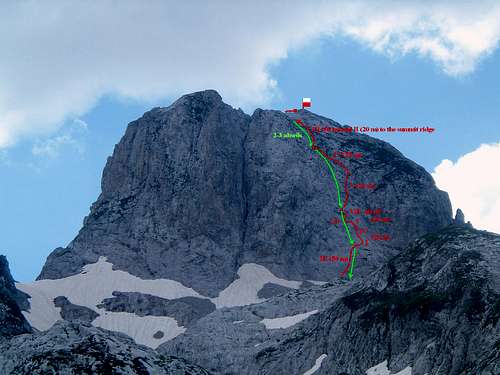
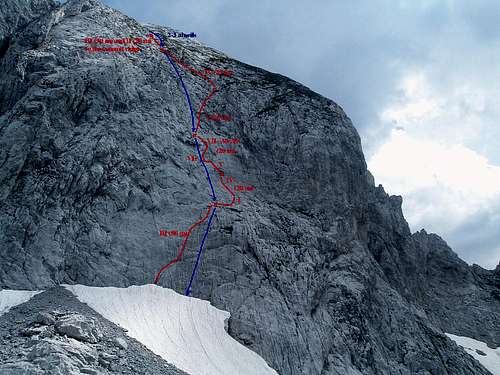
| Abseil (rappel for the climbers across the pond) down the line of the route. See green arrows on topo 1 and blue arrows on topo 2 above. I tried to ab off the anchor in that block at the notch but the peg popped out as soon as I put my weight on it (luckily it happened then and not when I was 10 m further down!) so we descended without belaying to the upper end of pitch 6 and abbed off a long sling over a big block, full 50 m to the belay at the top of pitch 5. The rope got stuck so I had to prusik up to unjam it. It was getting dark so we decided to bivy on grassy ledges ‘cos abseiling down that choss at night could be lethal. At sunrise the next (2nd) abseil was off 2 rather lousy pegs (tried not to put full weight on the ropes) at the middle of pitch 6 to avoid rope jamming, again to the belay at the top of pitch 5. The 3rd ab went down the combined pitches 5 and 4, to the belay at the top of pitch 3. Of course the ropes got jammed in the worst choss, making me prusik up again and almost drop a microvawe-sized chunk of rock right on Seba’s head. From here it’s plain sailing... almost. The 4th ab goes down to the big ledge and the last 5th one to the bottom of the face. Ropes got jammed again in the washed-out karst formations and this time Seba prusiked to free them. |
|

Gear
| Two 50 m or better 60 m ropes. It is better to climb the route on 2 ropes to minimise rope drag and be safer from stonefall. There are no bolts on the route. Nuts/wires, hexes, friends, cams – all sizes, with medium sizes possibly doubled. Plenty of pegs (pitons, pins for US and Canadian folks) - knifeblades, lost arrows, kingpins, V-shaped and U-shaped channels/angles, you name them. We had about 15 of them and ended up with the last one left. Climbing the route solely on ‘clean’ pro would be well hardcore and abseiling off would be virtually impossible. Lots of slings. Helmets, of course. And last but not least, a bit of cojones :-) |
|

The Balkans Peace Park Project
The aims of the charity organisation Balkans Peace Park Project are to establish a transborder environmental protection park in Prokletije/Bjeshkët e Nemuna (in Montenegro, Albania and Serbia/Kosovo/Kosova), help the sustainable development of local communities and allow free crossing of borders on foot for mountaineers and tourists. In Montenegro Mr Enes Drešković, chairman of Mountaineering Club ‘Hrid’ at Plav, works for this initiative. We called our first ascent route on Maja Lagojvet ‘Balkans Peace Park’ to popularise and support the idea of the Balkans Peace Park Project.
|
