Introduction
About two years ago I stumbled into a discussion about photography on one of the SP message boards where several people recommended using polarisation filters in order to enhance the quality of the resulting image. In 2003 I started using polarizers myself and since then I rarely venture out without one. During that time I was able to shoot a number of photos which without polarizer would have been utterly unimpressive while I also did a lot of mistakes since I had to find out about the use of the filters on my own.
During that time I have also seen photos down voted because the voter thought them photoshopped (“At that elevation you don’t have a sky that blue!”) or - the other extreme – heard a member claim that the polarizer reveals the real colours while our own eyes see only a grey-shaded version of reality.
Since – as always – the truth lies somewhere in between, I thought it might be helpful to publicly muse about my own experiences as an amateur photographer while also discussing the physical principle of the filters. Don’t be afraid that it gets too technical – but also don’t look for the actual truth. That would probably involve nasty physical formula and after ten years out of the physics business I don’t claim to understand them myself anymore.
Why Use Polarizers Anyway?
So here we are and the first question generally is:
What does a polarizer do?
The answer – as anybody who has used them will tell you
They enhance colours, making the picture crisp and clear – under certain conditions.
In order not to bore you with words, let’s have a look at the following two pairs of pictures.
![Große and Kleine...]() Gamswiesenspitzen without polarizer Gamswiesenspitzen without polarizer | ![Große and Kleine...]() Gamswiesenspitzen with polarizer Gamswiesenspitzen with polarizer |
In the first pair you see the pair of Große and Kleine Gamswiesenspitze as seen from Zochenpass in the Lienz Dolomites in September 2003. I shot the first picture as part of a multi picture panorama, for which I generally don’t use filters (you’ll find the reason in the drawbacks section below). However I liked the view good enough to also shoot a second shot with polarizers in place – the shot to the right.
The effect is quite apparent – a good but somehow dull picture suddenly turns into a colourful one, the clouds in the background move much closer so that, as hgrapid put it
“The clouds above seem like a sea below.” The structure of the rock is visible and it seems like a grey veil has been lifted from the picture.
![Rocca Busambra main summit unpolarised]() Rocca Busambra without polarizer Rocca Busambra without polarizer | ![Rocca Busambra main summit polarised]() Rocca Busambra with polarizer Rocca Busambra with polarizer |
The same effect is even more pointed in the second pair of shots, while the object itself might not be that impressive. While hopping along the ridge of Rocca Busambra in May 2006 I turned round after having downclimbed from the main summit to the next saddle. I first wanted to take a vertical shot, adjusted the polarizer accordingly, but then decided to settle for the horizontal alignment. While pressing the shutter I realized that now the polarizer was off and redid the shot with correct settings.
Again, the picture on the right is much more colourful and if not put side by side you would probably not imagine that these pictures show the same crest and were taken just seconds after each other. The lifted-veil-character is not as pronounced here as in the other pair, which is caused by the short distance in the second and the far distance in the first pair.
Now one last example:
Colàc (far right) in front of the Sella-, Geisler/Odle and Saslonch/Langkofel/Sassolungo Groups.
Here you see the western Dolomites as seen from the Buffaure ridge on a perfect day with decorative clouds giving just the right amount of shadow to the foreground. Also colours are intense here and there is no hint of a grey veil here. You can even see the faraway mountains quite clearly like the Geisler / Odle Group in the back centre of the panorama.
Working Principle
So – how is it done? Is it magic?
Certainly not, but it is a physical effect, which is much harder to explain than to master the use of the filters themselves. Therefore there is a short explanation below and a physical one. Let’s start with
The Short Explanation
When rotated to the correct angle, polarization filters reduce stray light by reducing reflections. Have a look at the pair below
![Demo Polarisation Filter]() Demo without polarizer Demo without polarizer | ![Demonstration Polarisation Filter]() Demo with polarizer Demo with polarizer |
To the left on the unfiltered image you can clearly see the reflection on the table which is missing almost completely on the filtered one to the right. The same happens when you take a shot in plain air. While it might appear that the air between your camera and the object you are taking a picture of is completely transparent, there are millions of tiny particles, aerosols. These aerosols might be simple water vapour or smog and dust particles – but all reflect additional light into your camera lens – an effect which you see as a grey veil on your photos.
The polarizer cuts away this additional light – and the grey veil is gone. But how?
The Physical Explanation (Unscientific)
(No mention will be made of circular polarisation though this is an important effect when using polarizers – you have to be able to think and speak in mathematical formulae to get that right ;-))
We have to start with the question:
What is polarisation in the first place?
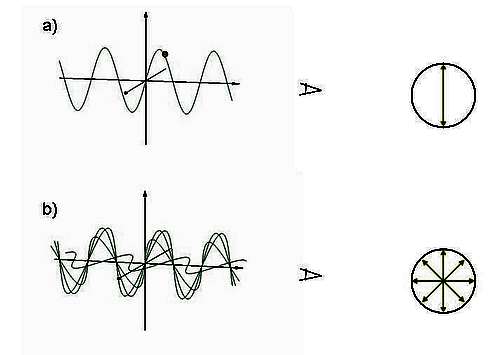
Most of you will know that you can describe light as propagating in waves. When discussing colours for instance we often speak of wavelengths or frequencies – red light has a long wavelength, blue light a short. Now have a look at the light wave below:
![What is Polarisation?]() Light Polarisation
Light Polarisation
If you pick out one special point on the wave (like the one indicated in green) and if you look at this point from the right hand side you will see it bounce up and down, following the movement of the wave. It would always keep moving in that direction since the wave itself moves up and down along the same pane. In geek speak this wave is linearly polarized, vertically in this example.
However, the light emitted from any light source consists of gazillions of lightwaves, all of which are emitted randomly in all directions. Moreover the panes in which the waves are swinging are also distributed along all angles. When viewed from one side you would find the points of the waves swinging in all directions, every single one bouncing up and down along one line but the multitude of them distributed along all angles. The image b) in the above picture tries to give you an idea.
Now you put the polarisation filter in place and the effect is immediate: only one pane is selected while all the light swinging in another pane is suppressed. As a consequence the polarisation filter greatly reduces light intensity – you’ll have to use greater apertures or longer exposure times – but we’ll be getting back to this in the “Risks” section. If you now choose to use a second polarisation filter you will find that – as you rotate it – you’ll be able to suppress
all the light. Both filters have to be at 90° angles between each other.
But how does that help in reducing stray light...
...or in lifting the grey veil?
To answer this question you have to know that every particle, even the tiniest one, while it reflects light changes the polarisation of it. Exceptions are metals which bounce back light as it hits them but our aerosols behave differently. Depending on the angle of the reflection the reflected light is more or less polarised with nil effect at 0° and 180° (light from front or back) and maximum effect near 90°.
In real life this means that if you have the sun at your back or in front – though there is still stray light, the stray light won’t be polarised. Using a polarizer won’t help a bit. However, if you have the sun to one of your sides, rotate the polarizer and you’ll get to a point where the veil has lifted – colours get much more intense (and darker) while details suddenly come to the foreground. Turning the filter will give you the impression that parts of the frame come closer or retreat farther to the back.
![Polfilter Working Principle]() Polarisation Filter Working Principle
Polarisation Filter Working Principle
Now that we have (hopefully) understood the mechanism, let’s have a final look and try to see what really happens: the object (mountain) emits non-polarised light in full colours. On the way to your camera stray polarised light gets added so that everything gets hidden behind our veil. With the polarizer you now choose exactly one polarisation – the one which diminishes the stray light. In geek speak that is the direction ,,tilted at 90° to the polarisation pane of the stray light”. In the end you’ll get a similar picture as the one that was emitted by the object in the first place.
Polarizer vs. Photoshopping and Other Filters
Photoshopping
We have all heard that one of the great advantages of digital photography is the possibility to edit and enhance pictures afterwards. Can I achieve the same results with photoshop?
The short answer is no – at least not with the standard routines. An automatic level or curve adjustment is a move in the right direction but don’t be fooled: it takes an expert photoshopper to obtain results that mimic the effects of a polarizer. And I doubt that anyone would be able to adjust one of the pictures on top so that it resembles its counterpart on the right. You may try and convince me…
UV-Filter
A different kind of filter – the UV or UV-haze filter promises similar results as polarizers. By stripping away light at lower wavelengths (i.e. below a wavelength of 380nm = UV light) they claim to get rid of stray light without the cumbersome aspect of having to rotate the filter to obtain the best effects. However the stray light is not primarily emitted at these wavelengths – only very high up in the mountains you will obtain visible results. If you plan to climb above 4000 or 5000m a UV-filter might be all that you need.
Limitations
There are a number of conditions in which a polarizer is useless or gives unexpected results. I wouldn’t say these are drawbacks but you have to be aware of them.
Back light / Front Light
As that in the theory section the polarisation of the stray light is virtually nil at 0° and 180°. You won’t get results with polarizers under these lighting conditions. However – if the sun is very high up in the sky – polarizers can still help because now there is an angle of almost 90° again between the sun and the direction you are looking.
Portraits and Macro Shots
Close-up shots are not affected by polarizers. There is simply not enough stray light between the object / subject and the camera. However, if the background (like blue sky) is of importance or if there is an reflecting object nearby (like spectacles), you might still enhance the shot. Be aware that the filter reduced light intensity!
Flash Light Photos
Don’t do this with a polarizer! The automatic settings between flash and camera won’t recognise the filter and underexpose the shot severely.
Telephoto Pictures
The opposite is true for tele photo pictures. Here the effect can be seen though you might want to adjust the filter while looking at a wide angle an zoom in later. Depending on the amount of haze between you and the faraway object you might have trouble seeing the effect directly.
![Western Sicilian Highlands]() Rocca Ramusa on Sicily
Rocca Ramusa on SicilyHaze and Smog
Too much haze or smog reduces the polarizer results greatly. Now you have multiple reflections on the aerosols and the polarisation of the stray light gets blurry. The hazier it is the less impressive the results. Polarizers are useless in fog!
As for smog – the same holds true as for simple haze. However, the smog particles are “dirty” and thus change the colour of the stray light. As a result faraway shots with polarizer can look brownish.
Overcast Skies
There is absolutely no use in a polarisation filter when the sky is overcast. All the light – direct and stray – will be polarized in all directions so that a filter won’t do any good at all.
Risks
Blurring
I has been mentioned somewhere above that polarisation filters greatly reduce the light which falls on the chip or film. In everyday application this means that you either have to open the aperture or – if that is already open all the way – you have to use longer exposure times. Especially if you are using the automatic exposure mode of your camera you might not even be aware of it. Even on a bright day a telephoto shot can get blurred if the exposure time is longer than the reverse of the focal length (f=200mm -> t<1/200s). With a polarizer which cuts off additional light you might easily fall below that threshold.
![Vignetting]() Isola Alicudi in Sicily
Isola Alicudi in SicilyVignetting
There is another effect which – though it occurs with any filter – is most pronounced with polarisation filters: vignetting. Since chip as well as film are rectangular while the whole optics is circular you might observe circular patterns in the corners of your photos. The effect is pronounced with wide angle lenses together with polarizers. As the opening angle of wide angle lenses are wide they might get obstructed by the filter, which is placed in front of the lense. Imagine it as casting a shadow into the lense. Polarizers are especially thick so that the effect is largest with these kinds of filters.
However, Brenta told me that there are special thin-mount filters which are more expensive and lack the thread in front. With these kind of filters you may be able to eliminate the vignetting effect. Due to the lacking front thread stacking of filters is not possible.
![Sky Gradation]() Sky gradation in Germany's Soonwald
Sky gradation in Germany's SoonwaldSky Gradation
If you plan to use wide angle lenses together with a polarisation filter you might observe that the colour of the sky changes brightness over the width of your photo. Since polarisation is different at different angles the stray light on the left side of a wide angle photo is differently polarised than the one on the right hand. Have a look at the shot to the right and see the colour change from a very deep blue on one side (one you would never achieve at an elevation of 600m without a filter) to much lighter blue on the other. The shot was taken with a 18mm lense with an opening angle of 74°.
Panoramas
Don’t use polarizers for panorama shots! Certainly not for panoramas covering an angle of more than 90°. Since the stray light polarisation differs at different angles and since the polarizer picks out only one polarisation you are bound to get visible “steps” in your panoramas. Even if you leave aperture and exposure settings fixed the “color aspect” of the pol filtered shot changes over the width of the pano, thus switching from blueish (directly against the sun) to yellowish (at 90°). With the individual shots at different of these hues you will get “colour steps” in the pano. With patience these can be treated individually in photoshop but it is a very cumbersome process.
Conclusion
![Gamskofel (Mooskofel hidden...]() Gamskofel in the Carnic Alps
Gamskofel in the Carnic Alps
If you can spare the 30 – 50 dollars (or Euros) that a polarisation filter costs and if you are interested in good photos – by all means buy one and start experimenting with it. No number of words can prepare you to what a polarizer can do and you should start observing its effect by simply looking through and turning it. As you do so you will see the sky turn a magnificent blue, the clouds turn a dazzling bright white and objects in the background seem to move closer to the front. The filter does not have to fit to the lense mount – if it is wider you won’t run the risk of vignetting. Be aware of limitations and risks and the filter will give your photos a new life.
External links
Similar article with additional info


 Gamswiesenspitzen without polarizer
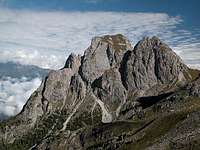 Gamswiesenspitzen with polarizer
 Rocca Busambra without polarizer
 Rocca Busambra with polarizer
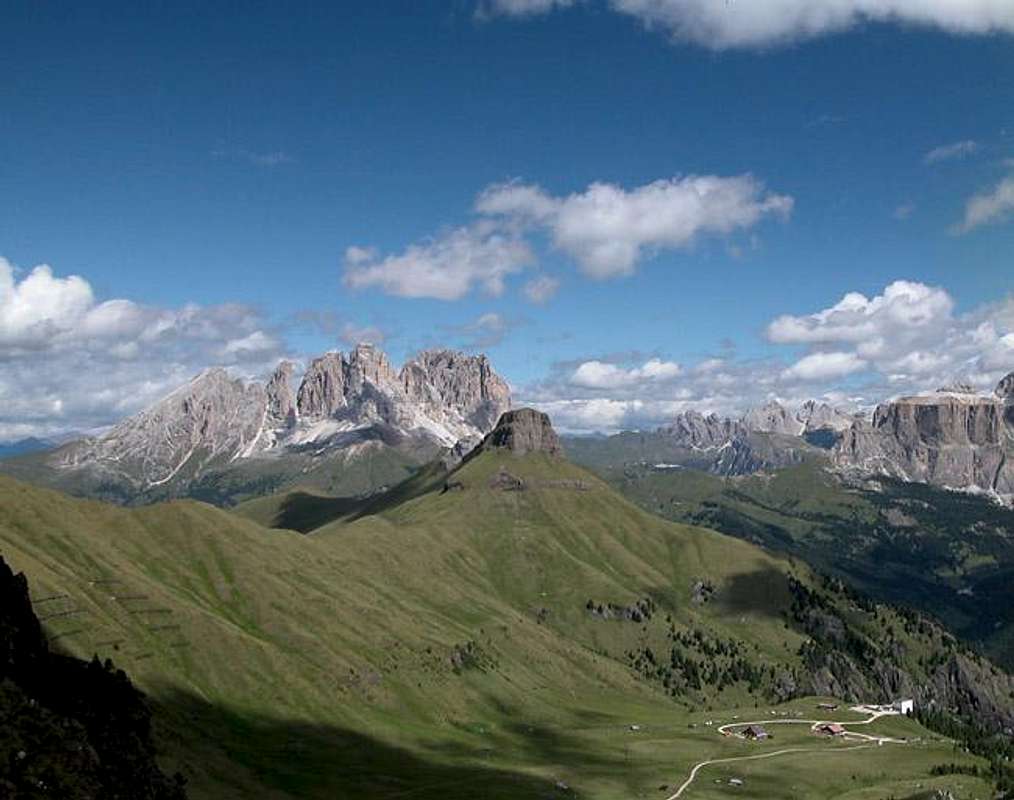

 Demo without polarizer
 Demo with polarizer
Comments
Post a Comment