Alpine speed; go light, go fast, be safe.
![spindrift]() Spindrift avalanche
Spindrift avalancheAlpine climbing exposes the climber to numerous objective hazards. Be it weather, seracs, unstable snow conditions, rock fall, ice fall, or thunderstorms; mountains have plenty of ways to ruin your day. The best way to avoid becoming an unfortunate statistic is to limit your time spent in the danger zone.
Climb efficiently. Poor fitness, heavy packs, and inefficient techniques and systems are the biggest enemies to speed. Efficiency is born through practice. Rock climb, ice climb, mixed climb, and aid climb until you can climb 5.10, WI 5, A3, and M5 at the crags quickly. Train with your partners in low stakes situations to learn each other's habits. Train fast. Hiking with a heavy pack is a common training tool, and while this helps develops strength, it trains you to climb slowly. Trail running trains you to be fast; pushing iron and cragging will make you strong.
Leading in blocks of four to six pitches is more efficient that swinging leads. The leader and follower packs do not need to be swapped and the ropes do not need to be restacked in between pitches. After a block, the belayer will be chomping at the bit to lead. Using an auto blocking belay device connected to the belay anchor’s power point will allow for one handed belaying, freeing a hand to drink, eat, and take photos. Keep a tight top rope for the followers, this will breed confidence and in turn speed. Penalty slack has no place in the alpine. For maximum efficiency, play to each climber’s strengths. If one partner is stronger on ice, that block will fall to him or her. If one climber is faster at aid or rock climbing, let them have it.
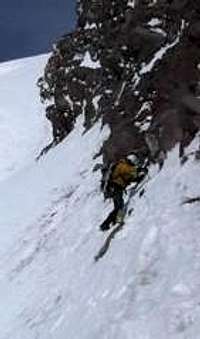
While not 'safe', soloing and simuclimbing, when done well within the party's abilities, foments speed. MVS and I climbed the remote two mile long full North Ridge of Forbidden Peak car to car in a mere 15 hours. Most parties take three days. We achieved this by packing the rope and soloing the easy sections. Soloing is safer than roped climbing if no belays or protection can be had. In these circumstances the rope only serves to bind everyone's fate should someone fall. When simu-climbing, the weaker climber leads as he or she is inherently more conservative with protection.
Weight is the enemy. Every ounce counts, however, starting off with smart decisions regarding the big ticket items will go far towards lightening the load. Packs, sleeping bags, shelters, ropes and the rack offer the greatest opportunities for weight savings. Choose these carefully and don’t be afraid to spend money. Save money elsewhere.
![Axe and crampons]() 12 ounce steel axe and crampons
12 ounce steel axe and cramponsDon’t be penny wise and pound foolish. Aluminum crampons save a full pound over steel, yet perform poorly in many snow and ice conditions. For alpine climbing and mountaineering insist on steel. Ditto for ice axes. Aluminum headed axes will not penetrate hard neve’ and ice nearly as well as a forged steel pick. For routes with steep ice, a pair of matched ice tools or a technical piolet paired with a hammer increases security and speed.
Dress for success.![Gib Ledges - Mt Rainier]() Dressed for the weather at 12k on Rainier in April
Dressed for the weather at 12k on Rainier in AprilDon’t bring ‘extra clothes’. Dress to stay just warm enough while moving on summit day, plus a belay jacket, warm mittens, warm balaclava, and socks. In frigid weather add a pair of belay pants. Wear the lightest possible clothing and boots appropriate for the anticipated conditions. Wear all your clothes to bed, except hard shells and boots which tend to trap perspiration. If you didn’t wear all your clothes to bed, you brought too many or too warm a sleeping bag. Stuff your hard shells in a stuff sack for a pillow and put your boots between the foot of your bag and sleeping pad to keep them from freezing. Your belay jacket gets draped over the top of the bag; wearing it in your bag can compress the insulation of both the jacket and sleeping bag. Put dry socks on before going to bed and dry the wet socks and glove liners against your stomach. A good sleeping pad is essential to sleeping comfortably. While self-inflating pads have become acceptably light and compressible, a thin Evazotte pad is idiot proof which is important to me since I am at times, a big idiot.
![Rack]() Alpine rack loaded for bear
Alpine rack loaded for bear Nuts and passive pro form the backbone of the alpine rack, carry 8 - 10. For winter mixed routes, replace the smallest size nuts with a couple of KB, Bugaboo, or shallow angle pitons. Pitons in this size offer greater security than tiny nuts and will work in icy cracks. Round out the rack with a few cams from finger to hand size. Although cams are heavy, the weight penalty is repaid in speed of placement. For big routes, bringing the four largest size hexes rather than doubling up on cams saves weight and expense if you need to leave gear as rap anchors. If you aren’t comfortable with hexes, practice until you are.
Cheap titanium screws with aluminum hangers are attractive for weight savings, but are unreliable compared to quality steel screws. To save weight, carry mostly shorter screws. In good ice they are nearly as strong as longer ones and in poor ice a long screw is worthless anyway. Bring at least one long one to make v-threads though. Rack the gear on a single length, sewn 9/16" sling. It weighs less than a padded gear sling and can be sacrificed for rap anchors.
Wire gate carabiners have become standard; a full rack saves considerable weight over the solid gate versions. Small locking carabiners also save weight over the full size ones. Sewn spectra slings are lighter and less bulky than nylon and absorb less water. Carry 8-10 single length slings configured as trippled alpine draws and two double length slings each with a small, locking carabiner. The 'draws' are racked on gear loops; wrap the double length slings over a shoulder, clipping both ends with a locking carabiner. This allows the climber to unclip and easily remove the slings.
Ropes. There are too many considerations regarding ropes to discuss in this article. Different routes demand different systems. Colin Haley weighs the merits of the various choices in this article:
Ropes for alpine climbing. While the trend is for longer and longer ropes, the old standard 50 meter cords save weight and make rope management easier. Unless climbing a route with established 60 meter raps, 50s work just fine in the alpine. Also, shorter pitches means a lighter rack. Beware skinny single ropes achieve their weight savings at the expense of sheath durability. A half rope weighs even less and is more durable. Although not UIAA approved, for moderate routes carry one and double it for extra security on hard pitches. Steve House and Vince Anderson climbed and descended the biggest alpine face on the planet, the Rupal Face of Nanga Parbat, with a 50 meter half rope and a tag line.
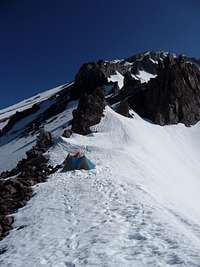
![Casaval Ridge Bivi]() Floorless shelters on an exposed ridge.
Floorless shelters on an exposed ridge. A small, single wall tent will make bivouacs far more comfortable as well as allowing you to bring a lighter sleeping bag. I consider bivi sacks only for emergencies and for routes without ledges large enough to accommodate a tent. Floorless shelters or tarps are lighter than most tents and quite weatherproof in all but the most exposed sites. These have been used up to 17k on Denali, and they are plenty sturdy when properly staked and guyed.
![User Profile Image]() Full three day alpine pack.
Full three day alpine pack.. Keep it simple. An alpine pack should be no bigger than 50 liters and weigh little more than three pounds. Ideal packs are built like trash cans with shoulder and hip straps. No zippers on the body, they add weight and will fail at the worst possible time. CCW, Wild Things, Montbel, and Black Diamond all make appropriate packs.
![Mt Hood, North Face]() Kitted for a one day winter ascent of the NF Mt. Hood.
Kitted for a one day winter ascent of the NF Mt. Hood. Stoves are essential in the high alpine to melt snow for water. Use the lightest stove that is appropriate for the conditions anticipated. Cold, low elevation climbs necessarily require white gas stoves, but for three season use in the CONUS, Canada, and Europe, a light, inexpensive butane canister stove is lighter, more convenient, and safer to use inside a tent. MSR Pocket Rocket and Snow Peak Giga Power are both great choices. Stove systems like the Jet Boil and MSR Reactor have become very popular, but recognize the Piezio ignition systems are easily damaged and won’t last the working life of the stove. Bic makes tiny lighters. Bring two, they still weigh less than a single, regular lighter. Titanium pots are the lightest option, but conduct heat poorly. On long trips the negligible weight savings will cost in exta fuel carried. Aluminum pots offer the best trade off between light weight and heat conduction, but are hard to find without heavy coatings.
Don’t carry more water than you need. Drink plenty of water before leaving camp and hydrate well in the evenings. Fill up at every opportunity, using chlorine dioxide tablets to disinfect questionable sources. A mathmetician friend determined swapping bladders for Naglene bottles is the most cost effective way to reduce weight. Bring one bladder without a hose which tends to freeze and one Nalgene style bottle which obviates the need to carry a separate mug. Stay hydrated and fed. In the long run you will climb faster if you have to stop and melt water than if you try to climb while dehydrated and hungry.
![Alpine Start]() Gearing up for an alpine start
Gearing up for an alpine start Carrying day packs will lighten your load and the increased speed will allow you to climb two and three day routes in a single long day. Be safe though, and carry minimal supplies for unplanned bivouacs. A small stove kit, a bivi sack and a thin foam pad weighs only two pounds, yet increases your survivability, not to mention comfort, when that one day trip turns into an unexpected overnight. These items are shared with a partner, lowering the extra weight to a single pound per person. The great Himalayan alpinist Greg Child once wrote he would rather carry extra headlamp batteries than a bivi sack. LED headlamps with lithium batteries weigh next to nothing and are bright enough for early starts and late finishes. Lithium batteries, aside from being lighter than alkaline, last longer and are less affected by cold temperatures.
Albert Pinestart who? The alpine start is grounded in the belief that it is better to start in the dark than finish in the dark. Starting in the cold dark of night gives the climber more time to deal with route finding challenges and technical difficulties that have a bad habit of burning precious daylight. On big glaciated peaks, it is important to finish the climb before the heat of the day creates unstable and dangerous snow conditions. Climbing in the far north or south means nearly 24 hours of daylight. Many climbers choose to travel at night low down when the glaciers are solidly frozen and wait for the sun to rise high enough to warm the bitter cold at high altitudes.
[img:772430:alignleft:small:Gearing up for an alpine start]Wake up with enough time to be climbing by 3 AM at the latest. Prepare the evening before. Melt all your water and put these 'boilers' in your sleeping bag. The water releases heat throughout the night, keeping you warm as well as preventing the bottles from freezing. Leave the pot full of water so it can be quickly reheated for coffee and oatmeal. In bitter cold, put the pot in a stuff sack and bury it with snow to keep it from freezing. Wear all your clothes to bed so crawling out of bed is less miserable, as well as being faster. Lay out your gear, tie butterfly knots and attach prusik cords to the rope if traveling on a glacier. Don't be the climber that makes the rest of the team wait.
External Links
Extreme Alpinism: Climbing High, Fast, and Light by Marc Twight is still the best resource for how to climb fast in the alpine.


Comments
Post a Comment