
|
|
List |
|---|---|
|
|
Custer, Butte, Blaine |
|
|
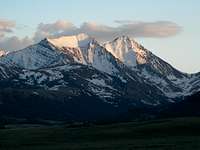
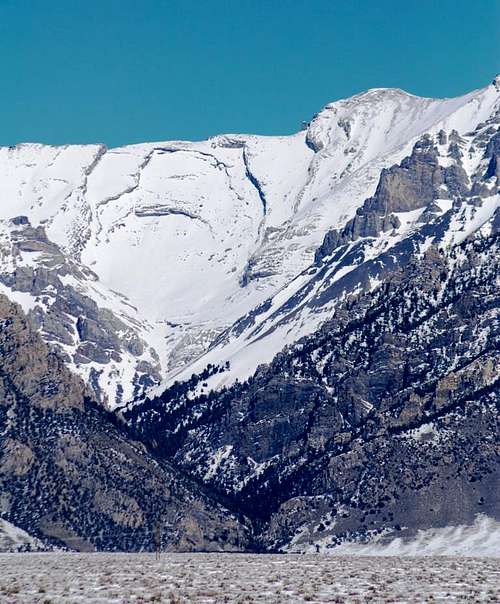
Winter Routes for Idaho's Highest peaks.
The North face of Idaho's 5th highest peak rises above the Upper Pahsimeroi valley. Shot from Mt. Corruption
In Idaho, the winter season begins on December 21st and ends on March 20th
This page is part List, Trip Report, Album and Winter Route description for Idaho’s nine peaks reaching over 12,000 feet elevation. Climbing the “9 over 12” has long been coveted benchmark for Idaho peak baggers and the concept seems to have grown exponentially in the last few years. With that popularity, climbing the 9 in winter is steadily gaining interest from those not content with a limited climbing season.
Most of the ascents were carefully planned out with avalanche conditions as the first priority. That’s not to say these are the safest routes for winter climbing. As conditions change, so does the reliability of a given route. A good place to get information on current conditions is Idaho Summits Outdoors Forum, http://www.network54.com/Forum/105717/
Just post a question and usually someone has a pretty accurate idea of what you will be getting into. However, always use your own judgment, Keep an eye on forecasts and realize conditions can change very quickly. I won't offer any how-to advice on this page, if you don’t have adequate winter skills, learn them on safer mountains or go with someone who does. Winter climbing is dangerous and tough. It’s equipment intensive, the approaches are usually much longer and the days are short. The rewards however, always seem to vanquish the miseries of the day. Be safe – Have fun!
Mount Borah 12,662'
The Summit Block of Borah From Mt. Idaho
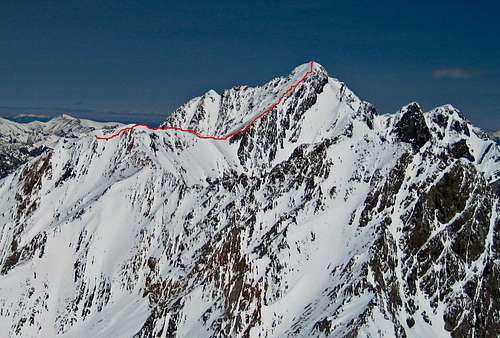
The summit block of Borah from Mt. Idaho. The route follows the ridge from Chicken Out saddle to the top.
Borah Peak: Standard Rout-ish , January 1999 and February 6, 2007, both climbs were done solo. The conditions were vastly different between the two climbs so the technical sections were in different locations. In 1999 I started at midnight hiked in from the highway but in 2007 I was able to drive to with in 2 miles of the trailhead.
In 99 I used a GPS to stay generally on route to the top of the tree line. In 07, I paid attention to the blaze marks and obvious features of the well used trail, plus it was my 7th trip to the top and I was confident to follow it by memory. Others haven’t been as fortunate, in the summers of 2007 and 2008, two descending parties failed to stay on trail where it leaves the ridge and enters the trees.
Both parties dropped straight off the ridge and down into Rock Creek and were benighted in the canyon, one pair walked out on their own the next morning and the other was located by Search and Rescue. At the top of the tree line, the ridge takes over and it should be light enough to proceed without a headlamp.
The first technical section starts when the ridge gets steep at the approach to Chicken out ridge. One chimney like feature half way up the ridge can become choked with ice and the rocks but it’s narrow enough to easily stem your way up using big easy holds. In 2007, I followed two sets of boot tracks in the snow all the way to the chimney, one of the climbers had ascended the chimney, fixed a length of 11mm rope and decided to call it quits. He rappelled back down and they abandoned the rope and climb. The rope hung there till someone removed it in the summer.
The second tricky section starts at the Chicken out crossing, it’s best to avoid the climbers trail below the crossing and traverse on top of the ridge instead. This requires climbing over several exposed rocky sections perched over steep snow. Follow the ridge all the way to the big saddle between Chicken out ridge and the summit.
The third section starts about 100’ below the summit. Both times I went up in winter I stayed close to the south ridge all the way to the top. The standard route goes strait up the middle of the face for the last several hundred feet, but in winter the face is covered in a wide snow field that looked too dangerous to try. Just below the summit, the ridge gets too exposed and over hung with snow to climb on so the only alternative is to venture out on the steep snow of the west face. I’ve climbed the ridge in summer and know that the rock under the snow is just a big series of slabs that can’t anchor the snow very well. It can make for a tense 15 minutes of trying to stay as light a feather.
 #1 The route over COR |
 #2 Sacajawea from below the summit block #2 Sacajawea from below the summit block |
 #3 From the top looking South |
#1 The standard route up Chickenout Ridge and across the Chickenout saddle takes in most of the steep climbing on the mountain. The summer route side-hills along a climber trail on the left side of the snow covered saddle. The winter route avoids some large snowfields by following the ridge all the way. Sections of drifting and large overhanging cornices can be a problem from the saddle to the bottom of the summit block.
#2 North face of Sacajawea peak shot from the big saddle between Chicken out Ridge and the summit.
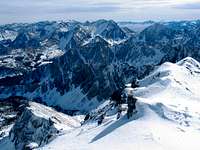
#3 The Lost River Range stretches on for miles south of the summit. this photo offers a pretty good idea of what the north east side of the range looks like during a mild winter. It also show a pretty good view of the winter route for Leatherman peak
Leatherman Peak 12,228'
Leatherman NE route
Viewed from the top of Mt. Borah
Leatherman peak: North East Side , March 19, 2005. Matt Nelson, Eric Pope and I waited till the last minute to grab a winter ascent and ski descent on this one. If you’re geared up for snow climbing, the North East side is probably the easiest way to climb Leatherman peak, It’s very straight forward, not as steep as the standard route and the two and a half mile hike up the West fork is very rewarding. However, in winter, dangerous avalanche conditions can exist on the route and that was the main reason we waited till it was nearly spring.
We hiked up the canyon and at the tree line, estimated we were on a 38” snow pack but when we got to the mountain proper, that pack thinned considerably all the way to the summit. Mother Nature’s humor thinned as well and by the time the summit was reached, the hope for easy corn conditions was carried off with the wind.
2005 was a dry winter so we were able to drive to within one mile of the trailhead. Similar conditions can be sometimes be had in the early days of winter.
The crossing at Mahogany Creek can be problematic if it’s not covered in a thick layer of ice, the ice in the edges builds up to over two feet tall. Remedy the problem by chipping them down with a large digging bar or axe. At the trailhead pay close attention to the trail blazes. The trail offers the most obstacle-free way to ski back to the road.
 #1 Matt skinning in |
 #2 Lower slopes. #2 Lower slopes. |
 #3 Leatherman and 11,909 |
Photo #1, Matt breaking out of the valley floor. Point 11,114’ dominates the background. Merriam Lake lies on the other side. The weather in the valley was warm with only a little breeze.
Photo #2, Matt in front and Eric brings up the rear at about 10,450’. The weather was still mild but clouds were being ripped apart near the summit. You can see the snow is lightly falling, this was the beginning of a storm that was isolated to the summits and as we climbed the wind really became problematic, heavy gusts, blowing straight downhill threatened to rattle the skis right off our packs. Matt and Eric decided they’d had enough at about 11.000’. I got to the top about 70 minutes later in heavy clouds and a hideous wind. It took me all of 10 minutes to be on my way back down.
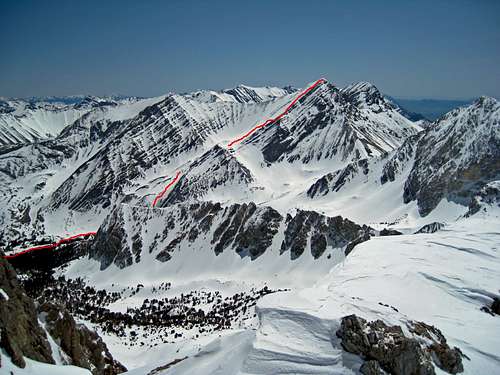
Photo #3 Photo by: Idaho SummitsThe North East face of Leatherman and 11,909 left. Shot by Idaho Summits, offers clear evidence why this is not only a great snow climb, it’s an Idaho classic ski line. There is a rib on the right side of the face that offers some protection in bad snow but it looks tedious and exposed.
Mount Church 12,200+
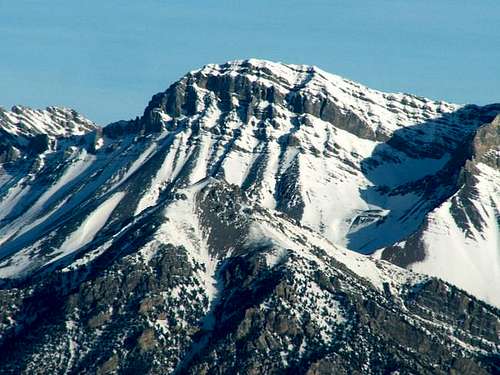
The Summit Block of Mount Church
Photo by Idaho Kid The summit of Mt. Church. The route follows the ridge from the right after gaining the crest.
Mt. Church: Standard Route. For me, the slog up Jones Creek has always been the crux of climbing in that part of the range. Thick brush and endless creek crossings put a never-ending spin on my least favorite but most revisited canyon in the range.
It took two tries to put this one underfoot in winter. The first attempt on 1-21-07, began with a late start and temps at -17degrees. Brandon, Dooley and I made it as far as the ridge crossing above Jones creek and turned back when we realized we wouldn’t make it to the summit and back through the steep ridge sections before dark. To complicate things, Dooley had fallen on the business end of his ice axe while climbing out of the canyon, he still sports an ugly scar on his left bicep.
On March 16th Brandon and I, armed with the lessons from our failed attempt, returned to the mountain and started at 3:00 am. We reached the summit several hours later in a driving wind that had reduced our communicating to a series of hand signals and misunderstood rope tugging. Later that day, we did the two-fer and marched up Donaldson as well.
Truck to truck took us 17 hours, easily the longest one-day winter climb either of us had done. We got pretty lucky on the conditions, the snow was safe and the cornices on the crest had mostly caved off making the short technical sections of the ridge not only easy to see and read but downright fun to climb around on.
The most dangerous section of the climb, real or imagined, was the snow chute that descends 700 feet from the crest to easier angled terrain above the tarn at 10,800’ (see Donaldson peak).
 #1 Hobbs nearing the crest |
 #2 The East Ridge and summit from Donaldson Peak #2 The East Ridge and summit from Donaldson Peak |
 #3 Summit break |
Photo #1. Brandon Hobbs nearing the Lost River Crest. The summit dominates the background.
Photo #2. Taken from the summit of Donaldson peak. The ridge traverse requires concentration and patience, but it’s pretty straight forward if the snow conditions are safe. We encountered only a few dangerously overhung cornices and we negotiated most of the “thin” sections on the west side where the snow was wind packed but usually yielded to a good kick step. We carefully belayed the few stretches that required cutting steps with an axe. The trip from the crest, to the summit and back took a little over two hours.
Photo #3. We stopped on the summit and sat down with our backs to the wind long enough to share a handshake and a package of Poptarts. We had different reasons for climbing Mt. Church. For me, it was another great 12er in winter, Brandon however, was battling his own demons after losing his girlfriend on the mountain in August 2005 after she fell to her death off of a rock buttress 200’ above Jones Creek.
The small ridge below shows the cross over that drops down into Jones Creek on the left.
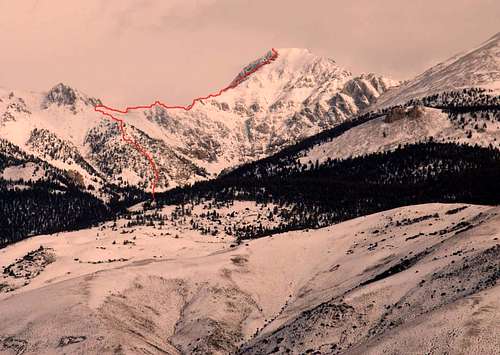
Diamond Peak 12,197'
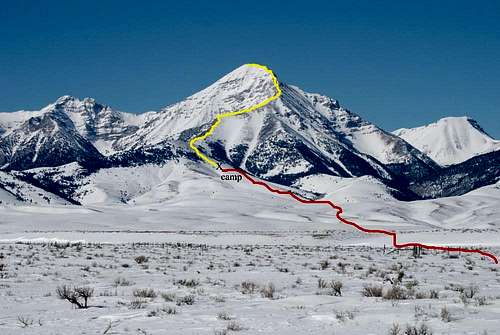
The Standard route, Diamond Peak from Birch Creek
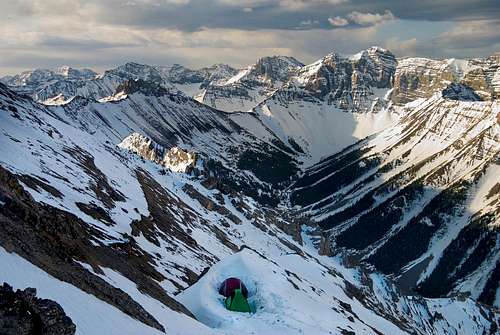
Route Photo. X marks the camp, we left the snowmobiles a few hundred yards lower down the mountain. The line from camp to the ridge would probably be the most avalanche-prone area on the climb. During our climb the snow was very stable and there were hardly any dangerous cornices on the upper mountain.
Diamond Peak: Standard Route. Diamond can be a fairly safe winter climbs once you make it to the actual ridge. Steve Stephens and I climbed it over two days starting on March 6th 2008. Getting to the mountain is a pretty tough chore in winter. A strong team could hike in from the highway and back in two days.
We used snowmobiles for the approach and it was still no easy task. We had to abandon them in bad snow about a mile short of the end of the road. We’d planned on camping on the lower ridge but darkness caught up to us not far after the end of the road so we dug into a large drift and began an unfunny comedy of trying to pitch tents in a howling wind.
The laughs continued when I spilled a large pot of boiling water in my tent. Luckily my sleeping bag was out of its way and the water froze on the floor instantly. I only had to break it up and throw it out the door. It was a long cold night but the wind was gone before sunrise.
We skinned away from camp in the morning but quickly ran into a hard veneer of snow that was too solid to ski up. We tied our skis on our backs and started again only to discover the veneer wouldn’t hold our weight. We sunk to our thighs on every 4th step or so and decided to shed the extra weight of our ski gear and our aspirations of skiing from the top. Once on the ridge proper, we stayed on hard drifted snow and made good time all the way to the summit. I’ve since picked up a pair Fritschi ski crampons that have made it possible to hike into places I don’t belong.
Finding the route to the mountain on a snowmobile is a real obstacle on a winter ascent of Diamond Peak. The roads are hidden under the snow and there are many fences crossing the foothills. If you’re unfamiliar with the approach, bring a good map.
 #1 Riddler Ridge |
 #2 Steve Stephens at camp #2 Steve Stephens at camp |
 #3 Steve on the summit |
Photo #1 The unclimbed East ridge leading to Riddler Peak viewed from the standard route on Diamond peak.
Photo #2 Steve with beacon in hand looks out into the sunrise. You can see a set of skis behind him, we were hoping to ski off the summit but the snow was too thin on the ridge and too solid on the steep east side slopes. We abandoned them pretty early in the climb but regretted it later.
Photo#3 Steve on the summit. Some of the peaks in the background are; the Riddler, Black & white, Nicholsen, and on the edge, in the distance is Saddle Mountain on the southern tip of the Lemhi range.
Mount Breitenbach 12,140'
Mt. Breitenbach above Jones creek viewed from Highway 93.
It's pretty easy to get an idea of what conditions you'll be facing on Breitenbach's West face by glassing the slopes from Highway 93
Breitenbach: West Face from Jones Creek, with Steve Stephens, 2-29-08
I chose the Jones Creek approach and a climb up the west slopes of the mountain because I knew the wind and sun had beaten the snow into submission on that aspect and I couldn’t see the standard route up Pete creek from the highway. We unloaded snowmobiles at the highway and managed to find our way to the mouth of the canyon in the dark and were skinning along by 5:30am.
We weren’t looking forward to another slog up Jones Creek but fat skis over deep snow made it very simple and we were past the worst of the brush by dawn. The snow proved too hard and steep to ski on without ski crampons above 10,000’ so we strapped our skis to our packs and continued on postholing up a breakable crust. Steve decided he’d had enough by 11,000’, he dumped his load and continued on. At 11,400’ we climbed into hip-deep, soft snow, we zigzagged back and forth across the mountain trying to find better conditions but in the end, we had to take turns breaking trail straight up the mountain to the false summit. I
t was a brutal few hundred feet. When we got to the false summit, we were greeted by a 25-30 mph wind, the true summit is only about a ¼ to the north of the false summit but it looked like a distant impossibility. Neither of us said a word, we donned another layer and started hiking. The snow on the ridge was as hard as a city sidewalk and it only took us about 20 minutes to reach the summit.
We crossed over more than a dozen old avalanche terminus heaps on our way up Jones Creek, a couple of them were quite large. Hiking up the creek, you’re blind to all the terrain above and the canyon would be a death trap in bad conditions. Although much of the upper route isn’t visible from Highway 93, the walls of the cirque to the left of it is. It’s easy to scope out any recent and older avalanche activity. The snow conditions were very stable when we did the climb, if they had been less secure we would have followed the rock, scree rib on the left side of the route line.
 #1 Steve rolling up Jones Creek |
 #2 The Route. Shot from Donaldson Peak #2 The Route. Shot from Donaldson Peak |
 #3 Windy summit |
Photo#1 Steve skinning up Jones Creek, most of the bad brush was behind us at this point. Our skies weighed heavy on our backs and AT boots are about as much fun as a toothache when it comes to climbing, but they put big grins on our faces all the way back down the mountain and Jones creek. We made it to the snowmobiles and then back to Mackay before dark.
Photo #2, shows our route. We stayed on the snow for the most part but if conditions had been unsafe, we could have picked our way up windblown or rock band sections all the way to the false summit. The thigh-deep snow started near the bottom of rocky looking fingers below the ridge, we were able to move one at a time from rock to rock in the dangerous snow until it thinned out just below the point.
Photo #3 Standing on the summit, the wind played hell with my skis all the way across the summit ridge after I lost the band holding the tips together and I couldn’t wait to take them off. Steve stayed on top for about five minutes and then bolted back below the summit and a much more hospitable leeward side of the mountain. I stayed on top and dug out the summit register, hastily signed in, then clicked into my skis and blasted down the mountain. I skied all the way to where Steve had dumped his gear and waited for him. The sun and heat were intense and I quickly started removing layers. I carelessly fumbled my helmet and watched it roll all the way to the canyon.
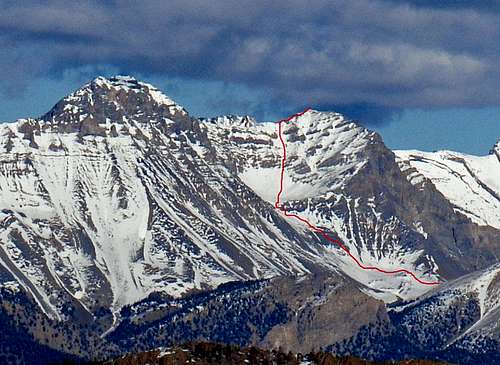
Lost River Peak 12,078'
Hyper Gully
Lost River Peak and the route to the notch at 11,100’. The Super Gully, “standard route” is on the left. We waited till conditions were very favorable on this climb, it’s an easy route to see from the highway and one of the shortest approaches on a 12er. If conditions are questionable, any route with gully in its name is unsafe.
Lost River Peak: Hyper Gully, with Brandon Hobbs, 03-09-2007.
Lack of snow accumulation and bombproof conditions made any route up for grabs on Lost River peak that march. Brandon and I initially planned on climbing the Super Gully but decided to try something different.
We didn’t know the Hyper Gully had been climbed and named and didn’t really care, it looked like more fun than the “standard” route. The trip started off a little shaky when I had to descend 900’ to retrieve our only camera after I’d left it behind on our first break. Brandon agreed to climb in slow motion while I raced down and back.
The gully follows the standard, route till it branches off to the south at about 7,800’. It continues up a narrow but mellow wash down the west face of the mountain and ends in a narrow notch at about 11,100’ on the south ridge. From the notch, the climbing gets more interesting. Follow the base of tall cliffs for about 400’ till they break into a steep face section, climb straight up the face till you come out on the South ridge again at about 11,680’. Climb to the lower and summit and follow the ridge to the true summit.
 #1Hobbs on the traverse |
 #2Hobbs wading up the south face #2Hobbs wading up the south face |
 #3 Kicking steps |
Photo #1, Brandon ready to stop a fall under the cliff bands past the notch. The climbing on the south side of the mountain was blessedly out of the wind and we enjoyed the traverse immensely.
Photo #2 Brandon, well past the Traverse, struggles up the soul-sucking South face. It took a good long time to make it up the slope. The promise of firm snow on the ridge was the carrot that kept us moving. When we got there, a strong, frigid wind let us know we still had a long way to go. Luckily it was mostly at our backs. We spent all of about a minute on the top and then ran down the Super gully.
Mount Idaho 12,065'
The route to the west ridge and summit
Shot from the valley floor, this isn’t a great route photo but it gives a general idea. Look at a detailed topographic map for more information.
Mt. Idaho: From Elkhorn Creek, 12-23-2007. Mt. Idaho was for me, the most worrisome winter 12er. I studied photos and topo maps but couldn’t see a safe approach on any side. I’d been to the summit via the North face but suspected the West ridge was my best bet. I knew gaining the ridge would be a trick. but still didn’t feel confident about what was up there. In early December, I decided to climb peak 11,352 (Mt. Morrison) and get a better perspective. From the summit I got a long look at the nose shaped hump that starts at about 9,500’ and leads to point 11,060 on the ridge and decided I’d give it a try as soon as winter started.
In the early morning of the 23, I parked near the highway in Elkhorn creek and by daylight, I was at the base of the nose. The climbing was easy and there still wasn’t a lot of snow at that elevation in the range yet. (about 23”) To the west, I could see a set of animal tracks, probably the bighorn sheep Id seen two weeks earlier on the upper slopes of Mt. Morrison. The animal had started two avalanches in minor gullies that went all the way to the valley floor and it was a good incentive to stick to the nose route.
The bottom of the Nose is dotted with small trees that anchor the snow pretty well but when you reach the tree line at 10,400’ the climbing is a little more exposed and conducive to sliding. Stay on the vertex and follow it all the way to the cliffs below point 11,060’ then cross to the safety of the ridge by staying glued to the rocks.
 #1The West ridge and windblown summit |
 #2The LRR South from the top #2The LRR South from the top |
 #3Mt. Borah from the summit |
Photo#1 shot from the rocks below point 11,060’ shows the West ridge leading to the summit. The wind blowing off the summit made for a long haul but the climbing from there, was very safe. I started two small point avalanches after I got to the rocks, both of them followed gully features and went all the way to the bottom. I triggered this one just before I got to the ridge. The crown face, visible in the lower left of the photo is about 18” tall.
Photo #2 from the summit shows 11.967’, White Cap, Leatherman, Church and beyond.
Photo #3 Mount Borah from the summit. In the spring of 2009, I returned to the top with my skis and made a shaky descent down the West face on bulletproof snow.
Donaldson Peak 12,023'
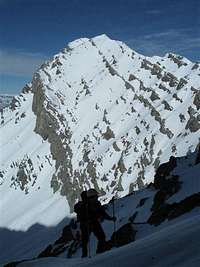
Donaldson Peak
The Standard Route On Donaldson Peak begins in Jones Creek. This is a grainy telephoto shot taken from the Whiteknob mountains in November 2009
Donaldson Peak: Standard Route, March 16, 2007. After we finished off Mt. Church and returned to the chute leading off the mountain, we had a short discussion about weather or not we could make it to the summit and back down the chute before dark. The summit looked a long way off but we were both still pretty amped up after the ridge traverse and decided to go for it.
We dumped the rope and some other unneeded gear and charged up the standard route. It took us less than 30 minutes to reach the summit making our earlier discussion seem ridiculous. There was little snow on the route and the dangerous climbing was all behind us. The wind continued to make things uncomfortable but we stayed on the summit for about 30 minutes reliving the ridge traverse and pointing out the tough sections.
As it turned out, it didn’t get dark till we reached the cross over to Jones Creek. We plowed through deep snow out of the windy heights to the bottom of the canyon and slowly made our way back to the truck.
 #1 Donaldson Summit block |
 #2 Donaldson from the summit of Breitenbach #2 Donaldson from the summit of Breitenbach |
 #3 The chute and headwall leading to the crest |
Photo #1 The standard route and descent chute start just over the hump behind Brandon. It was a very easy hike with only a couple short sections of uncomplicated scrambling. This was shot as we starting up the ridge to the summit of Mt. Church. As you can see the rope work on the easy sections was pretty laid back and run out in full lengths.
Photo #2 Shot from the summit of Mt. Breitenbach in February 2008, Donaldson is one of the more diverse peaks in the range and an easy climb only by its standard route.
Photo#3 The approach and descent chute on the western flank of the mountain, the late afternoon conditions made the down climb feel like the most dangerous bit of mountaineering we’d done that day. Large horizontal cracks that weren’t visible during the approach, or had opened up during the day had us on edge and we belayed from rock to rock all the way down. The avalanche activity on the left side of the photo appeared to be several days old and we didn’t see anything new come down that day.
Hyndman Peak 12,009'
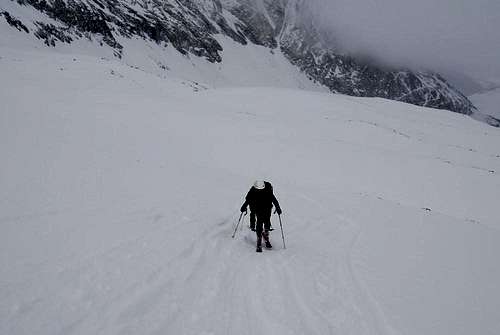
Steve and Cassie Skinning up to 11,000’
Steve and Cassie on the standard route. This is the only class II 12,000’ peak in the list making it a nice easy ski down.
Hyndman Peak: The Standard Route with Steve Stephens and Cassie Wood, 3-18-08.
This was the last of the 9/12 for me and probably the most memorable of them all. Like most of Idaho’s 12ers, I’d never been up the actual standard route before so it was fairly new country. A few of us had tried to make the summit in January that year but a big snowstorm that dumped 24” during the night of the 27th made it too dangerous to get into the upper basin.
The next morning, we could hear the ski patrol doing control work on Baldy and were witness to a couple big avalanches on the surrounding slopes. We stayed at the yurt from the 26th thru the 29th, and after the storm, Steve and I made a half-hearted attempt to make it to the upper basin, but on a 25 degree slope just below the basin lip, an acre of snow surrounding us settled with a thundering whumph and sent us back to base with our hackles raised.
On that first attempt, our plan was to climb the mountain on the 28th and then have two days to ski in the Hyndman Basin but the new stuff had fallen on a layer of weak snow that made it impossible to get on anything steep enough for skis but we had a great time hanging around our comfortable little round house telling lies and bragging about what we’d be skiing if only it were safe.
On March 17th we returned to the yurt in near perfect conditions and climbed the mountain in worsening weather by its standard route. After the approach, it was an easy skin to the summit and a great ski back down.
 #1 The Pioneer yurt |
 #2 Steve and Cassie above the saddle #2 Steve and Cassie above the saddle |
 #3 Steve on the trail. Hyndman in the background |
Photo #1 The Pioneer Yurt at night. Even if you’re not a skier, any winter climb on Hyndman should involve a stay at the yurt. All you need to bring is a sleeping bag and your food, everything else, including a dry sauna is provided. Contact Sun Valley Trekking for availability.
Photo #2 Steve and Cassie ascending above the saddle connecting Hyndman and Old Hyndman peaks. Once you make it to the mountain, the climbing angle is very easy. This is the only Idaho 12er I was able to skin all the way to the summit on. The skiing back down was very safe on our trip but the face is wide open and could be prone to large slides if conditions are right.
Photo #3 Steve skinning back home. The Yurt is located in the trees in front of him and Hyndman is in the background. It’s a long five or so miles from the end of the road to the yurt but as you can see the scenery makes it all worthwhile.