
|
|
Route |
|---|---|
|
|
36.88410°N / 118.7566°W |
|
|
Technical Rock Climb in the Back Country |
|
|
A long day |
|
|
III / 5.12a |
|
|
LOCATION
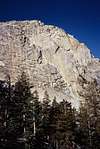
Approach as described on The Gorge of Despair main page. The Silver Turret is the largest formation in the Gorge and dominates the western flank of the canyon."Despairadoes" climbs the natural line up the center of the east face of the Silver Turret, arching to the left as it goes up. The prominent crack/corner system which the route follows is defined on the right by a clean monolithic face of rock which overhangs slightly for hundreds of feet. The wall forming the left side of the corner is a series of steep slabs with overhangs, which create upside down steps where they intersect the corner.
Two of the first four pitches are 5.11+. The difficulties are varied, with very thin face moves leading to physically demanding steep bouldery sequences.
Pitch five, the crux of the climb, is a thin finger crack with spectacular exposure which requires some hard stemming. This crack ascends directly up the large "gorilla face" feature in the middle of the wall.
Once above this feature the difficulties are behind, and the climbers can enjoy the incredible views while cruising the remaining pitches to the summit.
 |
BETA
The first pitch ascends the apron to a bolted belay. Start below and a bit right of the large crack/corner system which the route follows above. Climb up a shallow corner/seam and then move left crossing under the main crack/corner system above, then over and up to the belay bolts. 5.8r.Pitch two climbs up through several flaps on steepening slabs past 3 bolts to gain the corner after making a very thin traverse across the lip of an overhang. A burly stemming / lieback combination (fixed pin here) leads up the corner. Where the crack ends for a section move out left to the arete and climb up and then back to the corner. Finish up easier ground to belay under the next headwall. 5.11d
Begin pitch three by stepping out left to a wild airy stance on a diving board ledge. Climb up to a bolt and undercling back to the corner and bust one more hard move to gain easier ground above. Continue up to a bolted anchor. 5.11d.
Pitch four is easier. Climb up and across to an airy bolted belay which puts you in position for the crux pitch.
The fifth pitch climbs across wildly exposed moves past 2 bolts to gain the thin finger crack. Crank the thin crack to the top and hand traverse out left under the huge roof to it's end and climb up past another bolt to a bolted anchor. 5.12a.
From here the route follows the line of least resistance up and left for several pitches to gain the summit ridge of the Silver Turret. Pitch 6 gains the upper of several diagonal cracks and follows this line up and left to a belay in a corner (One bolt serves as backup to the limited available placements). Pitch 7 turns this corner and the next and continues traversing across to another one bolt belay. Pitch 8 goes straight to the top.
Continue up the North Ridge over the top and descend the 4th class South East Ridge Route.
There is a rappel route straight to the ground from the top of the third pitch, established due to Guyzo’s knee injury. Due to the arching path of the route, descending by the line of ascent would be difficult. From the bolted anchor at the top of pitch 3, rappel straight down to a pair of bolts at a hanging stance, and then from there to the ground. Two 50m ropes. Getting off from any point higher will require going over the top or getting back to the top of the third pitch.
Miscellaneous:
There is a section of relatively easy alpine style rock to climb after the crux of pitch three which is a bit loose. Other than that the rock on this climb is clean, solid and beautiful.
On the first ascent the crux finger crack was a little dirty. Not all full of grass or anything. Just a few finger slots were plugged. We cleaned it (so it was ready when we did the route two days later.) Climbers doing the route with one day to spend might need to clean the crack first, return to the belay, and then redpoint the pitch.
 |
EQUIPMENT
Double 50m ropes. Double rope technique is essential on this route.(We used 8.5mmx50m ropes)
1 set of stoppers. #1-#10 rocks or equivalent.
A few tiny wires - depending on how you choose to protect the crux.
1 set of cams, from small tcu's through 3 inches.
The usual runners and quickdraws.
A cleaning tool in case the finger crack is dirty.
About the fixed gear:
A variety of different types of bolts were used during the ascent of this route. On the lower slabby pitches 5/16 x 1 1/4 rawl buttonheads were placed by hand in 1994 (Other bolts identical to these which I have placed in other areas at about the same time are holding up well and so I would expect these to be good.) When we returned to finish the route in 1996 we came equipped with a Bosch drill and placed 3/8 bolts.
The difficult lieback/stemming combination on the second pitch when you first get across to the corner is protected by a fixed pin. This pin placed very soundly in 1994. Failure of this pin would probably not be catastrophic as there is a bolt not too far behind on the slab and reasonable gear placements are reached not too far above.
Use your own judgement when trusting this fixed gear. We placed it well, using quality hardwear, but this stuff has been exposed to the elements including possible rock and ice falling for a decade. It could be adviseable to have a bolt kit available for emergencies.
FIRST ASCENT
Kris Solem and Guy Keesee established the first several pitches in July of 1994. They returned the next year, but while regaining their high point Guyzo suffered a serious knee blowout while pulling the crux overhang on pitch three. Work on the route resumed in 1996 when Kris, Guy and Chelsea Griffie returned determined to do the deed. The first day of climbing saw the high point pushed to a belay atop the brow of the "monkey face", from where obviously easier climbing went to the top. With the secrets of the crux pitches revealed, they descended. After a rest day, and as psyched as he has ever been, Kris did a clean lead of the entire route with Chelsea as second. Guyzo remained below taking pictures and then scrambled up the class 4 south ridge to meet the elated pair on top.I don't know at this time if the route has seen a second ascent. I would certainly enjoy an email from anyone who has done it or does it in the future. Good luck, be safe, and enjoy!
 |  |  |