
|
|
Route |
|---|---|
|
|
Mountaineering, Canyoneering |
|
|
Summer, Fall |
|
|
One to two days |
|
|
5.0 (YDS) |
|
|
Overview
Outlaw Arch Canyon is the most spectacular descent route off Outlaw Peak or the Key Saddle, The route descends the rugged Outlaw Arch Canyon, has several down climbs and rappels of up to 90 feet, and passes the newly discovered Outlaw Arch, one of the largest known arches in the world. Once out of the canyon, it is a fairly long wade up river to the suggested campsite. You can avoid some wading by climbing up to the bench on the east side of the river if the weather is cool (the river feels good in hot weather!).The Key Saddle Route to Outlaw Arch Canyon is quite easy (comparatively) once you know where it is. There is some exposure and much scrambling, but luckily, the hardest parts of the route are not too exposed and the exposed parts of the route aren't too hard. This is a fantastic little adventure.
The canyon itself will require technical and natural anchoring skills. Do not underestimate the route through the canyon. It isn’t easy and is quite challenging. If you found the route up to the saddle to be difficult, don’t attempt to descend the canyon.
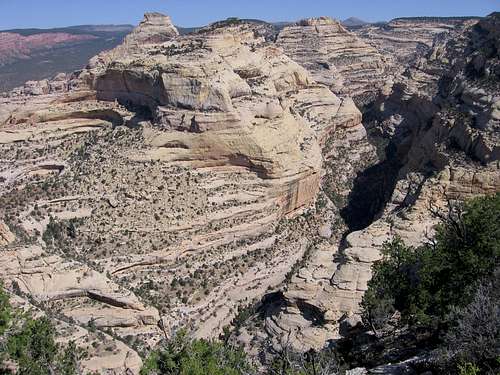 Outlaw Arch Canyon snakes off to the right.
Getting There
Note: Directions are going to be very brief and this is intentional. Pay attention to the landmarks when driving and make sure to use a good map. If you can’t find the trailhead on your own, then this is not the right place for you to go climbing. I would suggest doing something like Longs Peak instead.Briefly put: To get to the trailhead drive to the park headquarters of Dinosaur N.M., which is a few miles east of the town of Dinosaur, CO (Dinosaur is located on Highway 40 just east of the Utah border). Drive north on the Harpers Corner road for north until the Echo Park Road (gravel) takes off to the right (east). Drive the Echo Park Road to a junction. Turn right at the junction and head east along the Bench Road. Follow this road to the head of Red Rocks Canyon and Park. The road is sometimes too rough for passenger cars after leaving the pavement. Moderate clearance vehicles such as Subarus should do OK, but low slung cars can sometimes have problems.
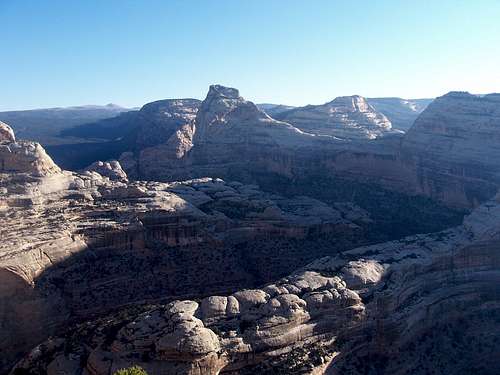 Peak 7071 as viewed from the optional trailhead (see option #4 below).
Maps
 Map of Approach to Outlaw Arch, outlining three possible routes.
 Map of the route into Outlaw Arch Canyon, marked in green.
Approach Route Options
Option #1The easiest but the longest of the three approach routes is the one down Red Rock Canyon. In my opinion, this is the best route in. From the Bench Road, follow the fence line to the canyon and drop down in. Old cattle trails can be followed for much of the way down canyon to the Yampa River, and there isn't too much bushwhacking. Near the mouth of the canyon is a signature from 1919 and some petroglyphs.
Once the Yampa River is reached, you can follow more game paths down the river to Outlaw Park. There is one section that would be tricky in high water where you must climb around a boulder. Just before the river crossing marked on the map, there is a nice sandy beach to camp on, at least at low water. There are also some very old pictographs as marked on the map above.
 Here is a signature we found in Red Rocks Canyon on the approach to the Yampa River and Outlaw Peak.
Option #2
Another route, slightly shorter than the one above is to hike cross country from the Bench Road to the big bend in the Yampa River north of the mouth of Red Rocks Canyon. The hard part is weaving in and out of all the drainags. If you stay to the north and away from the canyon, you can avoid many of the drainages, but be sure to not go too far north and end up on the wrong point. From the end of the point above the river bend (see map), you can scramble down to the river. Follow the river down to the crossing as mentioned above.
Option #3
The most direct way to the base of the climb is to head to and climb down the gully to the river. This is the most difficult route, and a very hot one when coming back out. Briefly put, from the car park at the beginning of the route marked on the map, head towards the big drainage west of Outlaw Park. Drop into the drainage, but don't follow it down very far. Locate the gully marked on the map. You will pass a small saddle between the canyon and the access gully. See the photo. This is a very steep and rugged route and there is some loose rock and much scrambling to reach the river.
Once nice place to camp is on the sandy beach south of what is marked BM 5144 on the topo map. This is just before you must cross the Yampa to continue down river.
 Important! Route to access gully to the Yampa River.
Option #4
Just northwest of the divide between Sand Canyon and Red Rocks Canyon, a 4wd road heads to the rim of the Yampa River Canyon at the location below:
HERE
From that location, you can head south along the rim and contour around the canyon and into the gully mentioned in Option #3. This is a very rugged route, especially on the return, but it has some great views.
Climbing Route to "Key Saddle"
The description will begin at the river crossing mentioned above. From the river crossing, continue down the Yampa River to the little gully north of the words “Outlaw Park” on the Hells Canyon quad map.Climb up the gully to the end. There is some brush and some cliffs to climb over, and with a bit of exposure, you can climb out of the gully and avoid some of the brush. Cross the drainage to the north and scramble up the rock ribs to the NNE as marked on the route map above.
Stay fairly close to the top of the spur, but keeping fairly close to the deep canyon not far to the right of you. This may take a bit of route-finding. What you are headed for is the saddle right at the head of the canyon. You want to get to a bench at the same level as the saddle. To do this, there are two choices of ledges to follow.
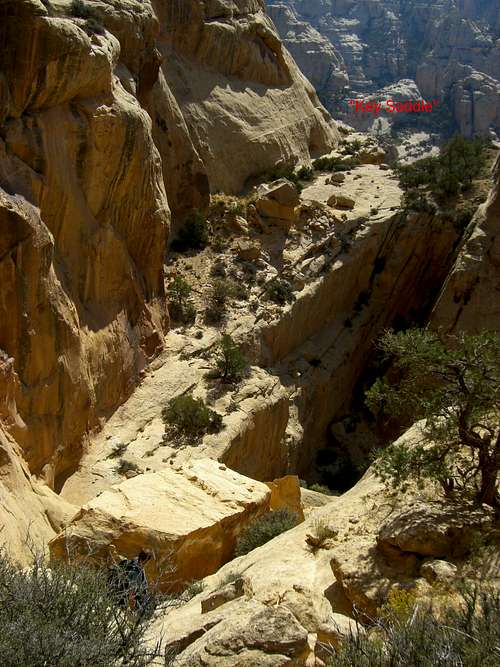 This is the "Key Saddle" that turned out to be the key to finding the routes up the peak and into the canyons. Click for larger view. The easy bench to traverse is on the left.
Option #1
The higher ledge is above the elevation of the saddle. Look for it and climb up to it. There is a bit of exposure when rounding the corner and a short narrow place in the ledge that might be scary for some. The ledge continues around the corner and above a gully filled with loose rubble; climb down into the gully and follow it down to the ledge (see the “Key Saddle” photo above. There is one tricky traverse to get onto the ledge, but there are several variations. The wide saddle is a nice rest spot. You will notice that bighorn sheep visit this area as well.
 Part of the traverse on Option #1
Option #2
Here is the second option for getting to the saddle. There is also a ledge below the elevation of the saddle that can be used. This is overall easier for most of the length, but had one scary little climb to get down to the ledge. If you do use this ledge, you will end up below the saddle, but can climb up the rubble filled gully mentioned in the paragraph above (the one that is climbed down from the higher ledge) and to the ledge that leads to the saddle.
I don’t know which one is the better route, but our group seemed to prefer the upper ledge. I have crossed that one a total of four times and the lower one once, and don’t have a preference.
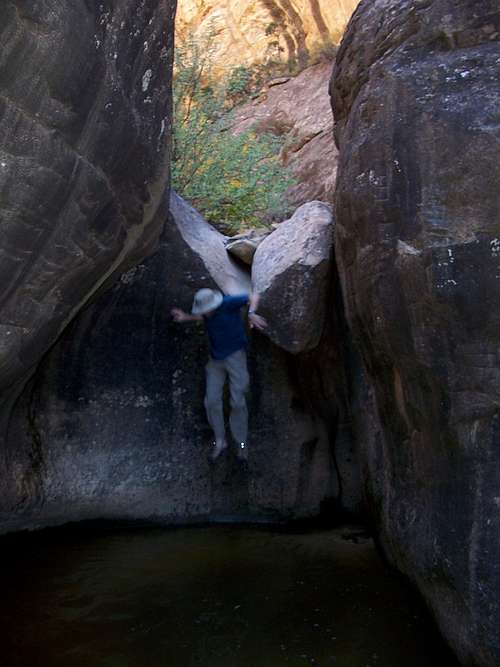
 Jeff is stepping over the exposed gap just before Key Saddle. Make sure to not slip here! You can either step over the gap, or do the exposed traverse above as pictured HERE.
Outlaw Arch Canyon
From the saddle, you must drop down the brushy couloir to the southeast. Drop down until you can follow a brushy bench around to the drainage to the north (see map). Follow the bench all the way into this drainage. Cross this fault line drainage to the upper most bench that curves around to the right. It takes a bit of climbing (4th to low 5th class) to access the bench, but there are several variations possible. Follow the bench around the corner and head north to the rim of Outlaw Arch Canyon.From the rim, head east and look for a route down in. There are many variations and you can head quite a bit up canyon before dropping in.
Once you are at the bottom of the canyon, you can explore up canyon if you wish. There are some fantastic overhangs and alcoves and some exposed scrambling to reach a pothole section just before the headwall.
 One of the traverses in Outlaw Arch Canyon.
Continuing down canyon, the canyon bottom is rugged in places and there are some falls to pass on the right before reaching the confluence with another major fork. I haven’t explored this fork yet, so don’t know what is up there.
The canyon will become more spectacular as you go down canyon and the best part is at the major bend in the canyon. The gorge is very deep and impressive here.
You will pass through a “boulder tunnel” and then reach an eight foot drop off. If you are very careful (this is not the place to sprain an ankle) you may want to jump, or this can be bypassed by some exposed scrambling and a down climb on the right. (The bench left is the one leading to the top of Outlaw Arch).
 This is the first jump into water, but be careful. This is not the place to sprain an ankle. The jump can be bypassed via a very exposed traverse and downclimb on the left while looking down canyon.
The first rappel is not far below the drop off. Climb down to a pothole to a forested ledge on the left. Look for a suitable tree to rappel off.
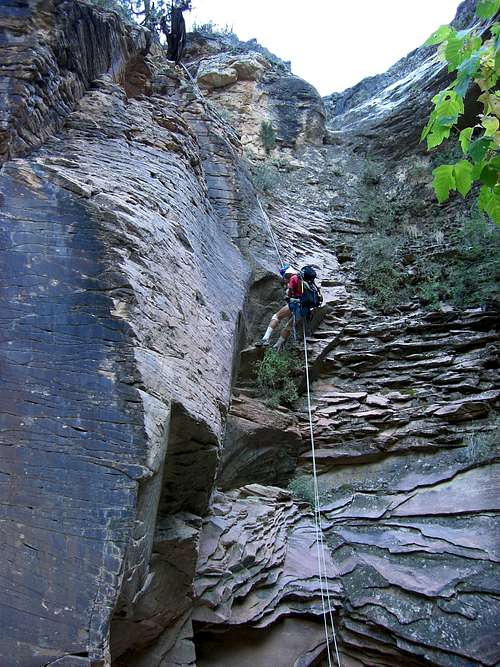
 These are the first two rappels in Outlaw Arch Canyon, as viewed from the top of Outlaw Arch.
The second rappel is reached shortly after. Be careful of poison ivy in this section of the canyon. We built an anchor here by stacking some rocks against a bush and placing webbing around that, but if floods come and wash it out, you will have to haul rocks down to make a new anchor. This rappel is 90 feet and quite spectacular. It is the highest rappel in the canyon.
 This is part of the exposed traverse to Outlaw Arch. What ever you do, don't fall here!
You will now see the huge Outlaw Arch, the ninth largest known arch in the world, and one which wasn’t discovered until September 2006.
The third rappel is not far below this. Look for a tree to rappel off. Make sure to wear a helmet as the rock is very loose and dangerous.
 Third and last rappel in Outlaw Arch Canyon.
At the bottom of the rappel, you will notice an old signature from 1941. Just below this signature is a tricky down climb and then you just follow the canyon to the river.
Once you are at the river, wade up river and around the cliff staying on the same side of the river that Outlaw Arch Canyon is on. From there, you can either follow the rugged deer and bighorn trails up the river to Outlaw Park where you will cross the river again. Don’t attempt this if the river is over 500 cfs. It would be best at 200 cfs or less.
 Wading the Yampa River.
High Water Variation
If you choose to do this route from May through July and with high water, there is an alternate route available.You can cross the river with a life jacket/floatation to access the route to the Key Saddle, but make sure you are a strong swimmer. The river is very cold in May and June, so a wetsuit would be standard equipment for the swim.
Complete the route over the last rappel as described above. Continue towards the river, but look at the left wall for a break that can be climbed. There is at least one class 3+ route. Climb the wall and to the bench. Follow the bench down to above the river and continue following the bench up river. You can follow various rugged benches to across from Outlaw Park. Using this route allows you to complete the route with only two river crossings. It is slower than the standard low water route, but extends the season the route can be done.
Time Needed
You should probably plan on taking a minimum of 1.5 days for the trip, and preferably more. We did it in once in one very long day, but we knew the route, but his is not recommended by any means, plus you have to camp away from your vehicle anyway. It will be an easy half day to the river crossing, where there is a good campsite. You could climb Outlaw Peak and camp, and descend Outlaw Arch Canyon that same day (or the next morning), but I would try to hike from the car park and use the descent down the longer Outlaw Arch Canyon in one full day. It would be better to do that one in one full day campsite to campsite, and then hike out on day 3.It would be best to plan on a 2-3 day trip, depending on what you plan to do in the area. Our first trip went like this:
Day 1: We hiked to the campsite and drop our backpacks. From there we climbed to the saddle, doing much backtracking and exploring around the little canyons before climbing to the saddle (we actually climbed to the saddle twice since we left our daypacks down on a ledge). We then descended into Outlaw Canyon, explored the two forks up a ways, and descended Outlaw Canyon back to the river.
Day 2: Day two was spent climbing back to the saddle, to the summit of Outlaw Peak, and descending Outlaw Arch Canyon. We then waded back up river to camp.
Day 3: We climbed up the east gully near the mouth of Outlaw Canyon and to Peak 6540 for some nice views of the canyons and of Outlaw Peak. We then went back to camp and hiked back to the trailhead.