
|
|
Route |
|---|---|
|
|
44.07900°N / 115.0539°W |
|
|
Mountaineering |
|
|
Most of a day |
|
|
5.7 (YDS) |
|
|
II, 5.7 |
|
|
6 |
|
|
II |
|
|
Approach

The Southeast Face route - though not the original ascent route of Warbonnet - is currently the most popular way of reaching the mountain's pointy summit. The route has several distinct variations but none involve climbing above 5.7. From the staging area (Bead Lakes), traverse northwest staying low for several hundred yards until directly below the Warbonnet/Cirque Lake Complex Col. At this point, head up the boulderfields directly towards the col gaining approximately 1000 feet from the lakes. Once at the col, scramble to the col's highpoint below Warbonnet's southeast face. First pitch goes up a high angle gully (5.4) for about 100 feet and ends at a 3 foot evergreen on a narrow ledge.
Topo

Route Description
 P2
P2 P5
P5 P6
P6 P5
P5 P6+
P6+ P4
P4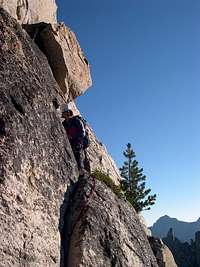 P2
P2Pitch 1: 5.4, c. 100 feet. From the highpoint at the Warbonnet-Cirque Lake Peak Col, climb up the slabs and solid flakes toward a small tree (c. 3 feet tall) on a narrow ledge system. There are actually two small trees about 10 feet apart. Aim for the left one. A variant of the pitch climbs toward the right tree and involves a fun lieback move (c. 5.5 or 5.6).
Pitch 2: 5.5, c. 160 feet. From one of the trees, traverse left along a good ledge system. You will downclimb slightly at the beginning and come to a "split" in the ledge system - a low angling ledge that vanishes around a corner and a high angling ledge that goes towards and behind a huge flake. Take the higher ledges. Climb behind the huge flake. Once inside, you'll see that there's a second (also pretty huge) flake wedged in there. Take the right fork (left fork is narrower and has many chockstones blocking the way) which involves a 10-foot downclimb move inside the "tunnel". Exiting the "tunnel" on the other side. At this point, you have a vertical chimney system directly above you. This is most likely what the guide books call "center chimney, 5.4". For the standard pitch three, move left and down. Belay atop a huge chockstone.
Pitch 3: 5.7, c. 120 feet. The crux pitch of the route. Climb the "left chimney". From belay, move left and onto a spire-like feature sitting near the mouth of the "left" chimney. Grovel your way up the chimney (awkward!) for approximately 25 - 30 feet with no protection. The books rate the chimney at about 5.4 but it felt stiffer. Exit the chimney left onto a dirty, low angle ledge or gully. Move up this gully (low 5th), to a finger crack (5.7 awkward) diagonalling up and left. Climb the finger crack for about 20 feet. Finish the pitch atop a huge ledge system at a tree. A variant of the pitch involves taking one of the other two chimneys. According to the books, the center chimney (mentioned above) is also rated 5.4 while the right chimney (supposedly starts directly behind the huge flake you passed behind on pitch two) is rated 5.6. All three chimneys supposedly bring you to the same ledge system.
Pitch 4: c. 5.5, c. 80 feet. Move up the wide ledge system (one or two fifth class moves) in the direction of the offwidth-like crack in a dihedral on the left side. Before reaching the offwidth, you'll see a beautiful hand crack in the face on your left. There's a small flake (probably with rap slings) at the base of the handcrack. Belay here. A variant of this pitch described in Kearny's guidebook, involves climbing higher to the base of another chimney (5.6-5.7).
Pitch 5: 5.7, 180 feet. Climb up the beautiful handcrack (c. 60 feet) to reach the top of the ridge. Turn right and follow the ridge (5.2, unprotected). You will pass a large block on your right (stay on the ridge) and the chimney (the chimney provides an alternative means of reaching the ridgetop and access to it is described above) with a rock horn wrapped up in rappel slings. Keep moving along the ridge and you will soon enter a "slot" that terminates in a comfy notch. You now have a perfect view of the last (best!) pitch of the route - the summit block.
Pitch 6: 5.4, c. 120 feet. From the belay notch, move down 10 feet onto a huge, flat chockstone. The chockstone is wedged between the summit rock and the "subsummit block" and has nothing but free air below it. Protection can be worked out here. Move up the friction face (8 feet, crux of pitch) to reach a ledge on the right side of the summit bock. There was a short "fixed" rope in place presumably for downclimbing later. From the ledge, move up the face to reach the summit ridge. You will have one piton to clip here. Move up the ridge and clip the rusted tin foil bolt/hanger. The angle of ridge eases at that point and going becomes 4th class. You will pass a set of rap bolts (newer summit register is hanging here). Continue moving up the ridge until about 15 feet below the summti horn. Belay off gear (good ledge). Take turns with your second tagging the summit horn. An older (empty) summit register container is here.
Descent:
Both guide books vaguely refer to rapping the route. That (judging by the many rap slings around horns, trees etc.) is probably a straightforward matter ONCE you backtrack down pitch 6. The hand-sketched rotue topo from the web, suggestes a relatively simple rap route directly down from the summit. This is how we descended but next time I'd retrace the route.
Descent Option 1: Move back down the summit ridge to the fixed anchor (new & old bolts). Do a DOUBLE 60m rap directly down the summit block (pretty wild). Traverse this ledge system left (climber's left) for about 20 feet and you should see a rap set up consisting of three pitons. It is from here onwards that this description should be looked at with a grain of salt. Do another double 60m rap directly down until you see a decent ledge system (again near the end of the 60 m ropes). Here, we slung a rock horn. One more double 60m rap brings you down to 3rd class, very dirty ledges that have some drop offs. Unrope, traverse the ledges left (climber's left) in the direction of the Col you started from earlier in the day. Follow the ledges to their edge heading in the direction of the Col. When the ledges "run out", do a single rope rap (c. 60 feet) into the dirty gully on the side of the Col. The gully is very loose. You should now be about 200 feet below the Col - scramble up.
Possible Descent Option 2: Rap the rotue as the book suggests. The only difficult part here is getting down the sixth pitch. This would mostly likely involve downclimbing the exposed pitch. Once below the sixth pitch, most rap anchors seemed fixed.
jtschanz - Jul 6, 2006 12:23 am - Hasn't voted
Descent infoHere's a bit more info about the "preferred" descent - which Radek lists as option 2 (rapping the route): This is actually quite straightforward. (1) Do a single rope rappel from the slings below the summit, back along the arete towards the notch at the top of P5. (2) Scramble down from the notch (unexposed class 3) to the rock horn with rappel slings at the top of the chimney mentioned in P5. (3) Single rope rappel down the chimney, then scramble ~20 feet down the loose gully to the slings at the base of the P5 handcrack (4) Double-rope rappel will bring you down to the start of the P3 chimney (the end of the P2 tunnel). Single-rope raps will probably work, too, as we noticed two lower rappel stations, but this has not been verified. (5) Reverse pitch 2 - scramble back to the tree atop P1 (or belay) (6) Single rope rap to the ground (60m just reaches, 50m would require some low 5th class downclimbing) Hope this is helpful.