
|
|
Route |
|---|---|
|
|
35.76670°N / 76.65000°E |
|
|
Mountaineering |
|
|
Expedition |
|
|
Russian 6A, ED |
|
|
Approach
Gasherbrum III is situated in a very remote part of the Karakoram mountains. There are mainly two ways to reach BC.From Askole
Travel on rough roads from Skardu to Askole (6-8h).
Trekking Askole - Jhula - Paiju - Urdukas - Goro II - Concordia - BC takes anywhere between 3 and 8 days.
From Hushe
Travel on good asphalt (70% of the way) and rough track to Hushe by jeep (5-7h).
Walk Hushe - Gondogoro Pass (5600m) - Ali Camp - BC. 2 to 5 days.
For more details about the approach, check the main page
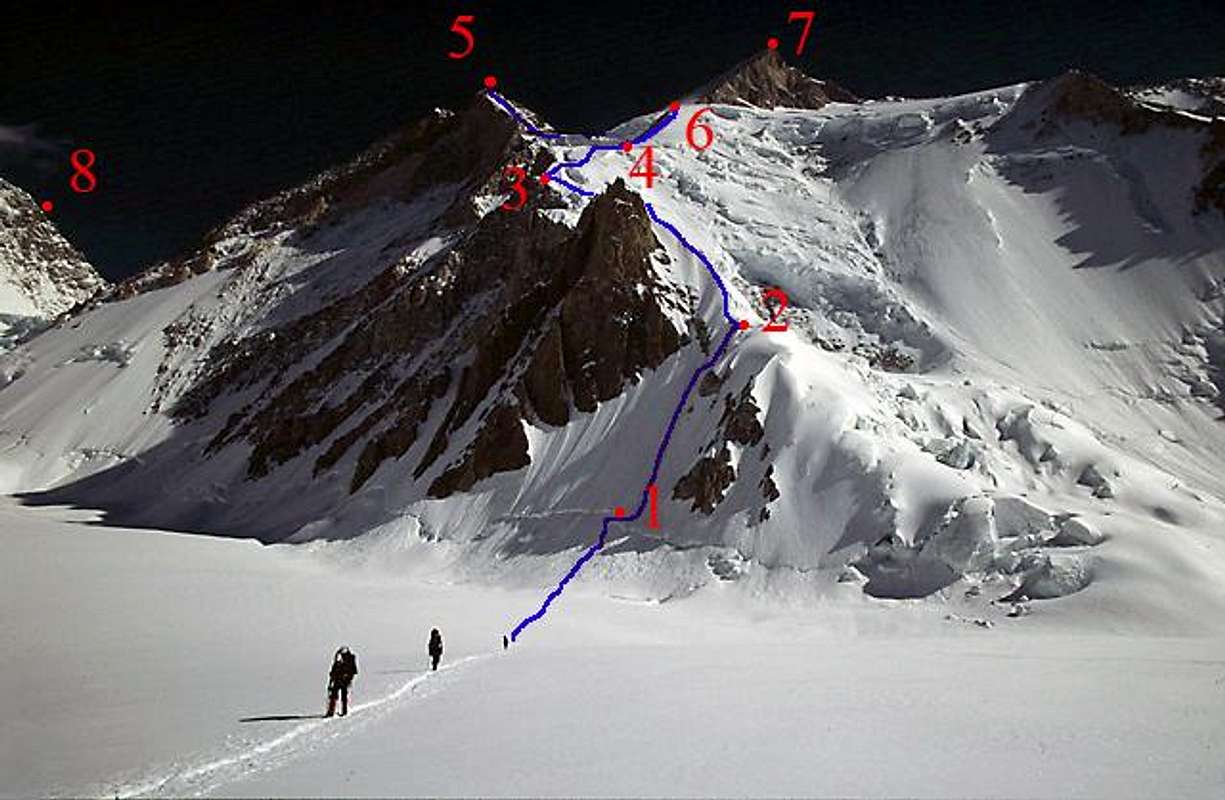
1. Traverse a bit below the horizontal crevasse and put on crampons here. Gain access to the face where the crevasse is narrow. Climb to the ridge. Average 50 deg. Some parts with 60+. Avoid climbing here after 10:00, as rock falls are getting more frequent then.
2. The Balcony at 6250m offers a camp spot. A good place to stash stuff.
3. Climb the long ridge to C2. Sometimes very exposed, but never as steep as the first part of the climb. An exposed traverse follows and the last part is mostly walking, with some short sections of steep snow climbing.
4. Camp 3. Mostly easy climbing to the camp at 6950m. Some short sections of steeper climbing, notably the last part before camp.
5. Gasherbrum III summit - 7952m.
6. Camp 4. Easy climbing in mixed terrain. Be careful with old and bad ropes here!
7. Gasherbrum II summit - 8032m.
8. Gasherbrum IV ridge - 7925m (summit).
The Icefall
The route is different every year as you have to negotiate an icefall. It's is not a fast and unstable one as for ex. Khumbu or Mizhirgi, so the risk collapsing seracs are minimal under normal circumstances. Most climbers choose to go at night anyway as the snow holds your weight better and the negotiating of the crevasses are much safer. A huge majority rope up all the way from BC to CI, but early in the season and early in the morning the icefall can be travelled unroped without too much risk if there is no other choice.The flat part of the glacier.
The first part is quite flat, with smooth ups and downs. There are very few crevasses in this section and going is easy. Late in the season you may encounter quite big glacier streams and even small lakes appears.
The serac part.
Leaving the flat part, all of a sudden there are lots of seracs around you. The first climbers of the year have to find a way through this maze, but when a route is found, it's usually marked with flags and route finding is not hard. There are sections where you have to climb seracs, so crampons are needed in this part. There are very few crevasses in this section proper. In the end, when the icefall is flattening out again it's time to be very careful. Some of the icefall's most nasty crevasses are found here and some of them are of the more hard-to-see sort.
The plateau.
After you've passed the section with scary crevasses, you're all of a sudden "out in the open". A completely flat snow field has to be crossed. Excellent views of for ex. Gasherbrum IV in front of you. On this snow field some of the glaciers largest crevasses are located. They are usually marked, but pay extreme attention when in the sections where there are crevasses. Some may be unmarked!
The up and down part.
After the plateau you start to gain some altitude again. Some parts are steepish and sometimes it's almost flat. You walk through an undulating landscape of snow-walls, seracs and flat snow fields. This is an easy, but long section. Some crevasses here, but most of them are very easy to spot.
Last section.
Pass some hundred meters from the base of Gasherbrum V and head for Gasherbrum II and III. You can't see CI until you're there, as it's hidden below a ridge on the huge snow field plateau.
To reach CI takes anything from three to ten hours, depending on load, acclimatization, snow conditions etc. Normal travel time is probably about five hours.
Camp I to Camp II
Walk the flat km from CI to the foot of the SW spur/rigde. No crevasses. Most climbers don't rope up or put on crampons until the climb proper starts. The ridge has broken up the last couple of years and nowadays the ridge is climbed from the west side, straight up from the snowfield, rather than the much smoother 35 degree walk which was the case before. Pass the first couple of rocks on the western ridge-face and look for a snow and ice passage close to them. Avoid to climb too close to the huge rock pillar on your left, as there are frequent rock falls there when the sun warms up.The altitude gain is roughly 250 m to a little platform called "The Balcony". Average 50 degrees. Some sections with 60+ degrees in the end. Camping possible on the balcony. A popular rest and stash place, about half way from CII. May not be there next year.
Leaving The Balcony, you enter a long and exposed snow ridge. It's a 50 degree average climb and even if exposed, very straight forward. The last part of this ridge is the steepest. You gain about 250m of altitude on this section.
The last part of the way to Camp II is a combination of traverses on snow, flat walking and some short sections of climbing. The first traverse is very exposed and steep.
Camp II is to be found on a platform and it's ok out of a safety angle. If there are extreme amounts of snow, watch out for avalanches. No big risk for a large one hitting the camp, but when I was there small powder snow avalanches went throught the camp.
Climbing times: I climbed to the balcony in 1h 45min and from there to Camp II in 1h 30min. No clue what's normal here.
Camp II to Camp III
This is also a part that probably changes a bit from year to year. The basic idea is the same though: to gain access to the ridge which leads to the flatter areas below the summit pyramid. In 2005 it was as follows. Some short, steepish sections had to be climbed directly after leaving Camp II. A flatter part took you to a snow wall with the face facing the SE. most of it was 55-60 degrees. When on top of this face, you had a huge drop to your left and had to change direction climbing the next slightly less steep snow-wall on your right. On top of this one it flattened out a bit and you had to aim at the steep serac wall. It could be climbed without too much hassle as the snow-ice mix was really good. Camp III is to be found on top of this serac wall. It's quite exposed to winds, but safe in terms of avalanches.You can climb this section in less than two hours, but for many climbers it take four-five.
Camp III to Camp IV
The ridge leading to Camp IV is a mixed climb of snow and rocks. You better avoid the rocks as much as possible as the snow under normal conditions is a much better alternative. There are plenty of old ropes along the route and be careful which one you use. Some have probably been hanging there since the beginning of Gasherbrum's climbing history. The mid section is the steepest, but it's seldom over 50 degrees. When the rocks starts to disappear, it also flattens out and you're getting close to Camp IV. It's very easy to find as there are dozens of "ghost tents" marking the spot. If you're in trouble and didn't bring a bivi-bag, you will find old tent-fabric en masse here. Another very safe, but exposed camp, which a lot of climbers bypass on the way towards the summit. Some pitch a tent here on the way from Camp III and use on the way down.This part can be climbed in 2 hours, but I heard 3-5 is more common
The last part of the route
Most climbers head for the long traverse underneath the rock pyramid of Gasherbrum II and therefore you probably have no help with broken trails when leaving the path to the much more popular peak. The ground underneath "The Carsolio Face" of G II is a broken mess of seracs, deep snow and a few crevasses. If there's snow on the face, extreme caution has to be taken as the slab avalanches here are huge and very fast. When reaching the first slopes of G III you should look for a snow filled couloir on the face. This is where the first Polish summit party climbed and the only repitition by the Basques was also done by this route. The rocky ridge on you left was a too great challenge for the Poles and the idea of climbing it was abandoned in favor of the couloir.The lower part of the route 2006
It seems like the route is much easier on the lower part this year, but also more dangerous.See this photo for this year's route.
Then have a look at this one showing where the route was last year.
Then finally, have a look at the mini serie Avalanche! on the G III page.
I would rather climb the wall again...