
-
 13386 Hits
-
 87.31% Score
-
 24 Votes
|
|
Route |
|---|---|
|
|
48.94371°N / 114.17145°W |
|
|
Mountaineering |
|
|
Summer |
|
|
A few days |
|
|
Class III (4) (GMS) |
|
|
Overview
In this climber's assessment, Kintla Peak does not appear to be climbed all that often, in part due to its remote location and difficult access. The summit register suggests that over the last few years, only 1-5 parties successfully reach the summit each summer. As a relatively unpopular climb with multiple route options, there does not seem to be a “standard route.” This route up the Southeast Ridge is the first listed in A Climber’s Guide to Glacier National Park and thus may be assumed to be the standard route, especially with Edwards' comment at the end: “This is probably the best route, because of pleasant climbing conditions and tremendous scenery all the way to the summit.” However, some climbers may find the East Ridge Route or North Face Route from the Kintla/Kinnerly notch to be less strenuous and/or more enjoyable.Approach/Getting There
 Traversing from Boulder Pass to Agassiz Basin
Unless you are particularly ambitious, the primary access to Kintla is via the Agassiz Basin from just below Boulder Pass, as described in A Climber's Guide. In summary, the route into the basin follows treeline from just west of Boulder Pass around the north and west sides of Point 8190 to the saddle between Point 8190 and Mt. Peabody (hereafter referred to as the Peabody Saddle). There is a good undesignated backcountry camp site just west of the saddle with a few flat spots and a couple large alpine larches to secure a bear hang.
Information on possible approaches to Boulder Pass and other approaches to Kintla can be found on the Kintla Peak page and in A Climber's Guide. Most parties will probably need at least three days to complete this route car to car (or boat to boat).
Red Tape: The usual backcountry regulations/restrictions within Glacier National Park apply, including entrance fees, backcountry camping fees and reservations, and LNT practices. See here as well.
Also read this and this if you are unfamiliar with GNP rock grading.
Route Description
From the camp below the Peabody Saddle, descend 350 ft to the basin below, at about the 6960 ft contour. This was originally described as directly descending the gully pointing toward the impressive Agassiz Glacier Falls. This gully is full of loose rock and often water, making it a less than ideal route. However, the terrain just north of this gully (within 50 ft) is much easier to descend and climb. Start in an open grassy slope and descend the left side until it cliffs out, then traverse slightly south (left) to the ridge above the gully. Descend this ridge or just north of it to the bottom.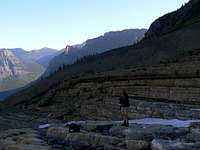 Crossing the Agassiz Basin
 Note the Notch in this photo, just left of the summit block
From the base of the gully, begin a long traverse to the saddle (7830 ft) between Mt. Peabody and Kintla. The challenges here mostly lie in the first 0.5 miles, where a large lateral moraine must be traversed and then glacially scoured steps must be navigated to cross a small bowl. The easiest route when snowcover is limited stays at or above the 6960 ft contour, passing under a set of cliffs at the south end of the bowl. The next 1.5 miles to the Peabody/Kintla saddle are straightforward and many easy routes follow the upward sloping shelves in the basin and cross snowfields. Early season (July-early August) climbers will encounter a lot of snow in most years, but late season (late August-Sept) climbers may find mostly rock in this section.
While crossing the Agassiz Basin, note the 90° notch in the south ridge of Kintla below the summit, just where the ridge starts to look challenging. This feature will become very important in the last 500 vert ft of the climb.
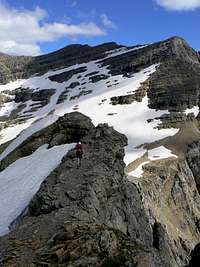 The Catwalk (photo taken while descending)
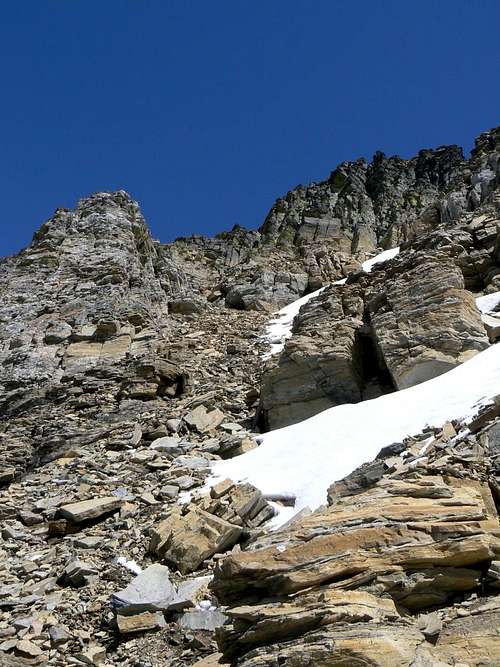
From the saddle, the Edwards guide states only that “it is an easy ascent up the ridge to the west.” This is not accurate. The scramble is Class 3 (GNP system) for the first 400 ft. Skirt to the north immediately above the saddle to avoid steeper terrain if desired. Then stay near the top of the ridge until reaching a long, narrow catwalk at 8250 ft. This 200 ft long catwalk, on the top of the ridge, is about 12 ft wide and is easily crossed - although the exposure to the south exceeds 1000 ft (but it is not quite vertical).
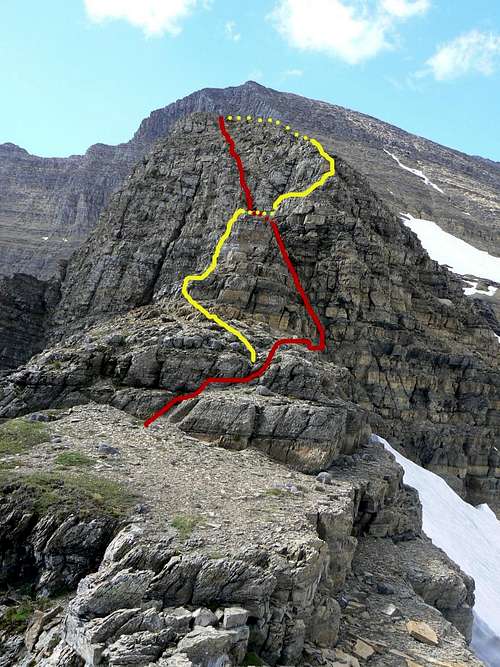 The Outcrop (click for description)
A large outcrop must be climbed to gain the next 250 vertical feet. Two routes are obvious. The first follows the primary weakness in the feature, a large crack starting on the north side, gains a flat spot about a third of the way up, then continues on the south side to the top of the outcrop (see photo - in red). This route is Class 4 and is very loose in spots with a short section at the bottom (on the north side) that may even be Class 5. Particularly on the upper two thirds of this route, where it is on the south side of the ridge, an unarrested slip would result in a long and likely fatal tumble to the headwaters of Akokala Creek, 1500+ ft below. Downclimbing this route would be especially tedious and potentially dangerous, although it provides an obvious route for ascent.
The second option (in yellow) follows the ridgeline more directly, climbing small steps just south of the crest to the flat spot, then follows the ridge again, this time just north of the crest. About 20 feet above the flat spot, the easiest climbing is well north of the ridgeline, on steps above the Agassiz Glacier. Although this route is also Class 4, it provides much safer downclimbing and the rock is much less loose than the rock in the crack.
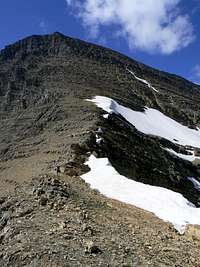 Above the Outcrop
Above this outcrop, the route is significantly easier, only Class 3 with some sections of Class 2. For the next 900 ft, stay on the ridge or just north of it. At the 9440 ft contour, a large ban of blocky rock crosses the ridge. Here, start to climb slightly north of west, leaving the ridgeline and heading toward the south ridge of Kintla. Numerous Class 3 options exist to navigate this band of rock (see diagonal cracks in photo). It is not necessary to reach the summit of Point 9826 and may result in more difficult climbing. Once the south ridge is obtained, head north toward the summit.
 Heading north along the south ridge
 Looking back (south) along the traverse
As you traverse north, recall the 90° notch in the south ridge of Kintla you observed from below. This is the key to a pleasant route across the west face of Kintla. Continue north until you reach this notch. You will likely have to bypass a couple vertical steps to the west side (just make sure to regain the ridge) before reaching this 30+ ft wall. Here, a goat trail traverses down and north across the west face (to the left), just below the steep, rocky layer and above the scree/talus fields that extend down and west to the Kintla Glacier. The trail will take you about 600 ft across (and lose about 100 vert ft) to the first of many gullies in the summit block. If you fail to find this trail, much time will be lost either climbing more difficult rock above or scurrying across very loose scree for 800+ ft on the west face below the trail.
 First Gully
 Second Gully
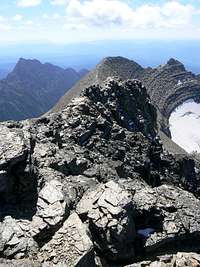 Looking back at the exposed traverse south of the summit
The abundant loose rock in all of these gullies will likely require any group to proceed one at a time. This first gully may still hold some snow until the middle of the season. You're now about 450 ft below the summit. Ascend this first gully on the north (left) side, about 225 vert ft, until it appears it will cliff out. From here, make an easy traverse (40 ft) north into the next gully (below the darker rocks). [This second gully is climbable from the bottom, but is longer, more difficult, and contains looser rock and sand.] Ascend the second gully about 200 vert ft, staying to the left near the top. Until this point, only a few moves will exceed Class 3. At the top of the second gully, climb a 20 ft section of solid, stable Class 4 rock (the dark rock in the photo) and arrive at the summit ridge, about 200 ft south of the summit. Traverse along the top of the ridge, including a few steps across very exposed blocks and you're at the summit.
 Enjoying the Summit
Route Stats:
From just below Peabody Saddle
Elevation - 3200 ft gain, 350 ft loss
Round Trip Distance - 6 miles
From Boudler Pass BC Camp
Elevation - 3850 ft gain, 1000 ft loss
Round Trip Distance - 10 miles
Essential Gear

Trekking poles may be handy for approaching the Agassiz Basin and climbing through the basin to the Peabody/Kintla saddle. Some climbers may prefer to use crampons and an ice axe while crossing the snowfields before the Peabody/Kintla saddle, especially in early season (July-early August).
Less experienced climbers may want a rope/harness/anchors for the Class 4 sections of this climb, but experienced climbers will likely be fine without.
Guidebooks and Maps
A Climber’s Guide to Glacier National ParkPurchase or Peruse
Topographic Map of Agassiz Basin/Kintla Peak
Click here