
|
|
Route |
|---|---|
|
|
48.27680°N / 120.7651°W |
|
|
Scramble w/ Short Technical Sections |
|
|
Most of a day |
|
|
Class 4 |
|
|
Overview
This is the easiest route to the summit but is by no means a walk-up. It is Class 4 at its worst but contains enough Class 2 scree-tedium and Class 3 scrambling to give your head and feet aches and pains. And don't be like me and slip six inches on a rock move and thereby scrape up the inside of your arm.
Fred Beckey's route description in his Cascade Alpine Guide is a little misleading. The unavoidable rock step is there, all right, but his Bird Creek approach makes for head scratching and his East Ridge scrambling is vague and leaves out one important detail.
Bird Creek
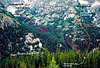
From Bird Creek Camp on the Devore Creek Trail (4,200 ft) hike directly up the forested slope (no bootpath) right of the creek. Keep well right at first. In a few hundred vertical the forest will come to a grassy slope in a minor depression. Diagonal left across the slope through small trees to another forest band a little closer to the creek. Ascend this band to its apex where it abuts a rock wall (~4,900 ft). Find a way up the short 30-ft wall (Class 2 to 4 depending on routefinding). On the ascent we did a few moves of Class 4 on the left above the alder brush. On descent we found a natural, hidden ramp on the right side that was Class 2. Once above this wall, walk across its top to another brushy gully at back left. Descend a few feet and cross this gully (trickling stream) and scramble up into the trees on the other side. Descend again ~100 ft at a diagonal to reach open forest below a boulderfield. Walk through the forest, moving rightward as you go, until you erupt onto an open area at c. 5,400 ft. This is a minor lower basin of Bird Creek. Near the creek is more ugly alder brush. To the right the open area goes up a bit. Ascend the open area until it is feasible to move left into a small forest band. Take this minor band almost to its upper end where it meets another short wall. There is a narrow 50-ft wide swath of alder brush on the left. About 100 feet below the top of the forest band it is possible to crash through the brush to its other side (natural conduits exist to ease the transit). Continue up and left to the middle basin (c. 5,800 ft) and FINALLY open terrain.
 |  |  |  |
Route to Upper Basin
There are formidable cliffs separating most of the middle basin of Bird Creek with the upper basin where the glacial lakes are located. There is a route up the cliffs at the high north end of the basin nearer to White Goat Mountain but this will be out of the way. Fortunately, there is an easy route up to the left that goes straight toward Devore Peak....
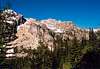
At the 5,800-ft level in Bird Creek, a gully to the SSW leads up to a "notch" with two big trees in it. Climb up this gully (some steep snow or dirt at the top) and exit it at 6,500 ff to a minor basin. Cross and ascend to the head of the basin where it is rimmed by steep ribs, outcrops, and gullies. Find a way up the rim (snow in gullies in early season, probably scrambling later in the year) to 7,000 ft and the beginning of the upper glacier lakes. Straight ahead will be the imposing Northeast Face of Devore Peak. To the right will be the thin crest of White Goat Mountain. To the left will be the long outlier East Ridge of Devore. Between Devore proper and the outlier ridge will be a funky tower I've called The Bottles (they look like bottles to me). Keep them in mind as you will be walking underneath their north side.
 |  |  |  |  |
The Outlier East Ridge
From the upper basin southeast of the lakes (you may not see them due to knolls in the way), head south to the 7,500-ft saddle on the East Ridge. The final 100 feet will be either steep snow or talus or scree. Ice axe recommended in early season. Turn right and follow the crest westward. DO NOT contour the south side as Beckey implies. Pass one minor gendarme on the left and regain the crest, following it all the way to a depression where a gully goes down the south side just before The Bottles.
Go around the right (north) side of The Bottles on either talus or snow, curving leftward back to one of several notches to regain the crest on the other side. At this point the outlier East Ridge melds with the abuttment of the (upper) Southeast Ridge. On ledges, ramps, ribs, and gullies, scramble across the south side of the ridge/SE Ridge abuttment to a broad notch on the upper left side (c. 8,200 ft). The scramble through here is Class 3 but exposed at times.
 |  |  |
The Final Southeast Ridge
From the broad notch you will be able to see the final summit towers a few hundred yards to the north. What you're seeing is actually a false southern summit. The "unavoidable Class 4 step" will also be evident at this false summit.
Contour around the final ridge on the west side (Class 2/3) to a small notch at the step. The step is about 20 feet high and largely unprotectable. A mild indentation in the wall offers a Class 4 conduit up the step. The holds are good, the rock clean. Basically, someone has to free-climb it. From above, the leader can then belay up the second if need be. A rappel station to the right above the step can be used as an anchor. A 30m rope would be long enough.
Above the step do not climb up the boulders beyond (false summit with deep notch on other side). Instead, go far to the left (100 feet) and round the false summit rib on an exposed Class 3 corner. This leads to a short downhill ramp to get into the head of the concavity/gully on the other side. The true summit will now be visible. An 80-ft gully goes right up the gut of the summit block. Arc around the concavity and descend 20 feet to the base of the gully.
Climb up the gully to its top and turn right to get to the highest point. The gully is Class 3+ (Class 4 at bottom if it is wet) and warrants serious consideration for a rappel to bypass it on descent. A rappel to skier's left of the gully can be done to get back to the notch between the summits.
For the descent, reverse the up-route. Make one rappel to bypass the summit gully and another to get down the unavoidable step. The rest can be downclimbed, plunge-stepped, or glissaded.
Time = 6-8 hours from Bird Creek Camp; Distance = ~3 miles; Total gain = 4,300 ft
 |  |  |  |
The Bottles
I'm not sure if this was the first ascent of the higher of the two towers that make up The Bottles, but this is what I did. It appeared to me to be the only route easier than Class 5:
From the snow swale on the western corner of the western (higher) tower near the lowest of the series of notches on that side, I scrambled up a short Class 3 ramp to the high notch abutting the tower. I then rounded the corner and continued on an easy Class 2 ledge for about thirty feet until I came to a weakness in the middle of the south wall. (One could continue down the ledge to access the lower, eastern tower; it didn't look too interesting.) I climbed up the weakness for 15 feet on Class 3+ holds. The next 10 feet was to the left to the top of a block. This part was Class 4 but with good holds. Once atop the block, I scrambled back right 20 feet to the highest point. I forgot to erect a cairn. The downclimb of the Class 4 bit was the crux. I had to reach low with my foot to find the holds, but the holds were secure.
Time = 10 minutes from the snow/talus at the western base.
 |  |
Essential Gear
30m rope (50m rope if you've got a light one). You will mostly be rappeling with it.
Ice axe (early season only; unnecessary otherwise)
Helmet (lots of loose rock)
Harness
Throw away rappel slings
A really light rack if you feel so inclined (mid-size cams, an assortment of nuts and hexes)
Sunscreeen, bug spray
 |