Using the Graduated Density (GD) Filter to Control Lighting in Outdoor Photography

Using the Graduated Density (GD) Filter to Control Lighting in Outdoor Photography

Page Type Page Type: Article

Introduction

One of the most common situations that the outdoor photographer runs into is variance in lighting that exceeds the dynamic range of the film or sensor (think of dynamic range as the ability of the film or sensor to capture both the lighter and darker elements of the picture). Often you’re in the situation where you feel that you have to give up one part of the photograph or another. This is especially true in situations where the sky is much brighter than the land, or where strong shadows exist within parts of the photo. And, with the popularization of digital cameras, this is even more critical, since digital cameras are generally considered to have about one f-stop less of dynamic range than film (making this a strong plus for the continued use of film in certain situations). A very noticeable symptom of this loss of dynamic range for the outdoor digital photographer is the loss of delicate texturing in clouds, giving them a “cartoonish” look. But, regardless of whether you shoot film or digital, the GD filter offers you the opportunity to better control certain lighting challenges.

The Graduated Density Filter

Neutral Graduated Density (GD) Filters<BR><font color= #FF0000 > PLEASE DON T VOTE - SEE CAPTION</font>Two GD Filters: GD1 & GD2.
Basically, the GD filter is half clear and half tinted. In the middle it gradually fades between the clear portion and the tinted portion (See figure at left). The tinting may be in various shades of color, but for the outdoor photographer trying to remain true to the scene (e.g., not trying to create heavily colored alpenglow where it didn’t exist), the neutral density (neutral gray in color) filter is a versatile tool. These filters are generally available in either one or two f-stops (that is, the tinted portion of the filter reduces light by either one or two f-stops as compared to the untinted portion, which doesn’t affect the light).

The reader should see immediately the usefulness of these filters! Consider the image at the near-right.
Reflected Trees in Winding Staircase Mountains<BR><font color= #FF0000 > PLEASE DON T VOTE - SEE CAPTION</font>

Shot without and with a GD filter.

It was shot using a Canon EOS 30D at 1/100 second, f/7.1. Exposure compensation was set to 0. The sky is a very light blue, much lighter than optimum. The trees reflected in the pond are much too dark. The photograph lacks the impact that a more balanced scene would provide.

This proved to be a perfect opportunity to use a graduated density filter. At this point, a more technical photographer might wish to meter (using a spot meter) both the lighter and darker elements of the scene, and then select the required filter density based on those results. However, in this case the photographer (Mark Doiron), used his “calibrated” eyeball and guessed that the GD2 (Graduated Density, 2 f-stop) filter would be the right match. You can see the result at the far-right, which was shot at 1/50 second and f/5.
Red Castle Peak

Shot with a hard edged filter.

Slowing down the shutter and opening up the lens (depth of field wasn’t a factor at such a short focal length) allowed more light to brighten the darker parts of the first attempt (these parts were behind the clear part of the GD filter). And the GD filter reduced the light coming from the upper portion of the image (which was tinted). The result was a well-balanced image that better presented what the photographer was seeing (the human eye being much better at adapting to diverse lighting in real life than on a photograph).

Hard and Soft Edge Graduated Neutral Density (GND) Filters


Singh-Ray™ GND filters come in either a soft-edge or hard-edge form. The soft edge provides a more gradual transition between the dark and light portion of the filter and is useful where the subject has bright and dark areas that mingle. In contrast, the hard edge has a sharper, better defined transition. The photo at left was taken using a 3-stop hard-edged GND filter because the boundary between light and dark areas of the subject was both straight and well-defined.
The Reverse Graduated Neutral Density (GND) Filter<BR><font color= #FF0000 > PLEASE DON T VOTE - SEE CAPTION</font>

The reverse Graduated Neutral Density (GND) filter. Notice how it gets lighter at the top.


Reverse Graduated Neutral Density Filters


The 2 and 3 stop reverse GND filter can be very useful when there is a dark foreground with a bright horizon and dark clouds above the bright horizon. This condition is common during cloudy sunsets or sunrises.
Dunes Sunset with Crestone Peaks

Creative use of a GD filter.

Unlike regular GND filters that are dark in the middle and tend to get darker above, reverse GND filters are dark in the middle then get lighter above.


To the left is an example where using a 3-stop reverse GND was appropriate. Using a regular GND filter would have resulted in a properly exposed foreground but because the top part of a regular GND filter is dark, the naturally dark clouds would have been underexposed. Instead, because the reverse GND filter is less dark on top, the clouds’ exposure more closely resembles reality.

Creative Use of Graduated Density Filters

The Typical Filter System<BR><font color= #FF0000 > PLEASE DON T VOTE - SEE CAPTION</font>

Typical filter system components.


For those who are willing to take more “artful” measures with their photographs, the GD filters provide the opportunity to darken portions of an image to achieve special affects. That was the technique used on this image of the Crestones (left) to create a dark, foreboding sky with a GD2 filter. However, unlike in the image of the pond, where the filter was set essentially to allow the middle of the filter to cross the middle of the frame, the photographer chose to slide the filter up within its holder, thus darkening only the very top of the image. This is possible with a GD filter because, unlike filters that attach directly to the threads on the lens, the GD filter requires a special mount that attaches to the lens, then the filter slides into that mount. When mounted, GD filters have the ability to slide up and down (or side to side), rotate freely, and be stacked into the holder (usually a maximum of two).

As briefly mentioned before, GD filters are also available in various colors to artificially enhance (or even create!) the appearance of sunsets, alpenglow, fog, blue skies, or even unnatural colors.

One thing worth noting about these uses of GD filters: While most photographers willingly accept the use of a neutral density GD filter to better balance light to achieve a more natural appearance in the final image, some draw the line at creative uses such as the one at the left, or anything that changes the colors beyond what the photographer witnessed. The authors encourage anyone using these techniques to be forthright when asked about their work.

Hardware Requirements

Camera Filter Sizes<BR><font color= #FF0000 > PLEASE DON T VOTE - SEE CAPTION</font>

Available filter sizes.


This brings up the subject of hardware. That is, as previously mentioned, GD filters require special mounts. Here’s what is required using the Cokin™ filter system (see figure at right):
[img:358071:alignleft:small:

Available filter sizes.

]
   o Filter screw adapters (adapt the filter holder to various size lenses you own)
   o Filter holder, single filter (holds only one filter, but has minimum vignetting) or two filter (holds two filters, but might vignette with wide lenses. Useful for stacking GD filters when extreme difference in lighting levels exists)
   o GD filters, +1 and +2 (both recommended)
   o Lens shade (optional, but your standard lens shade won’t fit. You might find your hat useful, though!)
   o Lens cover (optional, but protects lens when filter holder is installed. Not shown in figure)

One last point: The Cokin™ filters come in three sizes: A, P and X-pro (see figure at left). This is the size of the filter itself, not to be confused with the adapter rings for your lens collection. You need to select a filter size that will accommodate the lenses you use. If you don’t ever use really wide-angle lenses, then the inexpensive, but rather small, A-series filters may suit your needs. Generally, the P-series filters have minimal vignetting with most SLR camera lenses, while being reasonably priced and practical to carry while hiking.

Conclusion

Graduated density filters provide the opportunity to better present the sights you see. They're an indispensable tool for the digital, outdoor photographer, and are useful even for died-in-the-wool film buffs. When used properly, they have the potential to take your photography to the next level.

Comments

Post a Comment
Viewing: 1-20 of 30
12

Dave K - Nov 9, 2007 12:53 pm - Hasn't voted

Other useful GNDs

Hi Mark, good article. I have also found the 2 and 3 stop reverse GND to be very useful when there is a dark foreground with a bright horizon and clouds above the bright horizon. This condition is common during cloudy sunsets or sunrises. Unlike regular GNDs that are dark in the middle and tend to get darker above, reverse GNDs are dark in the middle then get lighter above. If you use a regular GND in the situation I just described, the clouds will often be too dark. A reverse GND helps the clouds to be properly exposed. Also, I tend to use 3 stop GNDs more frequently at dawn and dusk than one or two stop GNDs.

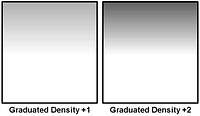
In addition, singh-ray GND filters come in either a soft-edge or hard-edge form. The soft edge provides a more gradual transition between the dark and light portion of the filter while the hard edge is more abruptly defined.

Mark Doiron

Mark Doiron - Nov 9, 2007 4:02 pm - Hasn't voted

Re: Other useful GNDs

Dave--That's good info! I'm not familiar with these filters, so now you've given me yet one more thing to learn. Meanwhile, would you be interested in adding a paragraph about these into the article if I add you to the privileges? --mark d.

Dave K - Nov 9, 2007 4:46 pm - Hasn't voted

Re: Other useful GNDs

Sure, I'd be happy to. It might be a few days before I get to it.

Mark Doiron

Mark Doiron - Nov 10, 2007 7:00 am - Hasn't voted

Re: Other useful GNDs

You're an administrator. I've PM'd you on this. Thanks! :-) --mark d.

Gangolf Haub

Gangolf Haub - Nov 10, 2007 11:29 am - Hasn't voted

Interesting article

I have wondered about these kind of filters, especially with digital cameras. As far as I see you can use photoshop to overlay a graded pattern, which should give similar results. Even better is the hdr technique, which Vid wrote about. If you use it you don't depend on straight lines for the horizon which are important for GD photography.

The benefits of digital photo processing :-)

nartreb

nartreb - Nov 10, 2007 1:31 pm - Hasn't voted

Re: Interesting article

Applying a gradient in post-processing works fine if your sky is only slightly over-exposed, but once you reach your sensor's maximum values, you can't recover the colors of the original scene. Digital cameras usually have lower dynamic range than most films, so it's more of a problem with digital than with film.
What often works is to deliberately under-expose, then use a digital gradient to brighten the foreground while darkening the sky. It's certainly not easier than using a filter, just another option.
I try to carry an absolute minimum of gear, but a filter is pretty small and I'll probably get one soon.

Gangolf Haub

Gangolf Haub - Nov 10, 2007 4:02 pm - Hasn't voted

Re: Interesting article

No doubt about it - I tried to hdr Mark's picture and found out that you are absolutely right about the colours. I have never had the problem but then my camera has a pretty wide range of "exposure depth".

Mark Doiron

Mark Doiron - Nov 10, 2007 5:48 pm - Hasn't voted

Re: Interesting article

Thanks to both of you reading the article and for the comments. Dave K and I are working to add more material (discussed in his own comment above) in the next few days. --mark d.

Nelson

Nelson - Nov 11, 2007 4:22 am - Voted 10/10

Sold on these

Good article.

I have had a soft edge 2-stop GND in my kit for years but rarely used it becuase of the hassle of mounting the P filter holder, the extra weight, etc. But I carried it into the Wind Rivers this summer and am now totally sold on them. Even thinking of getting a 3-stop as I still had clipping in bright areas of clouds on many shots.

I discovered I could get good results by simply holding the filter in front of the lens, being careful to avoid scratches. Of course when I was setting up a tripod I'd go ahead with the mount.

Here is a good discussion about the differences in brands:
http://www.nikonians.org/dcforum/DCForumID8/1059.html

Mark Doiron

Mark Doiron - Nov 11, 2007 6:49 am - Hasn't voted

Re: Sold on these

Thanks for the link, Nelson. When I get more time I'll visit that. As for clouds: Yeah, I wish I had a good set of comparison shots. The difference can be very noticeable and I'd like to demo that. I'm going to have to search through my old images (all on CD/DVD) and see if I can't come up with something. Thanks for commenting!

--mark d.

Charles

Charles - Nov 12, 2007 9:42 am - Voted 10/10

Interesting

Thanks for that. Yes it´s not always easy to get that horizon straight! :o)But there again with a tripod that should be no problem. As Gangolf wrote, one can do wunders with photoshop! Using RAW is also good (of course miles better than jpg!!!), it´s suprising what one can get out of them. HDR, if you can get the register is also something..againg tripod work.
Thanks once again.
Charles

Mark Doiron

Mark Doiron - Nov 13, 2007 8:49 am - Hasn't voted

Re: Interesting

Thanks, Charles, for reading and commenting. --mark d.

Zac Finley

Zac Finley - Nov 12, 2007 9:05 pm - Voted 10/10

Thanks Mark

I've been, what I guess most would call, a below average amature photographer for quite some time. I've just been too lazy to do the research to make steps to better photographs. Anyhow, I was just complaining about how my blue skies kept getting whited out in a lot of my pictures. This article seems like a good way to start experimenting with this type of filter. Hopefully I can put your good information to good use. Thanks -Zac

Mark Doiron

Mark Doiron - Nov 13, 2007 8:41 am - Hasn't voted

Re: Thanks Mark

I'm glad that it helped you, Zac. Also, don't miss out on polarizing filters--they can also help a lot and don't depend on an even horizon to do their work. Be sure to read Gangolf's article on those. Thanks for visiting! --mark d.

Nelson

Nelson - Nov 12, 2007 11:27 pm - Voted 10/10

Vignetting

If you have problems with vignetting you can cut off the outer mounts of the standard P filter holder, presuming that you never stack more than one filter. Or, Cokin has recently introduced a holder designed for wide angle lenses:

http://www.bhphotovideo.com/c/product/302175-REG/Cokin_BPW700_Wide_Angle_Filter_Holder.html

Mark Doiron

Mark Doiron - Nov 13, 2007 8:43 am - Hasn't voted

Re: Vignetting

Good suggestion, Nelson. I do own filter holder you linked to for my P-series filters. --mark d.

mrwsierra

mrwsierra - Nov 14, 2007 1:05 am - Voted 10/10

one more comment

Great article. The grad ND filters make a lot of shots and are indispensable, especially in lower light at sunrise/sunset. One or more filters can also be "stacked." 2 stop + 3-stop for example and is easy with the Cokin holder setup. The difference in light intensity between ground and sky is often huge - the human eye is so superior to a computer sensor!

Mark Doiron

Mark Doiron - Nov 14, 2007 10:27 am - Hasn't voted

Re: one more comment

Thanks the comment, Mrwsierra, I've added a few words about this. --mark d.

Arthur Digbee

Arthur Digbee - Nov 14, 2007 4:51 pm - Voted 10/10

Thanks!

I learn a lot from your photography articles, thanks for writing this up!

Mark Doiron

Mark Doiron - Nov 15, 2007 7:07 am - Hasn't voted

Re: Thanks!

Thanks for reading it, Arthur. I hope the info helps you! --mark d.

Viewing: 1-20 of 30
12