
-
 4963 Hits
-
 76.66% Score
-
 7 Votes
|
|
Route |
|---|---|
|
|
36.58618°N / 118.24175°W |
|
|
Trad Climbing |
|
|
Most of a day |
|
|
5.10c (YDS) |
|
|
8 |
|
|
IV |
|
|
Overview
Ghostrider is an eight-pitch climb on the prominent Whitney Portal Buttress put up in the early 2000’s by Mike Strassman, Raleigh Collins, Charles Byrne, Mark Husbands, and Jackie Carrol. For the first four pitches it follows a series of chimneys, cracks, flakes, and short bits of face climbing to a large ledge halfway up the buttress. Here the climb abruptly changes character and continues on for four pitches of relatively sustained 5.9-10a face climbing on knobby granite. The technical crux comes on the second (or third, depending on the start chosen) pitch, where about 15’ of thin face climbing past two bolts provides some entertainment. The first four pitches protect very well with some large gear, while the upper pitches are bolted. If you have heard that this section is “sport climbing”, then you heard wrong. You’ll find yourself pulling continuous moves at 5.8 or better, with 15’ or more between bolts. Descent is via rappelling the route. You will need two 60m ropes to get down.There is an excellent topo, and general logistics beta in Peter Croft and Marty Lewis’ Bishop Area Rock Climbs (worth buying even if you're not interested in this route). There is also a good topo available from, of all places, the Lone Pine Chamber of Commerce. The details of the belay locations and pitch grades don’t always agree between these and other sources, but I won’t try to sort that out. Whether the wide crack above the face crux is 10a or 10b is not nearly as relevant as the fact that this is an amazing climb, and well worth doing.
Approach
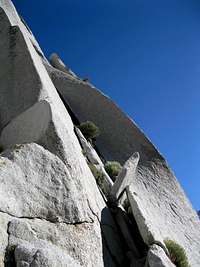
From Whitney Portal, start up the main Mt. Whitney trail, cross the stream, and follow the trail east to the first major switchback where the trail doubles back to the west. Start up a use trail here, heading straight up through steep, loose, sandy gunk for a couple hundred feet. Look for a shallow drainage heading up and left (cairns) and follow it to the base of the buttress. The regular start is a few tens of meters left of a huge flake/boulder leaning against the toe of the buttress, while the other starts are to the right of this feature.Route Description
 Standard start
Tanager Start: Tanager is a two-pitch route that starts in a right-arching crack a few meters to the right of the afore-mentioned huge flake leaning against the toe of the buttress. Climb the crack (10b) to a bolt belay, then a short bit of face climbing past bolts (10a) leads to a large ledge and another two-bolt belay. From here continue up the corner/chimney (5.7) to the two-bolt belay mentioned in the standard start.
 Looking up at the 10c crux on P3
Third pitch: Increasingly delicate face climbing past two bolts (10c) leads to a wide crack climbing past obstacles (10a). At a chimney-like alcove the corner morphs into a large flake. Wrestle the flake (one bolt on the face next to it) to a comfortable rest at the start of a ten-meter undercling leading out right. If you brought a big piece (a #5 Camalot might do the trick) you can protect the start of the traverse, otherwise you will have to make the first few moves with your last piece perhaps farther below than you might like. The flake you are standing on can be threaded with a very long sling, but it makes disturbing sounds when struck. There is a reasonable rest after the entry moves where you can easily plug in something in the 3-4” range. You can plug in more pieces around 3” almost at will across the traverse, but it doesn’t really have any rests until you get to the end, where you can fiddle in a pretty good nut overhead. Surmount the overlap (bolt) and climb straight up to a two-bolt belay at a narrow ledge. The third pitch can be broken into two by rigging a gear belay in the chimney/alcove.
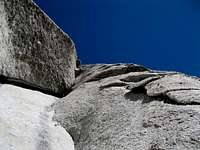
 Undercling traverse on P3.
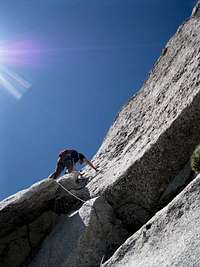 Starting P5