
-
 29452 Hits
-
 85.36% Score
-
 20 Votes
|
|
Route |
|---|---|
|
|
Trad Climbing |
|
|
Less than two hours |
|
|
5.7 (YDS) |
|
|
5 |
|
|
I |
|
|
Overview
Super classic route! Has to be done, one of Eldo's most famous and well trafficed routes. This is found on the Bastille N-Face and follows the obvious crack system to the top with several variations along the way. Make sure you are comfortable with placing gear and climbing at a 5.7 level since there are some exposed and tricky sections. Several accidents have happened here, so be careful!!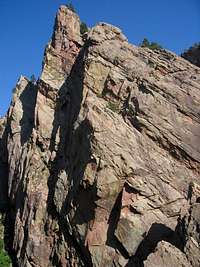 The Redgarden Wall.
 The Wind Tower.
Getting There
Super easy, if you can get to Eldorado Springs, then you can find the Bastille. From Denver head North on I-25 towards US 36. Take the CO Hwy 170 exit. Follow it as it curves around a new shopping complex, and go past CO Hwy 93 to the town of Eldorado Springs and to the state park. Yes, this is a state park so there is a fee required (5-6 dollars depending on the time of the year.)From Boulder, take CO Hwy 93 (Broadway) South until you get to the first stop light after leaving Boulder. This is Eldorado Springs Dr. Take this West until you hit the town. The park entrance is at the end of the dirt road into town.
The Bastille is the first large 'spire' or 'tower' to the south and is directly off the road. Look for a large flake to the right of Werk Supp (5.9). The anchors for the first pitch should be visable.
Route Description
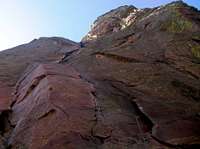
 Pitches 1-2 of Basttile Crack.
Pitch 1: (5.7+), 65'. Climb up to the flake and step left to the crack. Good to place protection before moving over to the crack. Jam or layback up the polished crack (crux), then follow the crack up and left to a small stance at very nice 2-bolt anchor with chains and clips. If you are doing the whole route and want to help your second with beta, belay from here, otherwise just keep on going!
Pitch 2: (5.6), 85'. Climb up to the chimney to the left of the anchors for pitch one, and step left onto the face. Climb up to a finger crack with plenty of face holds along the way, then traverse right above a little roof (crux). You can also go left into thin cracks and face-holds that are difficult to protect. Continue up steep, enjoyable cracks and angle up left on easy ground to a sloping ledge by a steep wall. Belay at a crack with a fixed pin. Plenty of cracks here to build a great anchor and to belay from a nice ledge. This area can get crowded if there is more than one team on the face, there should be plenty of room though.
 Pitch one, with the obvious flake near the beginning.
Pitch 1 and Pitch 2 can be combined with a 60m rope, we used a 70m. I am not sure if a 50m rope will reach, I would consult other material before doing this.
 On the second pitch, past the first pitch, (look close to see the anchors.)
Pitch 3: (5.7+), 50'. This short pitch has some intersting movements. Climb up into a pod, then work up past a small roof with good holds (crux). Continue up the cracks to another sloping ledge. A #1 and #2 Camalot are useful for the belay anchor. This pitch is often combined with the fourth pitch. This can easily be done with a 50m rope.
 Pitch 3, short and fun.
 Pitch 4: (5.5), 100'. Traverse left to a short corner with a destroyed fixed pin and a marginal fixed pin. Continue traversing left on balancy moves past another fixed pin (crux, but not very hard). Good footwork is key here since protection is minimal. Go all the way left to a hand crack and climb it to a corner. Climb the corner, then continue up and right on easy ramps to a belay stance below or just right of a wide chimney.
Pitch 5: Do one of the following:
a. 5.4, 60'. Climb the chimney to the top. Good faceholds in the chimney to place protection if you feel uncomfortable.
b. 5.8, 80'. Climb up a ramp right of the chimney to a huge corner with a wide crack. Climb up the face left of the corner to a fixed pin. Continue up the steep headwall and surmount a little roof at the top (crux).
c. 5.7, 80'. Climb the wide crack in the corner just right of the previous variation.
 Exit option for the last pitch.
Note: Like many climbs here, many people do the amazing first pitch, then rap from the bolts down. This allows the possibility to TR the harder 10a variation to the climbers left.
Essential Gear
It all depends on how comfortable you feel climbing at an Eldo 5.7 level. I brought a full set of BD Cams 0.5-3, doubling up on the #3 and #4. I also brought some smaller Alien cams and TCUs. Bring lots of small gear for the first pitch. A set of nuts is a must and a few smaller 'cow-bells' can also work for passive protection. This route follows the crack and does not jog back and forth too much, but it is a good idea to bring some longer runners to avoid any rope drag.I ususally do not wear a helemet when climbing, but due to the amount of traffic and possibility of awkward falls, I highly recomend wearing a helmet here.