
-
 17502 Hits
-
 88.19% Score
-
 26 Votes
|
|
Route |
|---|---|
|
|
48.93260°N / 113.61°W |
|
|
Mountaineering |
|
|
Summer, Fall |
|
|
A long day |
|
|
Class 4 |
|
|
Overview of Chief Mountain via The Southwest Slope Route:
Layout designed for best viewing on a "1024 x 768" screen. Chief Mountain, saintgrizzly photo.
At Chief Mountain
We Are Visitors
To A Sacred Place,
The Epicenter Of The Blackfeet Religion,
Steeped In The Legend And Lore Of The Blackfoot Nation.
Please respect all prayer prints (the cloth wrapped around trees) and artifacts located on and around Chief Mountain; please do not destroy, deface, or handle them.
Vandalism may restrict access to this incredible area.
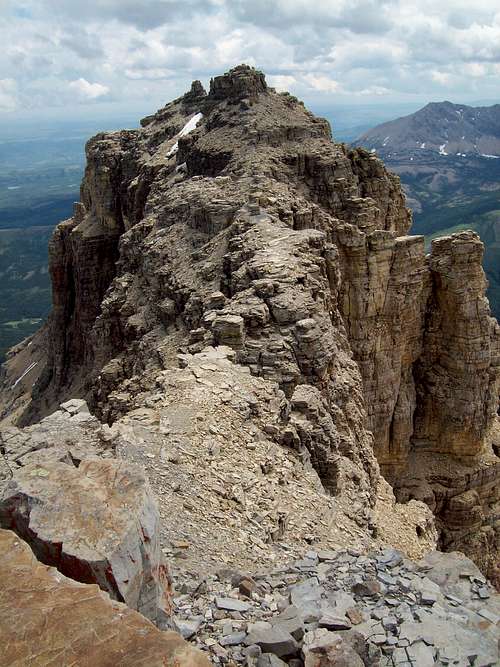 The Summit Ridge
Chief Mountain has been a sacred mountain to Native American tribes for hundreds of years. The Blackfoot name for the mountain is Ninastiko. The mountain was seen by white explorers in the late 1700s and was known as "Kings Peak" on maps produced in the United Kingdom in 1795. Meriwether Lewis, coleader of the Lewis and Clark Expedition, saw the mountain in 1805 and called it "Tower Mountain". The name was changed in the late 1800s in reflection of Blackfeet naming of the mountain which was "Great Chief". When Glacier National Park was created in 1910, the summit and most prominent eastern slopes of the mountain were located within the park, leaving only the lower slopes within Blackfeet jurisdiction. From Wikipedia.
This route is featured in Edwards’ “The Northern Lewis Range” on pages 136-138 in A Climber’s Guide to Glacier National Park by J. Gordon Edwards.
 View to The eastern edge of Glacier Natinal Park
The Southwest Slope Route leaves the saddle between Ninaki and Chief Mountain from about the 7,770 foot contour level and climbs a scree field for about 800 feet before reaching a band of class 3 cliffs that are covered with scree yet afford decent footing
……but perhaps it would be best to discuss how to get to the beginning of the route.
Approach Options:
 Topo of Approach Options
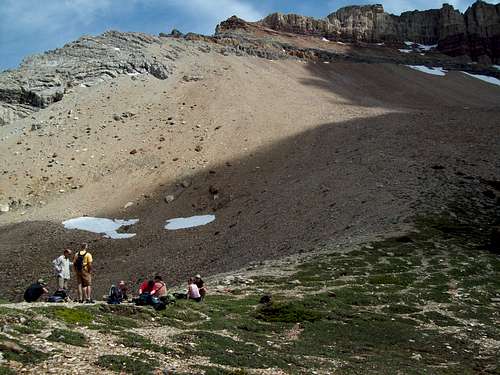 Taking A Break At The Saddle
There are four options that are available to climbers.
1) Lee Ridge Approach
The trail from Lee Ridge Trailhead to the junction with the Gable Pass Trail is 6 miles in length and is maintained by the Park Service. From this junction it is just a short distance to Gable Pass. Total elevation gain from the trailhead to Gable Pass exceeds 2,100 feet.
This trail leaves the Chief Mountain International Highway (Highway 17) about 1/2 mile south of the Chief Mountain Customs Station. There is no parking at Lee Trailhead but there is a pullout at the top of the hill about 450 feet up the hill near the sign that reads “Customs ½ Mile Ahead”.
From the junction with the Gable Pass Trail turn east (left) and follow it to Gable Pass. From there follow the ridge for about 1.25 miles around Papoose and Ninaki to the saddle below the Southwest Slope Route.
A Blackfeet Use Permit is not required for this approach since the entire route is located inside the Park boundary.
2) Gable Pass via The Belly River Ranger Station
Gable Pass can also be approached from the Belly River Ranger Station. The junction with Lee Ridge Trail is 3.8 miles and about 2,600 feet of elevation gain from the Ranger Station. The statistics provided does NOT include reaching the Belly River Ranger Station.
From Gable Pass follow the ridge for about 1.25 miles around Papoose and Ninaki to the saddle below the Southwest Slope Route.
3) Chief Mountain Highway to Slide Lake to Gable Pass Approach
Please Note: All persons, regardless of age, using this approach are required to possess a Blackfeet Tribal Conservation Permit. The $10.00 permit is available at most sporting goods stores.
From the park boundary a trail travels past Slide Lake to Gable Pass. The total distance to Gable Pass from the park boundary is about 3.7 miles. From Gable Pass follow the ridge for about 1.25 miles around Papoose and Ninaki to the saddle below the Southwest Slope Route.
This difficulty with this approach is locating the correct road and reaching the park boundary from the Chief Mountain International Highway (Route 17). The park service has published the following information to help locate the correct road.
The road is not marked by a sign and is reached by leaving US Highway #89 at Chief Mountain Junction and going 4.3 miles on the Chief Mountain Highway (Route #17). Look for a dirt road heading west/southwest and skirting just south of Chief Mountain.
“If you are unsure that this is the correct road look for the Chief Mountain Overlook, which is a signed pullout 0.3 miles northwest of the Slide Lake road at a point 4.5 miles from the Chief Mountain Highway junction. This overlook is known locally as Crusher Hill.
The distance from the Chief Mountain Highway to going west on the Slide Lake road to the trailhead at the Park Boundary is approximately 6.0 miles.
There is one major fork on this road a couple of miles from the highway. The left fork that leads down to Otatso Creek is the way to Slide Lake.
VEHICLES NOT RECOMMENDED
The park service also warns that the road to the park boundary is “very muddy, rutted and rocky. There is also significant damage due to flooding. This area is also heavily used by cattle.”
Perhaps it is best to either hike to the park boundary or ride mountain bikes. Even riding mountain bikes may be an ordeal. Depending on the conditions of the road and weather this road simply may be passable only on foot.
4) Chief Mountain Highway to Slide Lake to Southwest Slope Route
Please see all of the directions above for reaching the park boundary from Chief Mountain Highway.
Edwards wrote that it is possible to bushwhack from a spot about 4.6 miles along a lane that travels from the park boundary. He also elaborates that there is an overlook of Otatso Creek and an old cabin site. The cabin may or may not be there anymore. From this area bushwhack uphill to a narrow meadow below the south face of Chief Mountain. From the meadow traverse the slopes to the saddle between Chief Mountain and Ninaki.
Southwest Slope Route Overview:
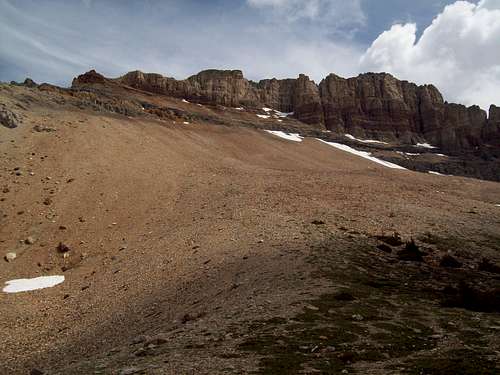 View Up The Route From The Saddle.
Rating: Class 3 and 4
Elevation Gain from Saddle: 1,300 feet
One-way Distance from saddle to summit: Less Than 1 Mile
The approaches to the beginning of the route are varied and once at the saddle between Ninaki (referred to as The Squaw in the Climber’s Guide) and Chief Mountain the route begins.
The Southwest Slope Route is straightforward and enjoyable once the cliffs above the scree field are reached. Total elevation gained from the saddle to the summit is about 1,300 feet and the distance is less than 1 mile.
It may be best to describe this route in sections:
Scree Fields From the saddle locate a climber’s trail that begins a moderate ascent through the lower portions of the scree field. Initially footing is good. As the slope gets steeper footing become more difficult and caution MUST be exercised to avoid sending loose rock bounding down the scree fields if there are other climbers below your position. The trail angles across the slope until nearly directly below the couloir that must be climbed above the lower cliffs that can be seen from the saddle. Lower Cliff Band Upon reaching the lower cliff bands more enjoyable climbing will be found on Class 3 cliffs that are partially covered with loose scree. There are plenty of options to avoid the ledges that are loaded with scree. Climb through the lower cliff band and locate the couloir that is hidden by a wall of cliffs. This couloir is most easily climbed by staying on the climber’s left. There is a great place to wait for slower members of your party about halfway up this couloir. Edwards wrote “Near the north end, a very deep notch appears in the summit ridge. Scramble up the scree to the bottom of that notch and walk through it to the east side of the ridge.” Climb to the top of the couloir and prepare to climb through and around the Upper Cliff band that guards the summit ridge by following a climber’s trail. After climbing through the couloir the deep notch at the top of the couloir a flat spot is reached and some climbers may want to turn right towards the southwest cliffs of Chief Mountain. The actual route traverses along the northeast side of the mountain to the False Summit.
|


