
|
|
Route |
|---|---|
|
|
44.36680°N / 121.13631°W |
|
|
Technical Rock Climb |
|
|
Less than two hours |
|
|
5.7 |
|
|
Approach
Follow the approach directions on the main page to reach the base of the riverside face of the Fourth Horseman. The route climbs a crack system on the right side of the Fourth Horseman riverside face (right of the main summit block). The route tops out Misery Ridge in two fun pitches and not on the summit of one of the spires.
 |  |
Route Description
Alan Watts of the guidebook fame has the following to say about this route:
This SINISTER route put half a dozen people in the HOSPITAL during the 80's. Oddly, the rock is solid and the protection reasonable, but for unknown reasons GEAR-RIPPING FALLS are a COMMON occurrence on the first pitch.
Note that the caps are my "modification". Additionally, Watts gives the first pitch an "R" rating.
Enticed by those words we climbed the route and here's what we found:
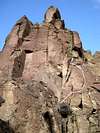
Pitch 1: 5.7 (barely), 60 feet. Climb a low angle, well-featured slab 10 feet (see route photo) and traverse right another 10 feet to reach a vertical crack/mini dihedral system. Note that you can clip a bolt before this initial traverse on the adjacent route. Climb up over a short and minor bulge (crux). At this point you can once again reach right and easily clip a bolt on the adjacent route. Below the belay "balcony" (see photo) traverse left. Note that up until this point - even if you choose to omit clipping the two bolts - the route seems to protect just fine with small cams (mostly under 1 inch). Here the extent of the runout: about 5 feet of easy but unprotectable traverse left. At this point mantle up and onto a more-comfy-than-it-first-looks belay ledge. Two belay bolts.
Pitch 2: 5.7, 80 feet. This is the reason to do this route. This pitch climbs directly up from the belay and enters a large dihedral (with a great crack in the corner that sucks up "any" pro - cams in the 1 to 3 inch size). Stem and jam your way up the dihedral until the angle kicks back and the crack becomes a dirty groove. You will see two bolts (one very loose) near what looks like the top. Clip them and keep moving another 10 feet (it's not a comfy belay position). Pass through a squeeze slot and reach the beginning of the walk-off trail (there's a single beefy looking bolt for belaying but you don't really need it as the body wedge is more than sufficient here).
Descent:
From top of route go around and to the left of the Fourth Horseman summit spire (trail). Follow it towards the Dihedrals and the doubly bolted rap anchor atop Cinamon Slab (see photo).
 |  |  |  |  |
Essential Gear
Helmets. Good assortment of cams. Pitch one readily takes stuff under 1 inch. Pitch two takes cams from 0.75 to 3 inches. Might want to bring a piece or two in the larger range (4-4.5 inch) to protect the easy finish to pitch two.
Miscellaneous Info
If you have information about this route that doesn't pertain to any of the other sections, please add it here.