
|
|
Route |
|---|---|
|
|
38.67290°N / 109.3756°W |
|
|
Technical Rock Climb |
|
|
Half a day |
|
|
5.10c |
|
|
Approach
Follow the directions on the main page under Getting There to access the base of the southwest face of the formation.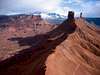 | 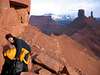 |  | 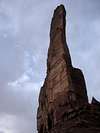 |  |
Route Description
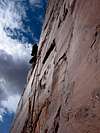
Also see update and corrections below.The route climbs to the top of Sister Superior tower in five, mostly short pitches on the southwest face of the tower. Terrain is steep – vertical and flirting with slightly overhanging – especially on pitches 3 and 4. Protection is excellent through most of the difficult sections. The route is rated 5.10c all guidebooks with the exception of Eric Bjornstad’s Desert Rock III: Moab to Colorado National Monument which rates the crux of the route as 5.10d. I can’t comment on this as I found the route very difficult and have never led a 5.10d before. Personally I found this route to be a big notch (in level of difficulty) above The Right Chimney route on the Three Penguins we've done recently (I'm comparing against the 10c pitch one of The Right Chimney). It's perhaps due to the fact that Jah Man is nowhere near my hand size?
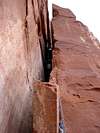
To locate the start of the route on the SW face of the tower, look up to see the obvious “Sister Squeeze” chimney of pitch 2 (30 feet above ground). The route starts up blocky terrain 30-40 feet left of the chimney (start has some chalk marks). Pitch lengths are quoted from the Supertopo guide as these values seemed accurate. For such a steep route, all belays are on very comfortable and relatively spacious ledges! The pitches are short (only 2 of the 5 are close to 100 feet; other three are way shorter) and so the route goes very fast - even for us!
Pitch 1: 5.8 – 5.9 (Knapp gives it 5.8; others give it 5.9 which is probably more realistic), 40 feet. Move up ~10 feet (easy) to the base of an 8-foot wall with a dirty ledge on top of it. Getting onto the ledge (mantle move) was harder than it looked from the base. Protection is good (small nuts). Once you pull yourself up onto the dirty ledge (don’t drop anything onto your belayer), walk the narrow ledge right, move up another short (~10 foot) crack/slot to reach a nice wide ledge immediately at the base of the squeeze chimney of pitch two (slings around boulder near moth of chimney). Belay on gear and slings at the base of the Sister Squeeze.
Variation: Jah Man Direct or Za Man provides a 5.10+ overhanging finger crack in a dihedral variation to pitch 1. Look for it about 30 feet right of the standard start of the route. For photos of this variation see here and here.
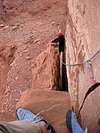
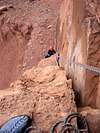
Pitch 2: 5.8 – 5.8+ (depending on guidebook), 60 feet. Your goal is to get inside the squeeze chimney but to do that you need to pull the crux of the pitch first! This opening move is the trickiest and pro (small nut or tiny micro cam) will be at your feet as you’re pulling it (with a nice ledge to mess you up if you fall). One option is to do a short lieback off of the big flake sticking out of the chimney at the base – get your feet on top of this flake. Then, get inside the chimney and let the groveling begin! The chimney has sporadic pro but it’s tight enough where you don’t really feel like you’re going to fall anywhere. Near the top you’ll probably want to be near the edge of the chimney as it’s wider and easier to exit there. Once you mantle onto the ledge, move right and belay from two crappy bolts (can supplement with ~1/2 inch cams placed in a crack formed by a questionable block). Alternatively, there is another set of newer-looking bolts further right along this narrow ledge. See Dan Leonhard's update on this belay (below).
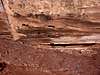
Pitch 3: 5.10c, 100 feet. Guidebooks suggest that the lower third of this pitch is the crux of the route (specifically the face traverse under the roof). I’m not sure (did not get it clean) – the lower half of pitch 4 seemed pretty damn hard as well. Move directly up a thin (very thin for me) hand crack. You’ll end up standing with one foot on top of a very loose sounding block (~5 feet above belay ledge). Be gentle with this one as it’ll be coming off any day now no doubt. 15 to 20 feet above the belay, clip the old bolt in the roof (can easily supplement with cams) and traverse the face left for ~15 feet. Pro opportunities are readily available in the roof crack. The traverse deposits you at the base of a lower angle, right trending “ramp” with a finger-to-fist crack on its left side. The ramp is rated anywhere from 5.8 to 5.9 depending on guidebook but it’ll feel trivial compared to section below. Belay on another good ledge with two beefy looking bolts.
Pitch 4: 5.10b – 5.10+ (5.10b is given by Knapp and Bjornstad guidebooks; 5.10+ by others; Green gives a rating of 5.10b/c), 100 feet. I thought the lower half of this pitch was as difficult as the lower part of previous pitch (I suck and did not get this one clean either). Start up the vertical thin (very thin for me) hand crack immediately left of belay bolts. About 30 feet higher you mantle onto an uncomfortable stance and move left a few feet to reach another slightly easier (books rate this 5.9+ to 5.10-….I personally was tired from all the flailing below at this point) thin hand crack. Follow it for about 30-40 more feet to a large ledge. Move up and slightly right (easiest line) over a run-out 5.7ish face. Belay from bolts atop a very spacious ledge 30 feet below the summit. Note that this pitch eats #0.75 and #1 Camalots! Protection is pretty much perfect.
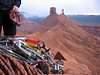
Pitch 5: 5.10a – 5.10 (5.10 is given by Supertopo; 5.10a by others), 30 feet. This one is probably easier if you’re tall. From belay bolts move up the right side of a 15-foot block and mantle onto the block (~5.8). Clip a bolt (ancient) and better-looking piton just next to it and pull 2 low 5.10ish face moves to reach easy ground (total of 4 or so bolts here – all pretty ancient). Belay on the beautiful flat summit from bolts.
Descent: Every belay is bolted except for top of pitch 1 above (rap slings in place though). Bolts atop pitch 2 are pretty old looking but there’s an alternative set of bolts 20 feet right along the same ledge. This means that there’s many options for getting off the top of this tower. The Supertopo-endorsed method (and one we used) involves two double rope rappels (we used two 60m ropes; Supertopo claims that two 50m ropes would work as well – have not tired!):
(1) From summit, do a double rope rap to top of pitch 3 (good bolts). Depending on how you toss the ropes, you will have to swing right to reach the bolts here (don’t let the ropes get away from you!).
(2) Do another double rope rappel to the ground.
Dan Leonhard provides some better and more up to date beta: A single-rope (60 meter)got us down in 3 raps. We skipped the last anchor (the slings on the boulder)and hit ground with plenty of rope. Also, the anchor above the chimney is now 3 bolts 1 piton.
 |  |  |  |  |
Essential Gear
Two ropes. Helmets are nice (I used mine quite a bit while banging my head against the sandstone in frustration). As far as pro goes, this is a controversial one (see climbingmoab.com discussion under this route – includes threats of physical violence). Obviously it depends on how comfy you are with 5.10+ thin hand cracks. Key is having many #0.75 and #1 Camalots (or equivalent Friends) if you’re unsure or sure that you’re not that comfy. Supertopo (overall, this guidebook’s recommended rack makes the most sense) recommends having 4 cams each in the 1 to 1.5 inch size range (in addition to other stuff).We had the following rack (some of it did not get used….yes, heavy duty – spare me the lecture, route was very hard for me):
1 #4 C4 (optional as the only place I used it was near top of the lower angle ramp of pitch three – easy terrain)
2 of each #2 to #3 Camalots (1 #3 is sufficient)
4 #1 Camalots (not sure if I actually used all 4)
5 #0.75 Camalots (4 would’ve been enough even for me)
3 red Aliens (2 are probably enough)
2 of each yellow and green Aliens
1 blue Alien (optional placement – nut will probably work as well – at mouth of Sister Squeeze on pitch 2)
1 set of nuts – easy handful of small to medium nuts was all I used (3 placements at most).
Note that large gear (large Big Bros, large cams) are probably useless for the pitch two chimney. For one, if you've decided to do this route, chances are you're not going to have any issues with some limited runout in a 5.8 (5.8+ at best) chimney. Furthermore, I suspect that the only thing that would work is the monsterous #5 Big Bro (guess you could get one and use it to replace some plumbing around the house later on...)
 |  |
Route Topos
Might add another one later... |
Web Links
(1) Sister Superior Group page on climbingmoab.com.(2) Excellent sequence of photos of the crux from utahclimbers.com.
(3) Jah Man TR from recclimbing.com.
(4) Three nice photos from Jah Man.
(5) Nice TR and few great photos from gdargaud.net.
More coming soon...
More Route Photos
 |  |  |  |  |
More Route Photos
 |  |  |  |  |
Dan Leonhard - Oct 26, 2006 9:55 pm - Voted 10/10
descentA single-rope (60 meter)got us down in 3 raps. We skipped the last anchor (the slings on the boulder)and hit ground with plenty of rope. Also, the anchor above the chimney is now 3 bolts 1 piton.
rpc - Oct 26, 2006 10:31 pm - Hasn't voted
Re: descentThanks again Dan - updated the pages with your info. Radek