
-
 19892 Hits
-
 79.04% Score
-
 10 Votes
|
|
Route |
|---|---|
|
|
50.96528°N / 115.2625°W |
|
|
Mountaineering, Trad Climbing |
|
|
Summer |
|
|
One to two days |
|
|
5.5 (YDS) |
|
|
18 |
|
|
III |
|
|
Overview/Approach
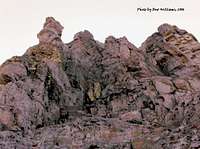
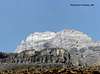
 The start of the technical climb of Peak 1
The Mount Lougheed Traverse has enticed me for several years. It represented the last of the local Canmore peaks I had yet to ascend. My wife and I have joked that if you want rain in Canmore, just tell Dow to plan a traverse of Mount Lougheed. It is a close, yet obscure climb for us locals. Everyone talks about it (at least one of its four peaks, if not all four, are in clear view from many locations), but it is difficult to find climbers who have actually done it. Available beta is skeletal to say the least. Sean Dougherty’s description in the “Selected Alpine Climbs in the Canadian Rockies” is just as meager as what you find trying to google this route on the internet (2006).


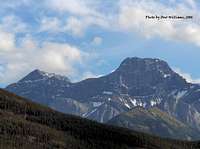
Take the Sprays Lake Road above Canmore to the West Wind Pass trailhead at Spurling Creek. There is not much fanfare here, just a pull off to the right and two marked trails across the road to the east: one directly across from the parking area and one further south at Spurling Creek. You can ascend either as they melt together somewhere along the way. Ascend on a trail that becomes somewhat faint in places towards West Wind Pass. Before you break out of tree line, you will come to a “T” in the trail. Take the right fork to ascend more steeply towards Wind Tower’s south west flank. This trail angles you away from West Wind Pass itself and gets you above tree line quite east of the pass. Once the trail peters out (approximately 1500’ in gain), take a sharp right turn and aim for Mount Lougheed’s northwest peak. You won’t notice Windtower much on approach to the col between Windtower and Mount Lougheed. The big corner face-ridge you see to the east is Mount Lougheed, not Windtower. As you continue to gain elevation, you will eventually make out the backside (south) of Windtower (photo) and as you reach the col (approximately 3000’ in gain) you will be in full view of Windtower’s climbing routes facing northeast (photo). There are cairns here and there, but not much of a trail. The last 1000’+ of technical climbing on Mount Lougheed’s northwest peak is in clear view however and easy to aim for (photo).
Route Description


1st Peak-8 Pitches-Mid 5th Class Climbing
Scramble up several hundred feet of easy going ground to the base of the climb (photo). You are forced to move right along steep walls until they start to break up into ledges. Once you gain the first ledge or two, start to find your way back left and ascend good rock beside a corner (right) where you will spot your first rappel station at the top of that corner. I observed two fixed pitons on the entire climb of the first peak and 8 non-fixed rappel stations. Continue up even spaced pitches that always seem to lead to nice benches on which to rest and reassess. You are following the ridge just inside the right side (southwest). I was led off route in one instance by one of the two pitons I found. It is rarely used (as this route is rarely climbed) and was actually chocked full of slivers of rock. It had me thinking the route went left back to the edge of the ridge when I should have been traversing via some 5th class moves back to the right. There is some decent exposure in doing this, thus I took the left route. At this juncture I figured out, just barely, that I was in fact climbing a steep pillar and needed to down climb back to the location of that piton and traverse back right. So just about anytime you doubt your route selection, you might think of going back right to correct it.
The 8 evenly spaced pitches were on mostly decent rock despite rumors of the rock being worse on Mount Lougheed versus any other local objective. I believe the toughest moves were on pitches 4 and 7. You will no doubt have backpacks on and pitch 4 moves best to the left which pinches you into a large flake. With a backpack, this can be a little awkward. Come out of the flake and climb the outer rock until you can move back under it. I remembered pitch 7 as being rather sustained. I know pitch 8 was a nice breather in comparison except for one move or two towards the top. You climb about 1000’ of technical rock through 8 rappel stations and then the last couple hundred feet become no more than a ridge finish to the summit. Kind of a false top out if you will. It will take another 10 minutes or more to the actual summit. There was a cairn and summit register in 2006. I was the 2nd ascent of the year (August). There is a bivy spot situated on the summit ridge and I have heard of long days reaching past midnight to reach the top of the first summit. However, I completed this task in 4.5 hours from the car. Some time frame in between is probably more reasonable.
Because I was solo and without rope or harness, I took note of my descent options in case I got turned around for any reason. It appears that you might be able to descend the 1st summit via a southwestern ridge that has deep scree pockets that ride down its left side. I have no confirmation of this, but felt comfortable I could navigate it if I had to. The col between Peaks 1 and 2 definitely did not appear to go without cliffing out.
2nd Peak-Several 5th Class Moves
The descent down from the first peak (10,191’) to the col between peaks 1 and 2 was nice and swift via scree. The traverse on over to the 2nd peak was also uneventful. Once you get closer though, it is a little confusing as to whether you have to ascend a subsidiary peak on the ridge prior to the 2nd peak itself (photo). You do not. That being said, the easiest ground to cover is basically exiting the talus and start climbing again just to the south of that lower peak and then take the ridge head on for the summit of the 2nd peak. If you are using a rope, you could easily pitch this out at least 4 times. I clearly remember the 2nd peak having its share of 5th class moves.
You end up at the exact same elevation for the 2nd peak as for the main peak (1st peak). You suffer an approximate 700’ loss between the two peaks that must be regained. The summit cairn and register are as significant here as they were on peak one (2006).
3rd Peak-Hike
Finally you reach a reprieve. You make another quick descent, 600’+ and then a shorter ascent to the summit of the third peak. Move left into the larger scree/talus for a quicker and more pleasant ascent. This peak sits 200’ shorter than the first two peaks and has no summit register. There is a built up bivy between these two peaks used for a multi-day trip. I rather thought it quite exposed (lightning and wind) however. This col looks like a descent option, but it is clearly not. If you descend Spencer Creek as I did, you will notice huge walls blocking your descent via this col (photo).
4th Peak-5th Class Climbing, Most Exposure of the Climb
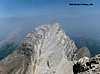
As you scout out the 4th and last peak (aka Wind Mountain) from the summit of the 3rd peak, you will no doubt be intimidated if you thought any of the climbing up to this point was difficult. Wind Mountain is the highest peak of the traverse and most difficult in my opinion. While not the length of technical climbing involved in the main peak, the first peak, Wind Mountain will treat you to more serious exposure. You will also notice that the traverse over this final col is by far more difficult than the previous two. This col is more sharply angled with large exposed slab sections in areas (photo). Stay close to the ridge versus descending too far into the bowl. You will be able to walk most of the way and once in a while be on your hands as you navigate over to the base of Wind Mountain. As you make your way over and stare at your final objective, you will question time and again how this could be 5.5 climbing (as rated in the guide book). There is a large overhanging section towards the top that looks extremely difficult (photo). The lower sections are short cliff bands that also appear tough to navigate. The shortest way to ascend these bands is directly on the exposed ridge, which drops several thousand feet straight down to the east.
As in most climbing instances, once you are into it, it breaks down one problem at a time until you finally see the route go to the left of the overhanging section, albeit exposed. There are a multitude of lines to pick early and then the route becomes more defined near the top.
Descent


I chose to down climb back to the col between peaks 3 and 4 for my descent. What I had noticed from the summit of peak 3 was that the southwest ridge on Wind Mountain, which is the preferred descent in the guidebook, dropped off dramatically to the col between Wind Mountain and Mount Sparrowhawk. The guide book is famous for not pointing out or discussing rappel situations, thus I had visions of calling my wife to order a helicopter to drop my rope and harness off on peak 4. I was not thrilled about that prospect, not to mention the embarrassment of not being prepared. Thus I studied the contour lines on my map prior to proceeding and had committed to the optional mentioned descent, but not confirmed in the guide book, Spencer Creek. For the record, this descent goes easy, no worries.
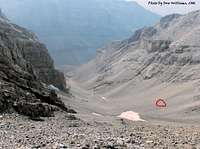
I chose not to down climb all the way back to the center of the col, due to the slabby nature of the rock (photo). What works is to not descend the last technical rock band, but rather descend its sharply angled scree bed. There is bare slab underneath this talus, but in 2006 it was relatively easy to switchback your way down as well as scoot down a corner or two until you eventually descend into the lower bowl which should be filled with snow, no matter the time of year.
This is the spot where I made a very unique discovery, two pieces (photo) of plane wreckage that I discovered afterwards were related to one of the most tragic stories of the Canadian Rockies. The second of the three planes that crashed, flew into the northeast face of Wind Mountain and several pieces were obviously thrown into the southern bowl.
Continue loosing elevation on talus until a waterfall breaks out of the rock and down into the drainage below the massive headwalls of where Wind Mountain meets Mount Sparrowhawk. Cross the waterfall to the right via one of several easy choices and descend the right side into the drainage. This takes you well below 8000’. The left side of the waterfall does cliff out further down.
Follow the start of Spencer Creek back out to Spray Lakes Road. The creek mostly goes without any serious obstacles and there is one bivy spot along the way in a lush meadow. You also are treated to spectacular views of the four peak traverse you just completed. From time to time you will have to bushwhack right or left to avoid a few waterslides, and you descend a little slower than you probably imagine you might. Spencer Creek curves due west and takes you right to the road. I made this entire trip in less than 12 hours solo. That is moving quite fast and furious however.
Climbing Sequence
 |
 |
 |
 |
 |
 |
Essential Gear
I will leave this section open to the imagination. I completed the route solo, no gear or rope. However it is classified as an Alpine III, 5.5 thus appropriate gear should be taken for the climb. You can climb this rock in alpine boots versus climbing shoes. Many parties make this a two day trip, so be prepared for a bivy situation.External Links
- 100’s of Canmore and Banff National Park multi-pitch rock climbs, ice climbs, alpine climbs and scrambles, just scroll down to routes
- OR: Best True Technical Clothing and Accessories in the Outdoor Industry
- Scarpa, has surpassed La Sportiva in terms of quality, function, value
- Osprey Backpacks, Not a Second Choice
- Great Outdoors Depot
- Mont-Bell
- Cascade Designs (MSR; Thermarest; Platypus)