
|
|
Route |
|---|---|
|
|
37.70330°N / 119.5167°W |
|
|
Trad Climbing |
|
|
Half a day |
|
|
Old school 5.7 |
|
|
5.7 (YDS) |
|
|
4 |
|
|
II |
|
|
Overview
Mount Starr King is really a group of three domes, about 5 miles from the Mono Meadows TH on Glacier Point Road in Yosemite. While the "Valley" sees thousands of climbers per year, Mt. Starr King, on the average, still sees less than a dozen ascents per year, most of them by the two "Regular Routes" the Northeast Face II,5.4 or the Southeast Face, II, 5.5, both first climbed in the 1870s. The Mt Starr King Massif consists of three domes, the highest one being the northernmost here visible on the left
 As of 2011, there are at least eight rock climbing routes on Mt. Starr King, ranging from the above 5.4 and 5.5 to about 5.9. All the routes on the West face are 5.8/5.9 climbing and were climbed in the 1970s. On the true East Face are three routes, 1987 Tsunami,II,5.7, 1987 Beast of Burden II,5.9 and the first route climbed on the dome in about 100 years, the 1969 route, The East Face, II, 5.7 climbed by Ron Schroeder, John Roebig and Tom Distler. This route climbs a long, left curving lieback/corner on the hidden (from the approach) true EAST Face of the largest dome.
 The East Face of Mt Starr King, II, 5.7 is drawn
Getting There
The appproach is about five mile hike from the Mono Meadow Trailhead to the saddle between the southern and the middle dome of the Starr King massif. A good trail leads in 3 miles past the Buena Vista trail junction to the Illilouette Creek crossing which in early season can be the crux of the whole trip. In early August 2011, after a very heavy snow year, we experienced only knee deep water. In a very early season, you might look at several alernative approaches listed on the Main Page. After the crossing, there is a slight uphill section after which you find several campsites, if you want to do this dome as a backpack. You will need overnight permit for that.There are two approaches to the East Face of Mt Starr King. The normal approach is listed first, our alternative approach is listed second.
After the Illilouette Creek crossing and in a few hundred yards, a trail junction is reached. Turn right toward Ottoway Lakes. Hike about 1/2 mile on this trail, then head cross country toward the saddle between the southern and the middle dome. This saddle is quite obvious from the trail. Beware of really thick manzanita field which protect the dome from casual visitors. From the saddle, hike up to the notch between the middle and the main summit and drop down to the back (East) side and the base of the route.
We selected the second approach by reading a map and concluding that a cleaner, on the rock slabs route was available starting further 3/4 mile down the trail and passing the southern dome on its south side. This approach was mostly free of fallen trees, manzanita fields and mostly on low angle slabs. The distance traveled is a bit longer than the regular approach, but is less steep and cleaner. Recommended.
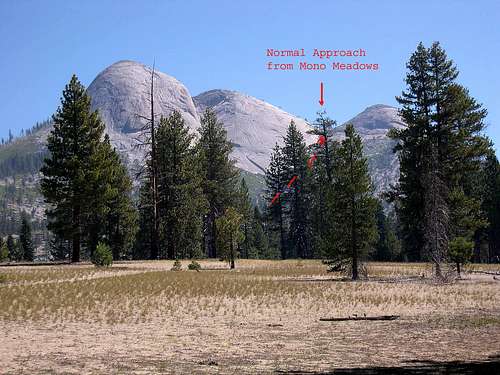 The normal approach is shown
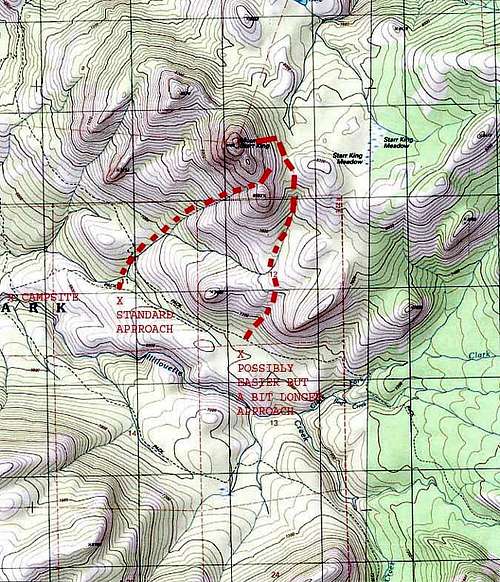 Topo of both approaches
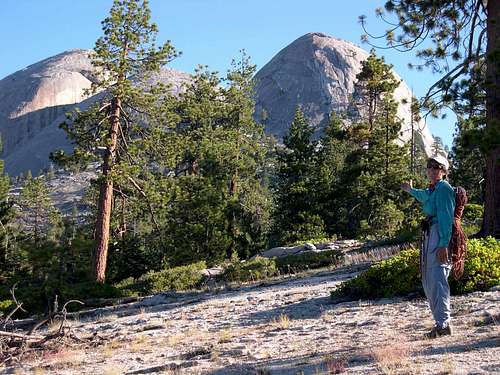 Penelope pointing toward the Mt Starr King massif from our alternative approach
Route Description
When you stand below the East Face of Mount Starr King, an obvious, and long ledge is clearly visible in the middle of the face. Alois approaches the East Face
The first pitch scrambles up cracks and face aiming for the left end of this ledge, passing a large and bushy tree and gaining the ledge via a short, wide crack (5.6).
 Penelope scrambling up the lower third of the first pitch
 Penelope leading the second part of the first pitch to the ledge
The secong pitch starts with a few face moves and a short crack which deposits you at the base of a left facing, left slanting corner.
 Alois on the short face and finger crack which starts the second pitch
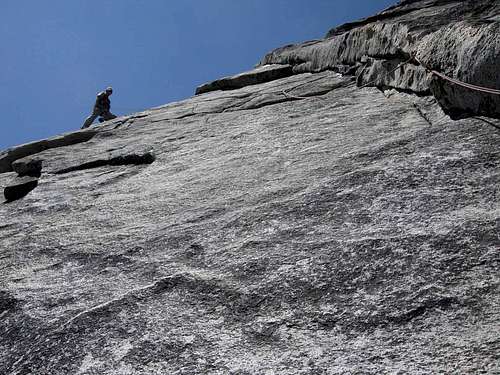
This second pitch follows the corner toward a steep face some 100 feet higher (5.7). Some good moves up the steep face put you on a nice ledge with two anchor bolts (1/4", a bit rusty, but in reasonable condition for almost 50 year old bolts).
The third pitch continues in the left slanting corner for about 80 feet (5.7) aiming for a small roof above. Just before reaching the roof, one can move left via a nice traverse for some 30 feet and reach the continuation of the corner. Some 30 feet higher, one finds a reasonable stance and a belay spot.
 Alois on the short traverse left at the top of the third pitch
 Penelope at the second pitch belay with the third pitch corner and the traverse left visible
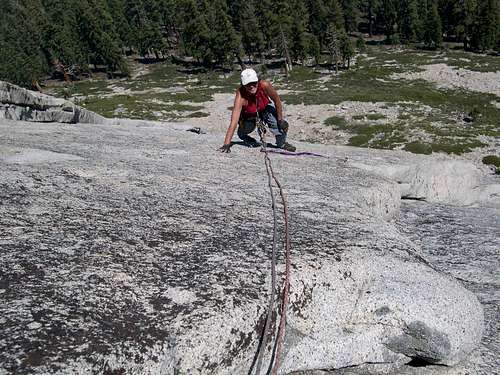 Penelope scrambling up the third pitch traverse
 Penelope wanted to do this route for her Birthday. She just turned 60! Doesnt' she look great?
The fourth pitch continues up the corner for some distance and higher up meets the summit slabs (easy 5th to 4th). The summit is a short scramble from there.
 Penelope signing the summit register. The incomparable Mt.Clark is visible in the center of the photo.
The views from the summit of Mt Starr King are exceptional. The Yosemite Falls, Lost Arrow, the South Face of Half Dome, many of the Tuolumne High Country Domes and formations, and the Southern Yosemite summits of Mt. Clark, Gray and Red Peaks fill the horizon.
DON'T MISS THIS SUMMIT
Descent
There are three ways to get off the summit.One is to solo down climb the 400 or so feet of 5.4/5.5 friction back to the SE saddle.
The second is feasible only if you have two ropes (we did, 2x 8mm, 60m). As of August 2011, there are two rap stations on the SE face (requiring two ropes to connect them) of doubled webbing and rap rings slung around large flakes. We found the webbing on the lower station quite frayed; we replaced it. It might be a good idea to carry some 20-30 feet of extra webbing and a ring or two just in case these stations need to be replaced.
 Alois at the first rap station about 100 feet down from the summit.
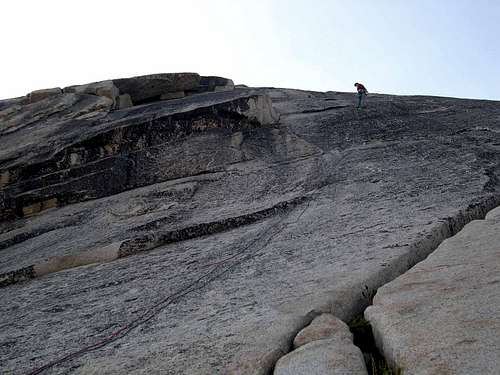 Penelope rapping the lower section of the SE Face to the Notch.
The third way is for the first person to downclimb the top pitch of the SE Face and put in a few pieces in the flakes and cracks. The second person then down climbs while belayed through these pieces. You can continue this method on the second rappel down until you reach the lower rap station, which allows you to rap to the lower angled section and to scramble down to the saddle, or, repeat your belayed down climb from the lower rap station all the way to the SE Saddle.
 Penelope is hiking down from the SE Saddle to our packs left at the base of the East Face route.
 Equipment
We used 2x 8mm double ropes and a rack consisting of small to medium (up to 3.5 Friend) cams and a set of wired cholks. The use of two ropes is not mandatory, I just prefer two ropes in the backcountry and on routes about which I don't have enough information (like this one). We left our packs at the base of the route and scrambled down to them via the Saddle between the middle and the main dome of the massif. It was very short and easy walk to get back to our packs.The route is a good and easier alternative to the routes on the West Face. It offers clean face and crack climbing at a reasonable level (sustained 5.7) on good rock that gets better as one passes the second half of the first pitch. The route is very seldom climbed, we found only one note in the summit register in many (12) years.
ElGreco - Aug 10, 2012 3:43 pm - Voted 10/10
Old school indeed!Alois nails it when he calls this route old school 5.7! Pitch 1 is easy. A lot of scrambling at the start. You can use the tree as pro and then traverse under it to the crack that will lead you to the belay. Pitches 2&3 are the old-school ones. The climbing is fairly sustained at no more than 5.7, but pro opportunities are not abundant, and (with some exceptions) placements are tricky. The majority of the cracks on this route are shallow and flaring. In addition, several flakes sound/feel hollow, and the rock is rough and grainy. Given that your placements consist mainly of small cams, crushing the rock surface could mean that a cam could pop out. Be careful with your placements. I'd rate this PG13 - not a good place for a beginner 5.7 leader. The face climbing on large knobs near the end of pitch 2 is fun, as is the left raverse on pitch 3 (which protects well)! The bolts at the end of pitch 2 are old, but you can reinforce the belay with a solid stance and 2 microcams (00 Mastercam or equivalent) on your right. There is also a good large nut placement at your feet. Pitch 4 features a few 4th/low 5th moves at the start and the rest is a walk-off. Go all the way left, or exit to the summit plateau via short bouldering problems directly above you. Rack: bring a set of nuts, double cams in the small sizes, and singles in the medium/large sizes. A #3 Camalot comes in handy but is not essential.