
-
 4890 Hits
-
 73.06% Score
-
 3 Votes
|
|
Route |
|---|---|
|
|
42.77658°N / 109.23739°W |
|
|
Trad Climbing |
|
|
Summer |
|
|
Most of a day |
|
|
5.6 (YDS) |
|
|
4 |
|
|
II |
|
|
Overview
The Northwest Buttress (II, 5.6) is the easiest route to the summit of Shark's Nose. A 5.9 airy, traverse variation exists for the adventurous.Approach


From the main Lonesome Lake cirque, begin hiking toward Pingora. Make your way up the slope to the west of Pingora. Soon you will see a lake, which is Cirque Lake. Hike along and/or above the northern shore of the lake. Your main objective at this point is the saddle to the north of Overhanging Tower. Hike up the talus slope, staying to the left side of the slope as you get to the top of the saddle. This will take you to 3rd class scrambling terrain. Instead of heading toward the low point in the saddle, continue to stay left and gain the saddle slightly higher up.

Upon reaching the saddle, begin traversing around the back side of Overhanging Tower. Although slightly airy at times, it does not exceed 3rd class scrambling. Eventually you will reach a point where your only option to continue is a descending low-angle ramp. From here to tie-in is 4th class terrain. At this point you will also be looking across at the nortwest face of Shark's Nose. Additionally, at this point you will notice a few parallel ramps slanting across the northwest face of Shark's Nose. Find the widest slanting ledge, descend the low-angle ramp, and scramble toward the slanting ledge. This will involve a bit of route-finding, although I believe there are several 4th class ways of getting to the base of the slanting ledge. When you reach the base of the ledge get ready for some big exposure and go for it! Along the ledge you will have to climb over or around a couple of boulders that have fallen on the ledge. At the end of the ledge you will find a short, steep wall with an abundance of holds. Climb up this and you will be standing at the base of the Northwest Buttress route.
Route Description


P1: 5.5. Begin climbing up easy terrain toward a short, obvious flake. Climb up the flake and continue on, slanting upward toward the right, up easier rock. The route is obvious and well protected. You will pass a couple rappel stations along the way. We chose to belay approximately 10 feet above the second rappel station.
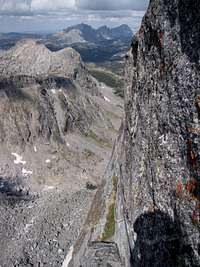

P2: 5.6 or 5.9. Continue up until you reach a crack with a fixed piton. Climb this crack for 5.6 rock, and walk 100 feet or so across a relatively low-angle slab, past a rappel station, toward a corner system in the rock where you can set up a belay. If you are in the mood for a very airy, runout traverse, instead of climbing the 5.6 crack look around the corner and you will see a thin hand ledge going across a 1,500 foot vertical face. Use the hand ledge and friction foot holds to traverse across the face until the ledge pinches out, at which point you will be able to reach across to a crack and wider ledge to stand on. This traverse felt like a 5.9 to me. Continue along the wider ledge toward the corner system mentioned above.
P3: 5.5. Climb up a friction slab with a mainly vegetation-filled dihedral crack to your right. The further up you climb, the more abundant protection you will find. It is possible to get off route on this pitch, as there are more difficult cracks to your right with a few pieces of bail gear/slings evident. Belay in a cave-like feature in the rock.
P4: 5.5. From the cave, climb up climber's right up a short, blocky crack system. You will reach a flat ledge, at which point you will see the summit. Climb up the friction slab to the small summit of Shark's Nose.
Descent: While climbing the route you will see several, obvious rappel stations. Use these to rappel back to the start of the route using two ropes. Along the way you will encounter a couple rope-eating cracks, so don't be surprised if the summit isn't the end of your day's ascent.
hubix - Aug 15, 2011 2:36 pm - Hasn't voted
Rappel is possible with one 50m ropeWe used one 50m for this route and didn't not see any problems while rappelling down. We downclimbed the easy ramp that leads to the start. But this ramp has some some rappel anchors as well.