
|
|
Route |
|---|---|
|
|
15.65°S / 68.4°W |
|
|
Mountaineering |
|
|
Winter |
|
|
A few days |
|
|
AD - snow and/or ice to 60 degrees |
|
|
III |
|
|
Overview
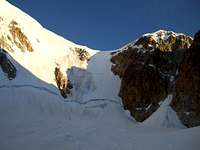
This is the easiest route to the top of Illampu, but it is by no means easy - although, in good conditions, with proper acclimatization and with careful preparation, the climbing itself should only be of moderate difficulty. The technical portion consists of a 300-meter high face of snow and ice mostly 45-50 degrees in angle, but approaching 60 degrees for a short section near the top, topping out in a saddle just below 6000 meters high, followed by a long ridge that is corniced in some places and has a few steep sections, including one just below the summit. In early season (through late June) expect mostly snow, but later on there may be significant ice both on the face and ridge.One of the unique characteristics of this route is that from high camp, the technical portion of the climb starts almost immediately. There is none of the hours-long trudge over snow that most other Bolivian mountains require; you get out of your tent, walk for about 10 minutes up to the face and start climbing. This has its pluses and minuses: the plus side is that you get the most technically difficult section over with while you're still relatively fresh; the minus side is that the most difficult and dangerous part of the descent is at the very end, when you ARE tired, and in all likelihood when the sun has hit the face, softening up the snow and releasing the rocks that are frozen into various parts of the face. Because of this arrangement, any serious summit attempt at Illampu requires a very early start. During the longest days of the winter (June), you want to be off the face by about 11, which means starting no later than 1. Try to pick a night with a full moon because you'll be in the dark for a long time, and dress warmly.
There are actually two high camps for the normal route on Illampu - one is just below where the approach trail hits the glacier, and the other is on the glacier itself, right below the northwest face. Some prefer the lower one because it's a bit warmer; personally I think it makes a lot more sense to camp in the higher one, simply because trying to negotiate the glacier in the dead of night seems like a less than pleasant prospect. Also, the lower high camp does not have any running water close by, despite being below the snow line, so unless you want to walk a considerable distance down and then back up, you'll have to melt snow there as well. The only reason to camp there that I can see is if you plan to do the approach in two days - something that a Swiss team which succesfully climbed the mountain this year without any porters or mules did.

Getting There
From Aguas Calientes, a faint trail marked with cairns takes you north up the side of a ridge, climbing for a couple hundred meters before flattening out, traversing for a bit and then dropping into the next valley. You will regret that little descent on your way back, but unfortunately there is no way that I know to avoid it. Once in the next valley, the cairns continue, first over some nice granite slabs, then traversing on a ledge above a spectacular drop down to the glacier below (a couple of short, easy third-class sections here), descending slightly, and finally ascending steadily, but not too steeply, up a huge moraine, until it hits a rock wall; at that point the trail drops down onto the glacier. A hundred meters or so below that point is the first high camp, which you will recognize by the rough circular rock walls that mark tent platforms. If you don't camp here, it's a nice place to rest and enjoy the view before the final section up the glacier. Allow 3 to 4 hours for this portion of the approach.The glacier section of the approach is the least trivial that I've seen thus far in Bolivia. If there is no track, the best bet is to stay to the right side, where crevasses and seracs are least prevalent. Still, you will in all likelihood have to find a way to cross some; in addition, a couple of the slopes are rather steep (close to 45 degrees), and require caution, especially with the heavy pack you will likely have. Needless to say, you should be roped and fully equipped for crevasse rescue.
Eventually, the glacier flattens out; once that happens, you can camp just about anywhere - just make sure there are no crevasses in the area. It is possible to get quite close to the face - almost to where it actually begins - but make sure you are well out of range of rockfall: you can easily tell if you're in the danger zone by the presence of little craters with rocks embedded in them.
Allow at least another two hours for the glacier section.
Route Description
Climb the face, aiming roughly for the center to avoid rockfall. You may have to go far to the right in order to cross the huge bergschrund on the lower part of the face, but make sure to trend back to the left once you're across. Difficulty here varies considerably with the conditions; when we climbed it it was pretty easy - firm neve snow with little natural steps on which you could rest. The upper part of the face gets pretty steep for a little while, but then mellow out again just before the top. Beware at the top of the face - in all likelihood the other side will be a cornice, so if you plan to bring up your second, make sure you set the belay safely below the cornice fracture line. Most parties will take between two and four hours to climb the face.From the saddle, continue left along the ridge, staying on the same side as the one you came up until it becomes wide enough to safely venture onto the crest. There are occasional steep sections, including one right below the top. Allow another 3-4 hours for the ridge.
In good conditions, running belays should suffice for both the face and ridge - pitching it out for the entire route will probably take way too long.
To descend, walk down the ridge (occasional downclimbing required) and either rappel or downclimb the face. Do be aware, however, that rappelling in early season will involve leaving a substantial number of pickets - we brought six with us, and left five, this with two 60-meter ropes. For that reason it might make more sense to downclimb the upper sections, and then rappel down low over the bergschrund (preferably not into it!). Plan on around four hours for the total descent from the summit to the bottom of the face.
Haliku - Jun 11, 2008 9:49 pm - Voted 10/10
A few additions to considerCamping at the 16,700 ft camp at the edge of the snowfield takes 2-3 hours to access the wall. Pickets and two ropes make it much easier to get off the wall. Plan to leave 6 pickets for the whole wall if using two 60m ropes. Rockfall will happen once the wall warms. We saw and heard rockfall all over the central section. Hiring a cook with porters/mules allows you to get to highcamp rested enough to attempt the route. Well worth the investment. The upper half of the wall had penitentes up to 1 foot. (June 2008) The right side of the glacier from camp has the least objective danger currently. Crevasses are either 1 foot wide or big enough to swallow a car--not much inbetween. Even though we didn't make the top it was a great climb. Also a great route page. Cheers, Haliku